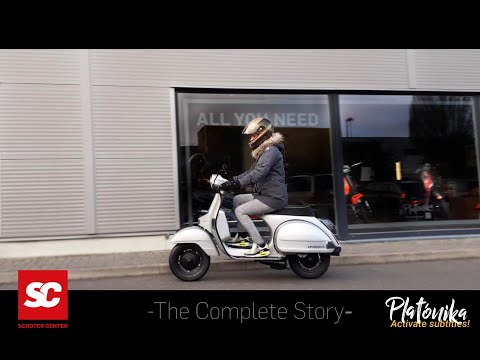


Many bgm innovations were part of our Platonica project, in this video you can see them Disc brake and the brake caliper mount im bgm Tutorial.
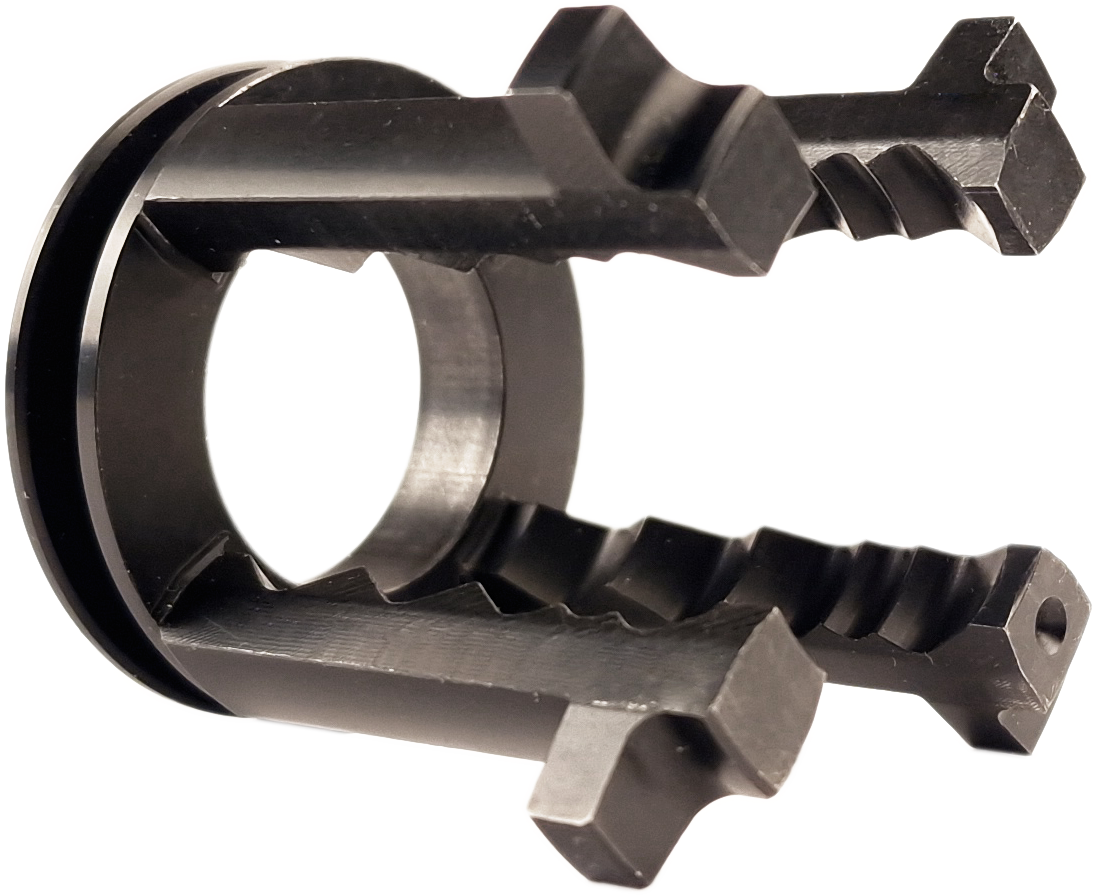
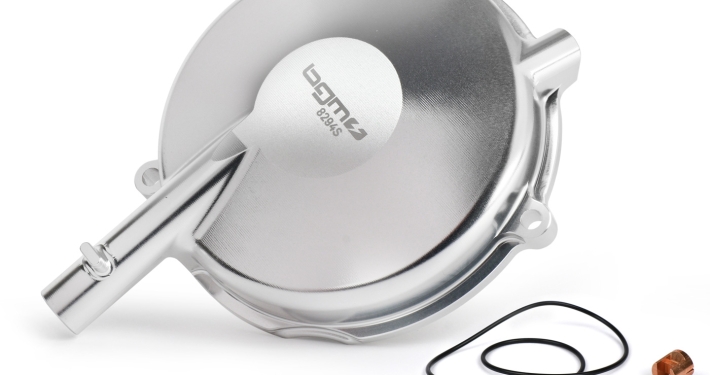
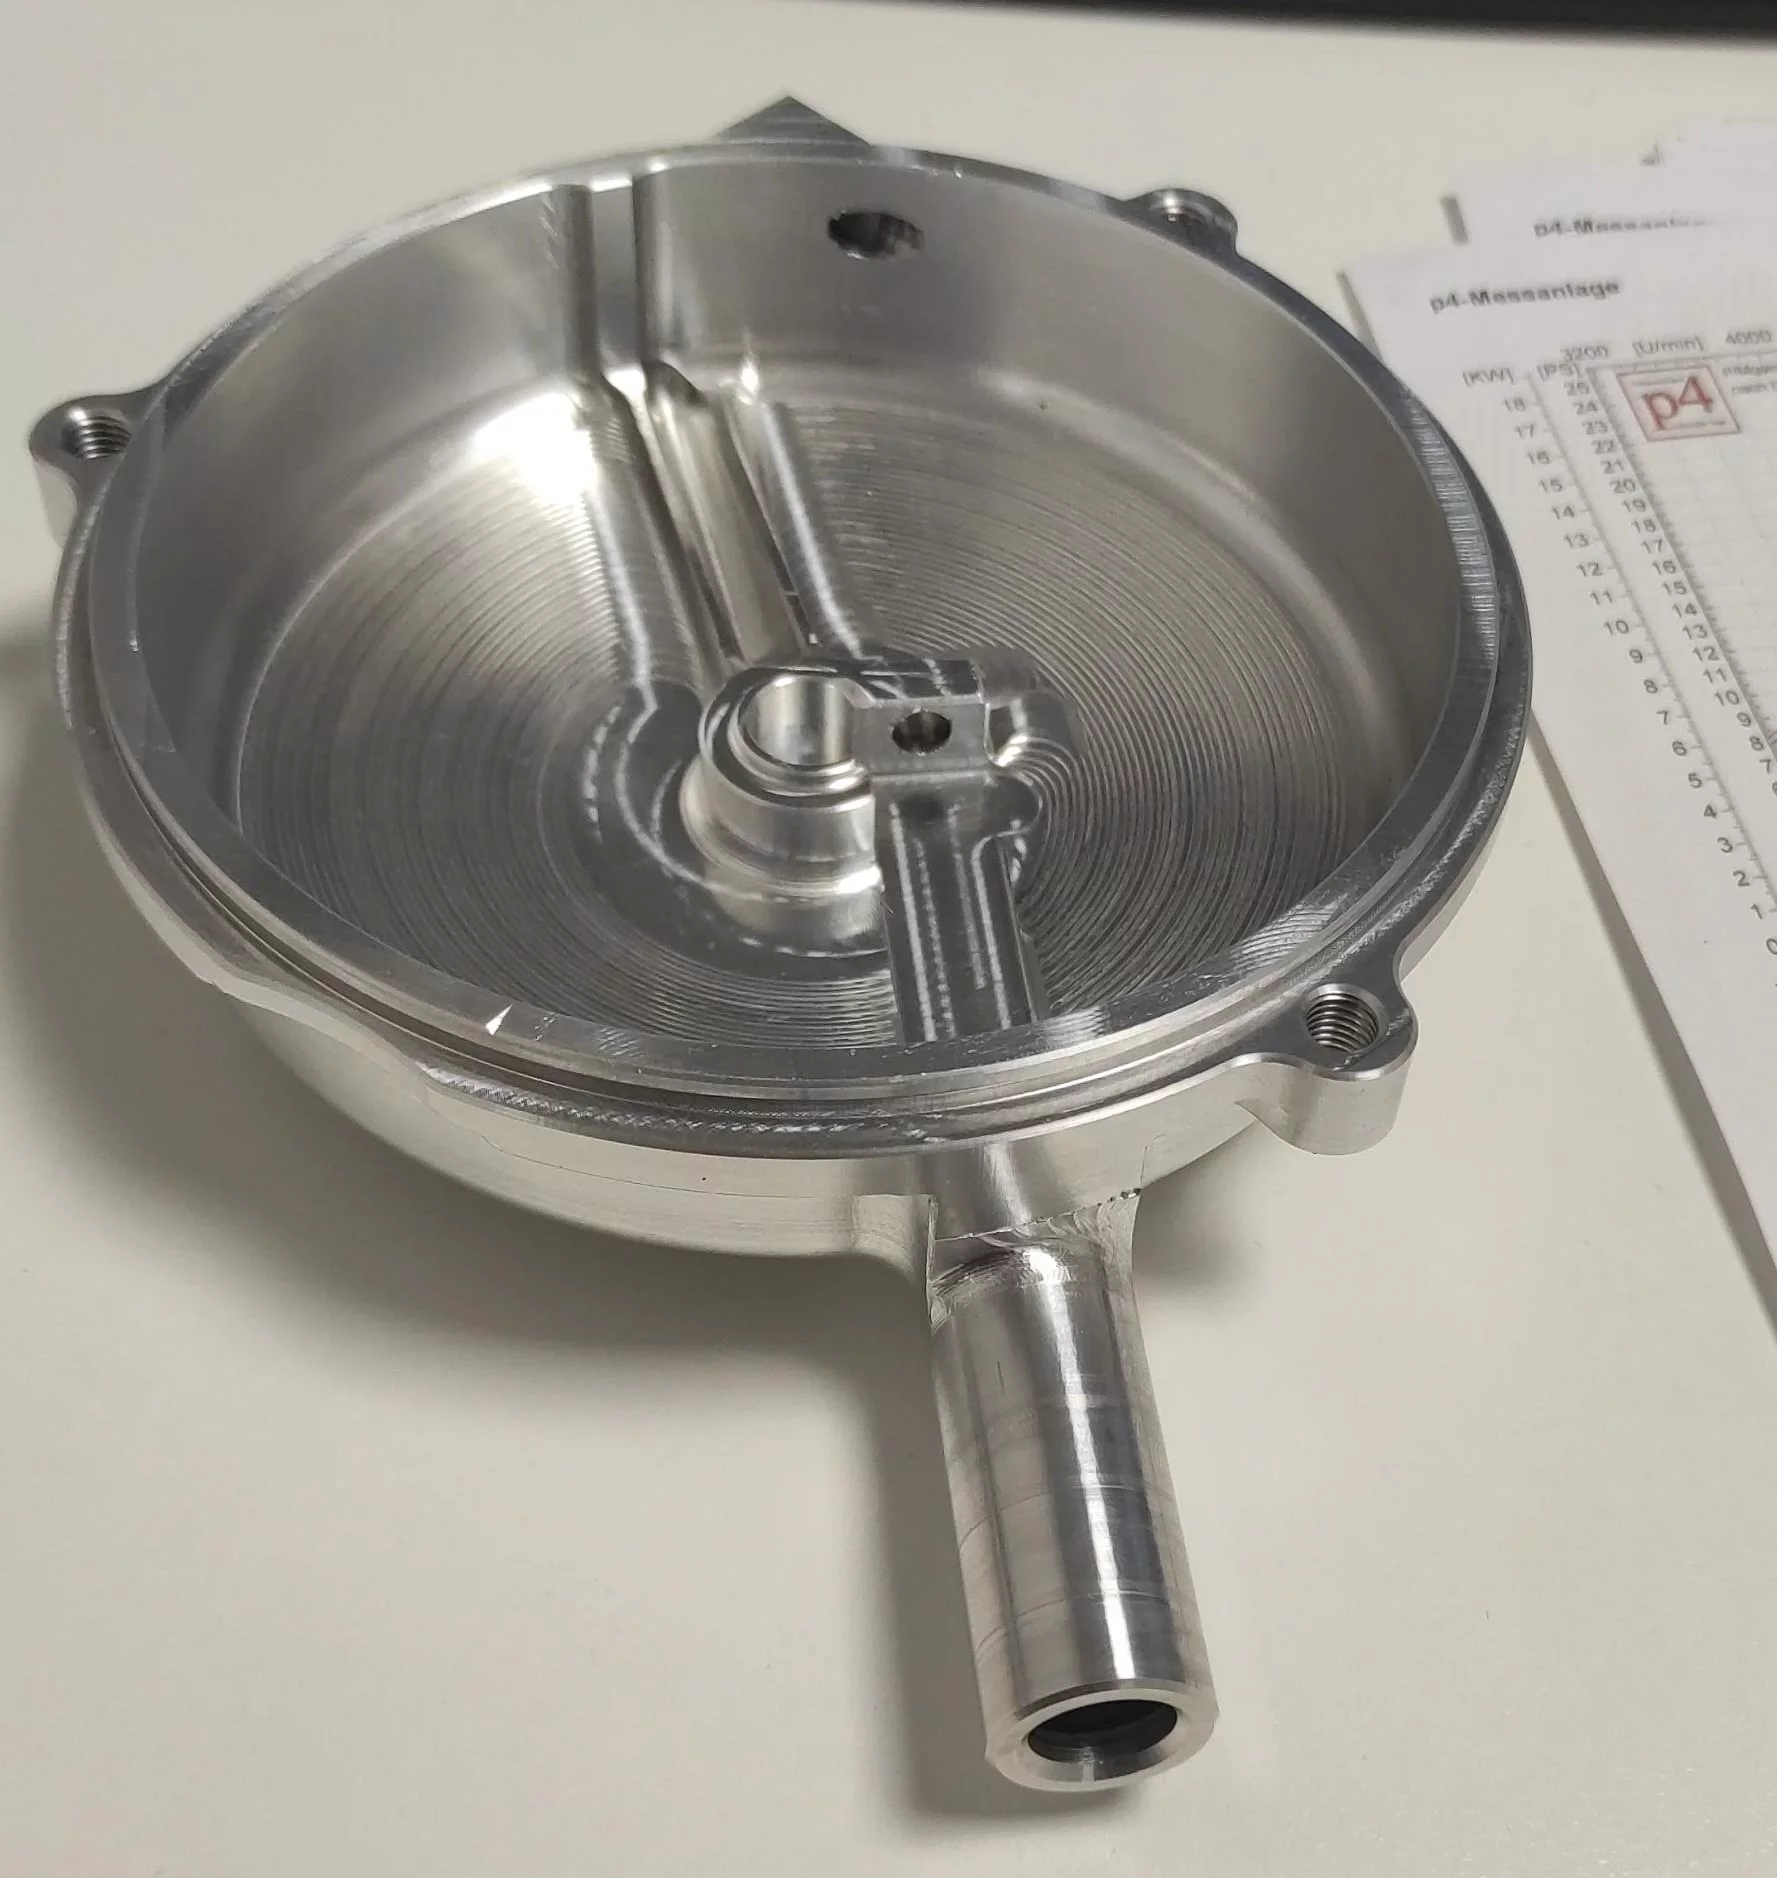
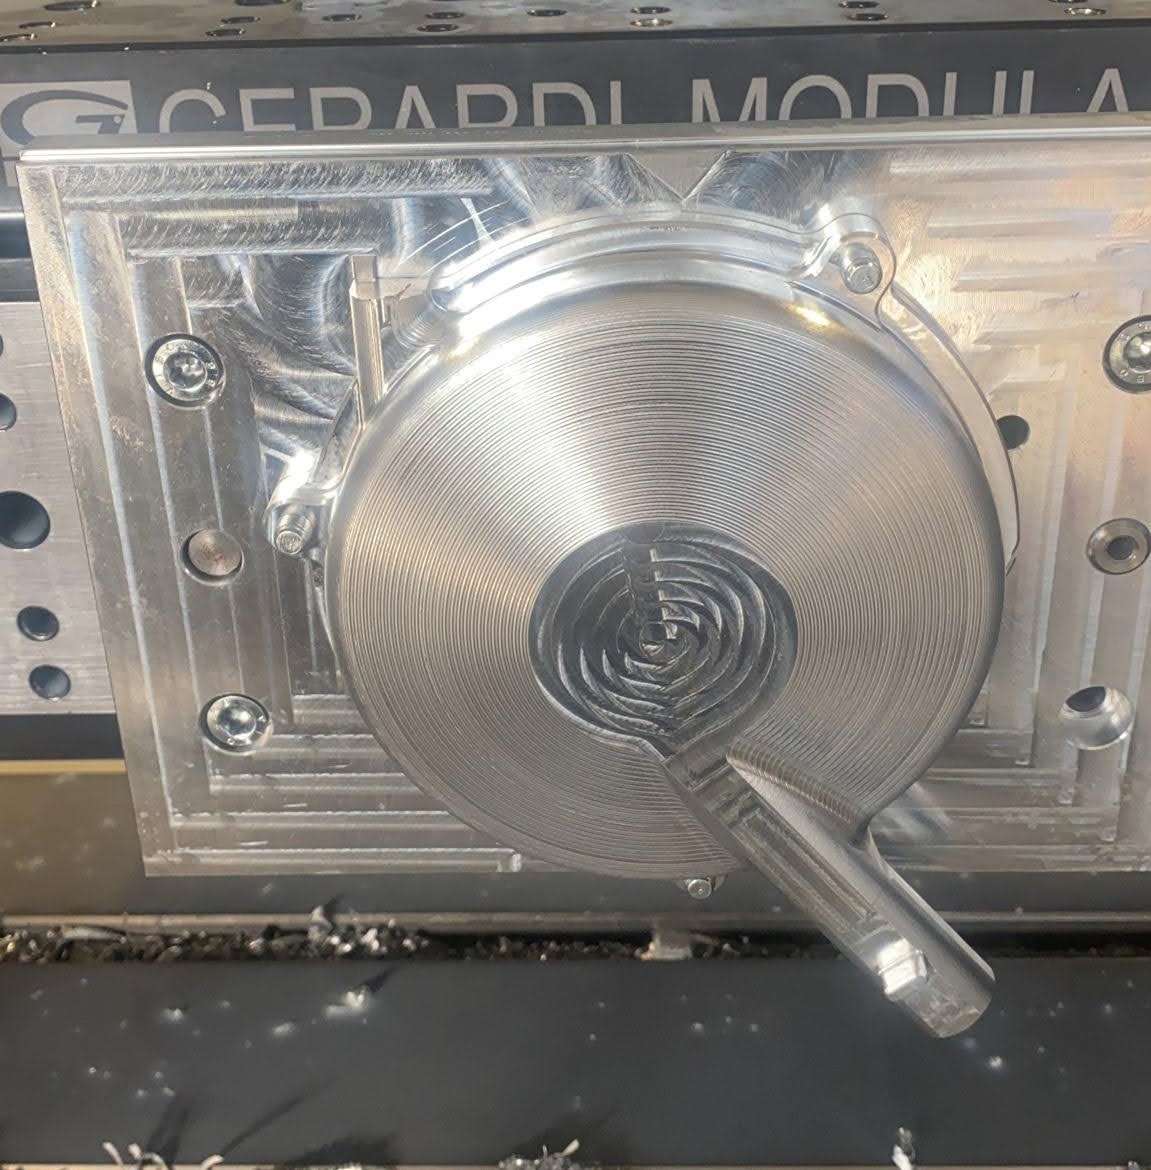
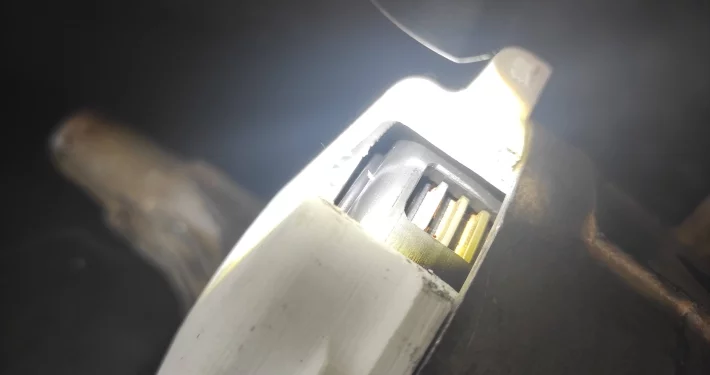
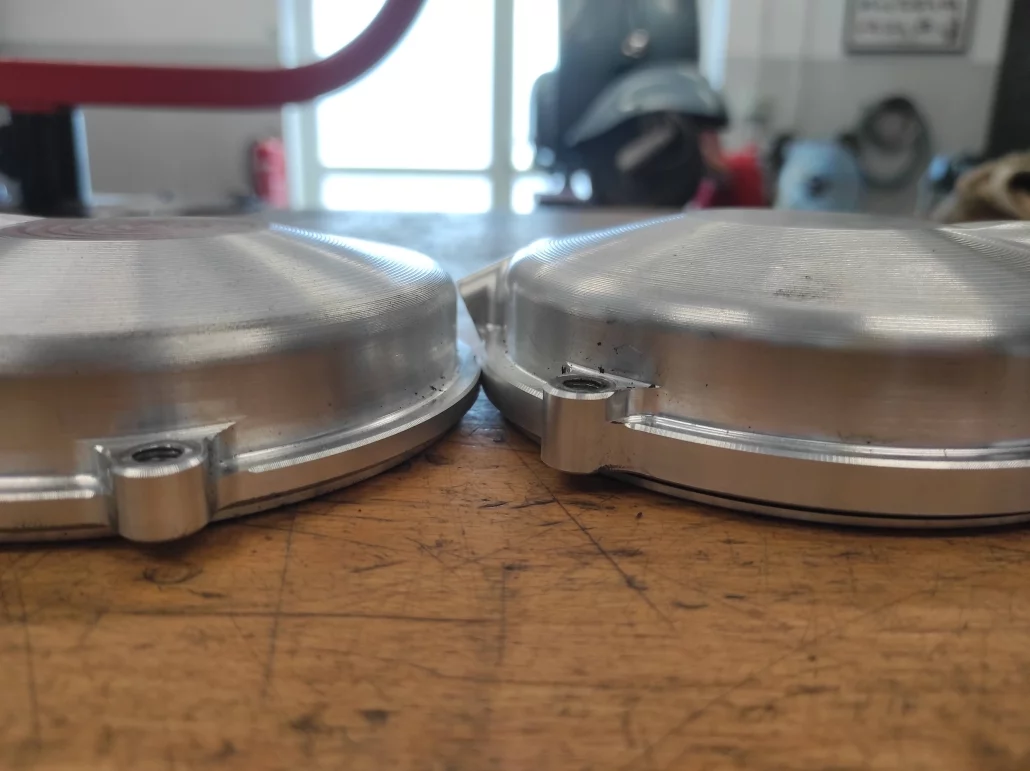
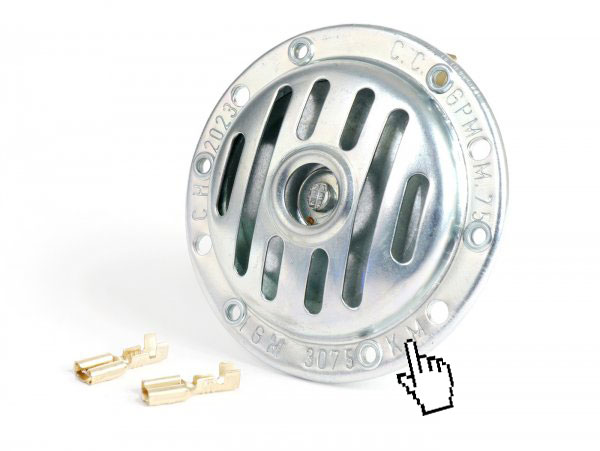
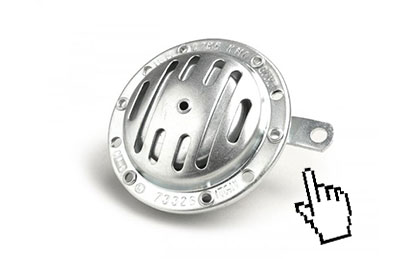
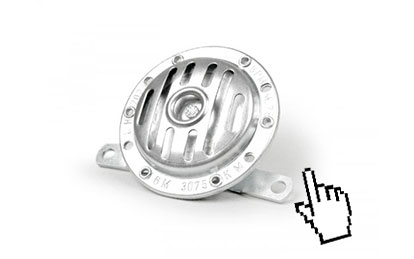
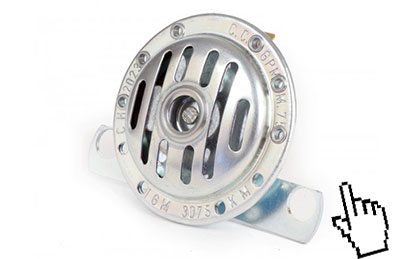
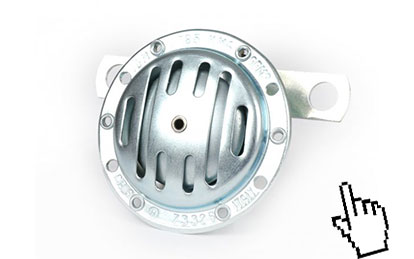
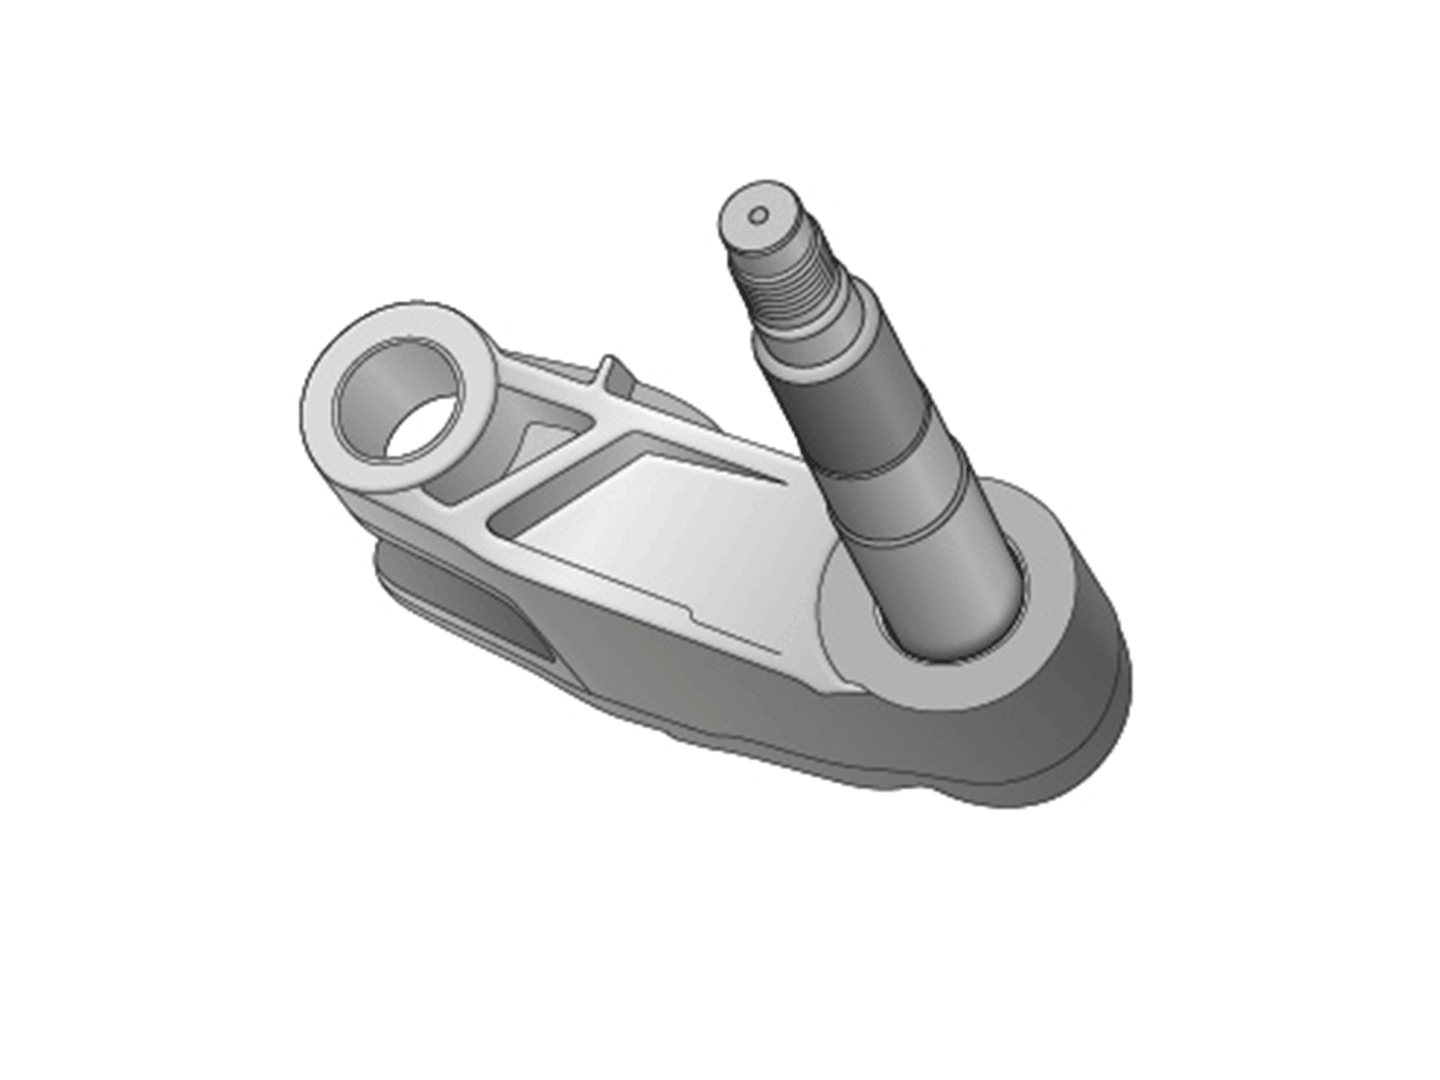
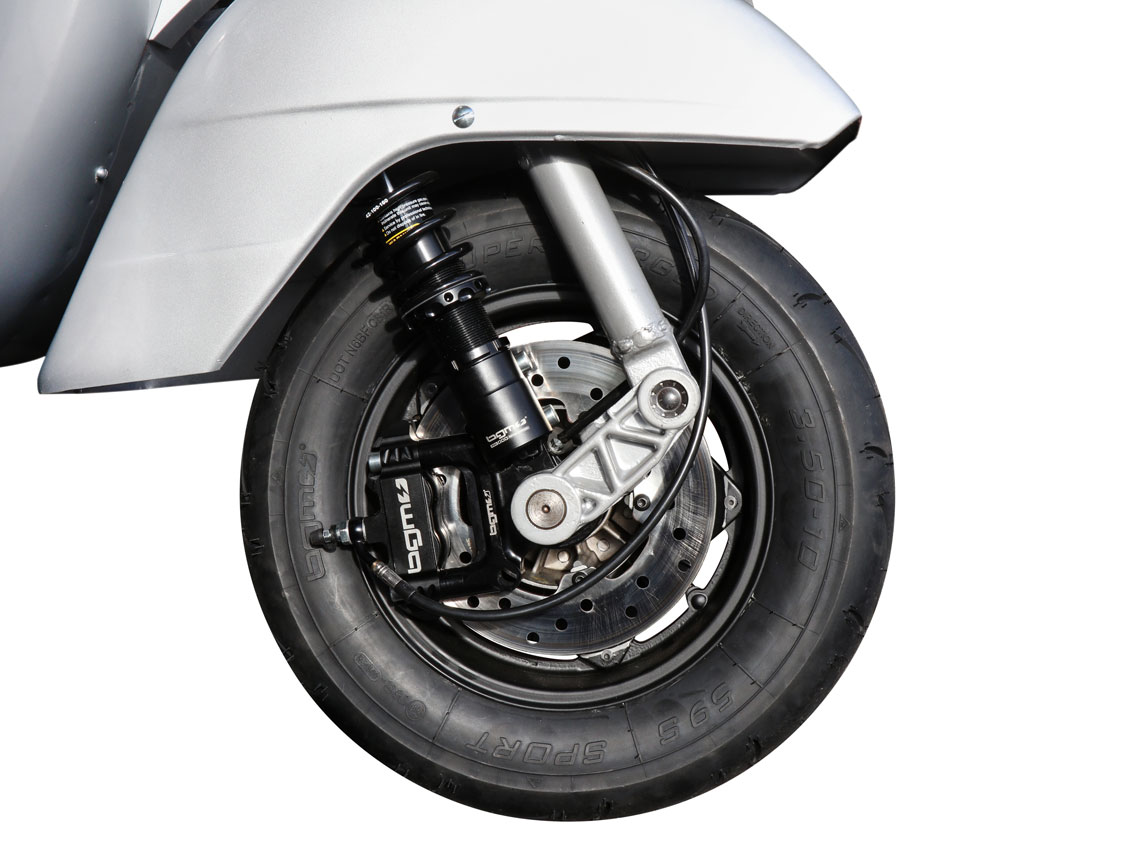
Our professional brake caliper mount from bgm PRO Made in Italy: Allows the assembly of the radially mounted BGM PRO 4-piston brake caliper, which enables braking values at motorbike level with fine dosing.
VESPA OR LML?
The brake caliper mount is available for Vespa or LML. The difference between the two types lies in the different dimensions of the speedometer drive. The selection of the right adapter therefore depends on the existing/used brake drum (Piaggio or LML).
Examples:
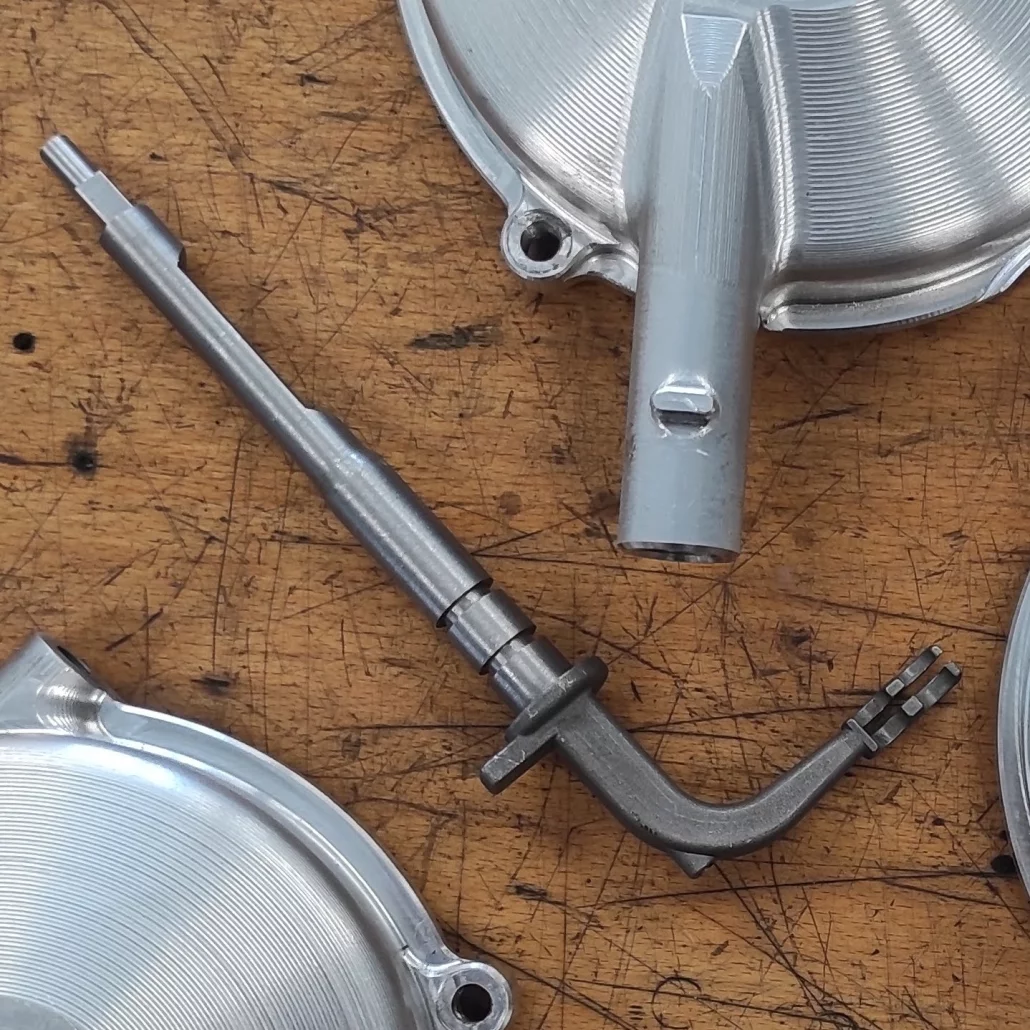
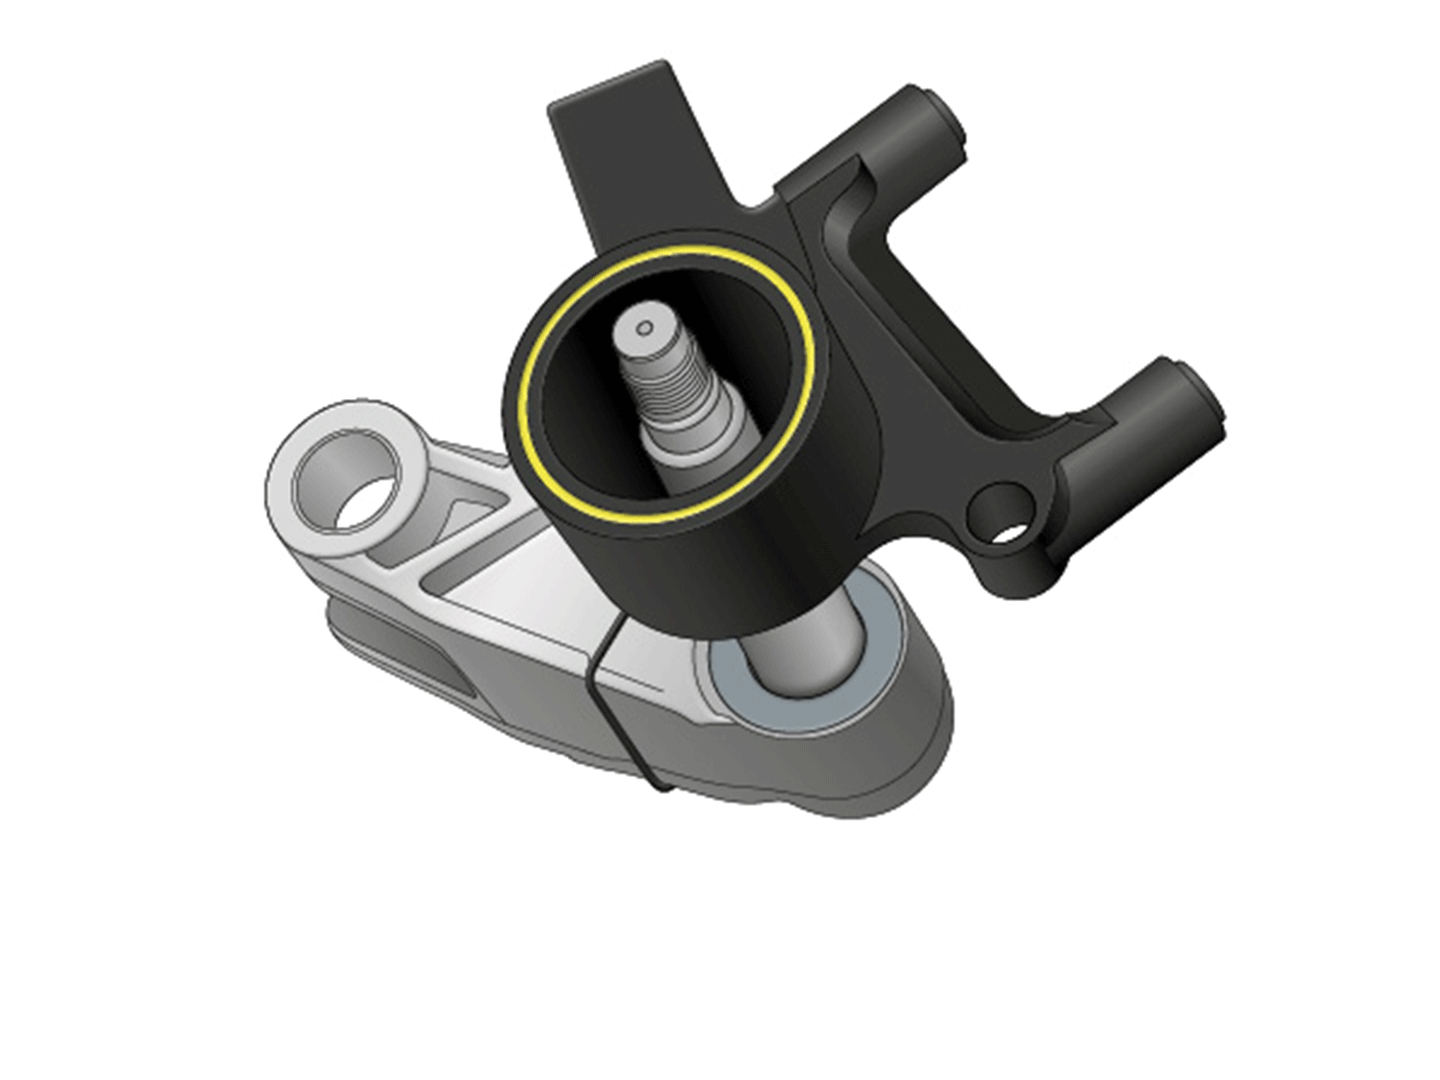
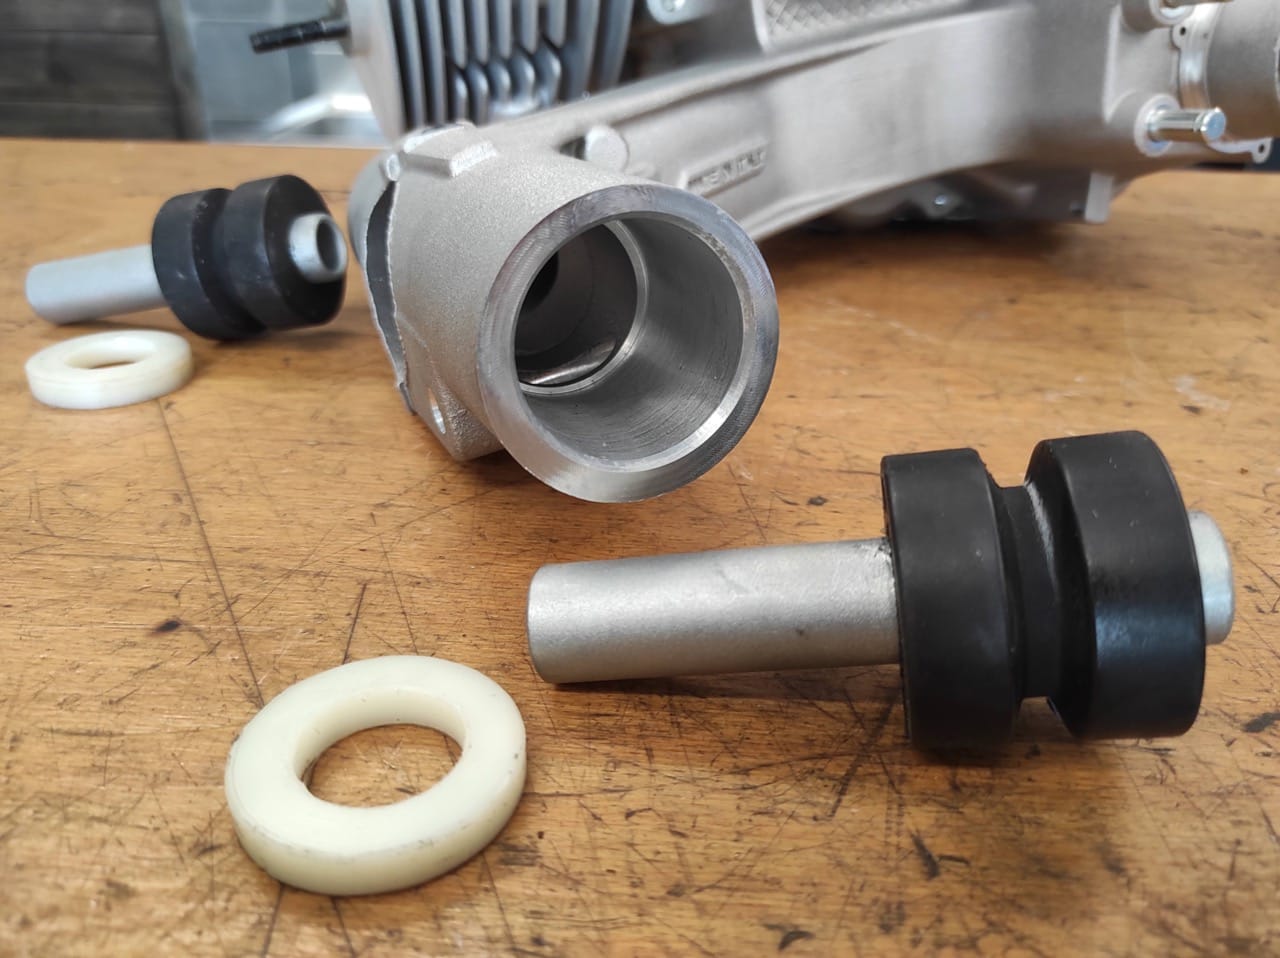
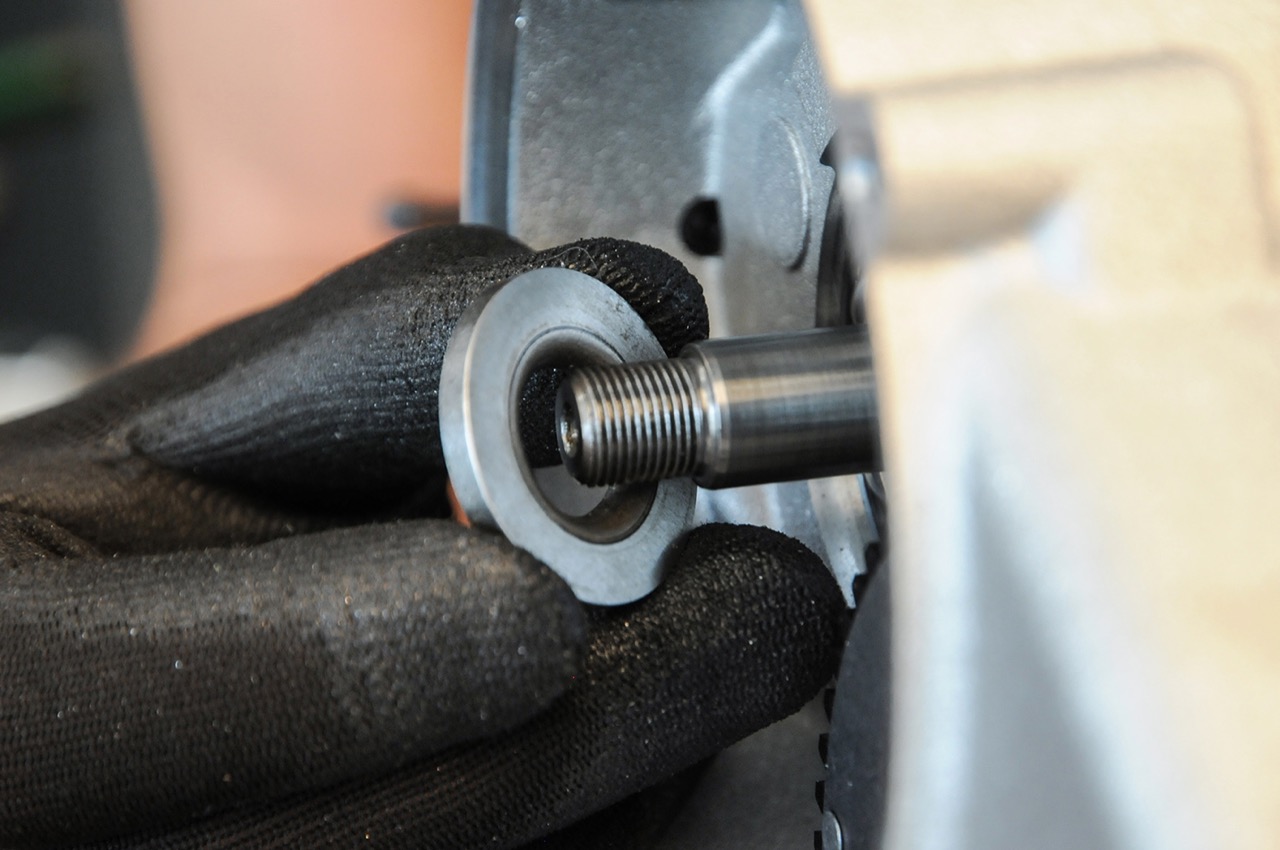
1. Put the O-ring on the axle and put it over the swingarm.
2. Put the shim on the axle.
3. Put the V-ring on the axle.
4. Grease the bearing of the brake caliper mount and put it on the axle.
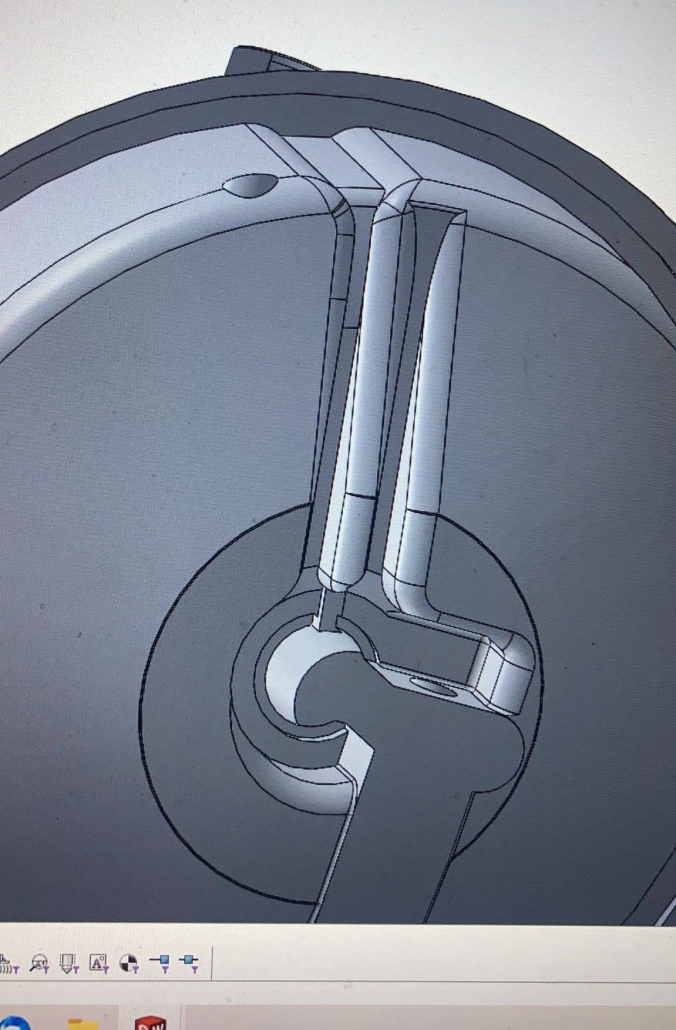
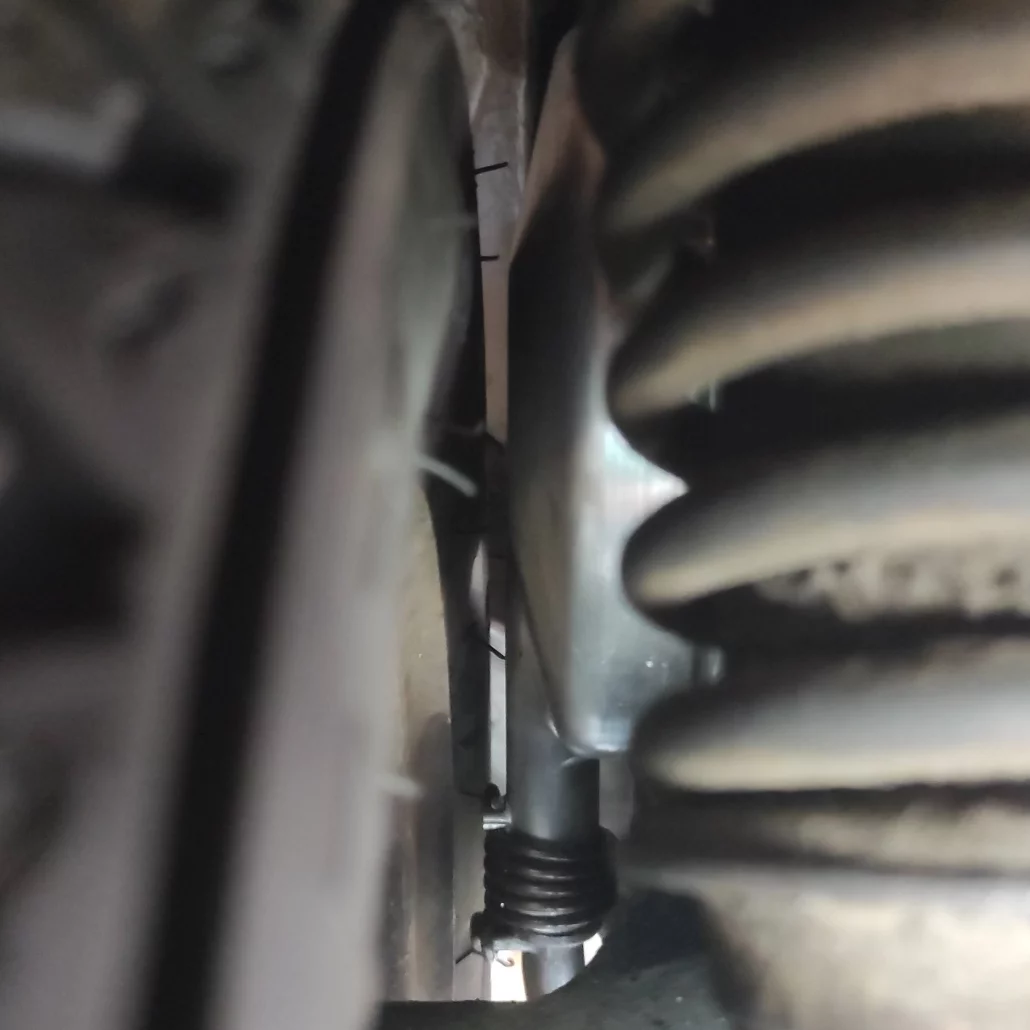
5. Place the appropriate D-washer on the axle and align it with the recess in the axle.
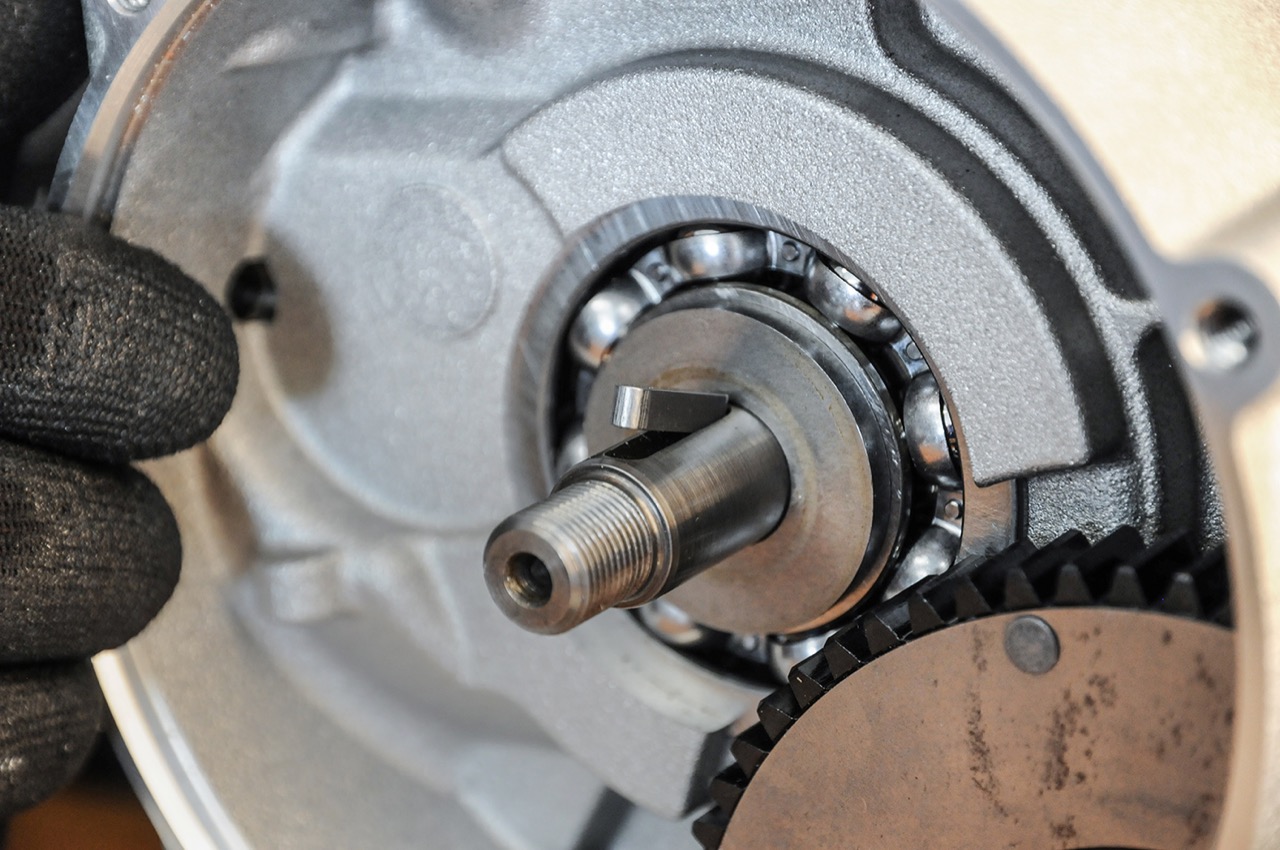
6. Place the Ø 20mm circlip on the axle and make sure it is securely seated in the groove, then position the O-ring.
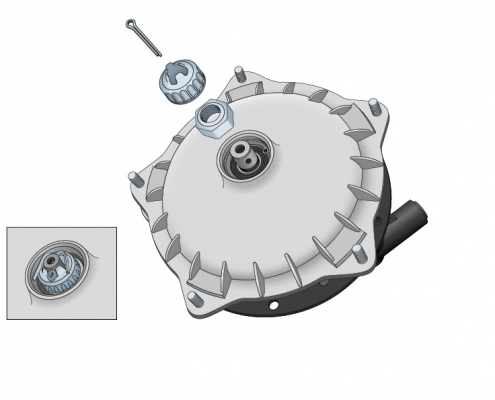
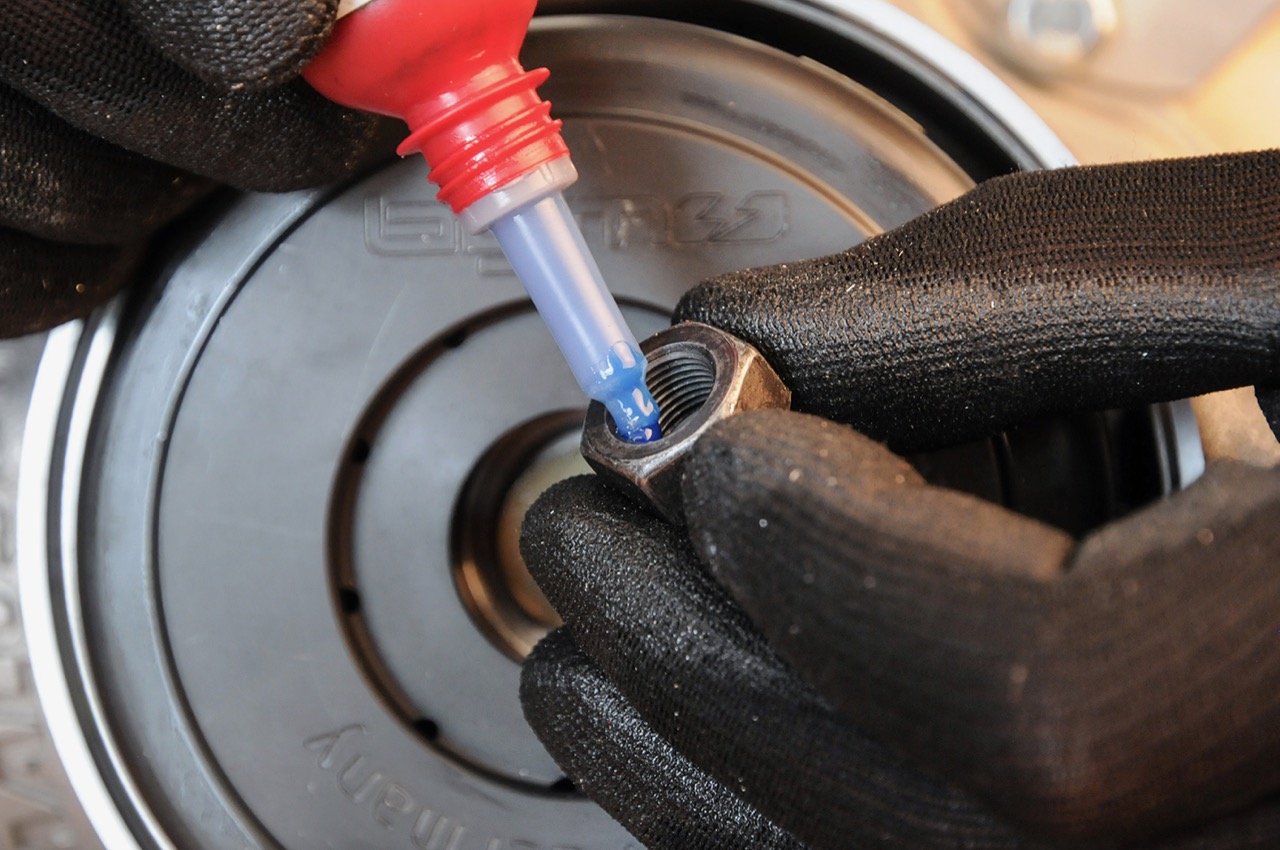
7. Put the brake drum on the axle and fasten it with a nut. Then secure with a safety cage and cotter pin. Attention, see step 13 before tightening the nut.
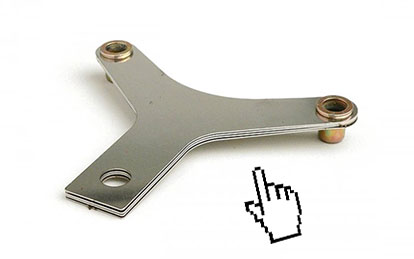
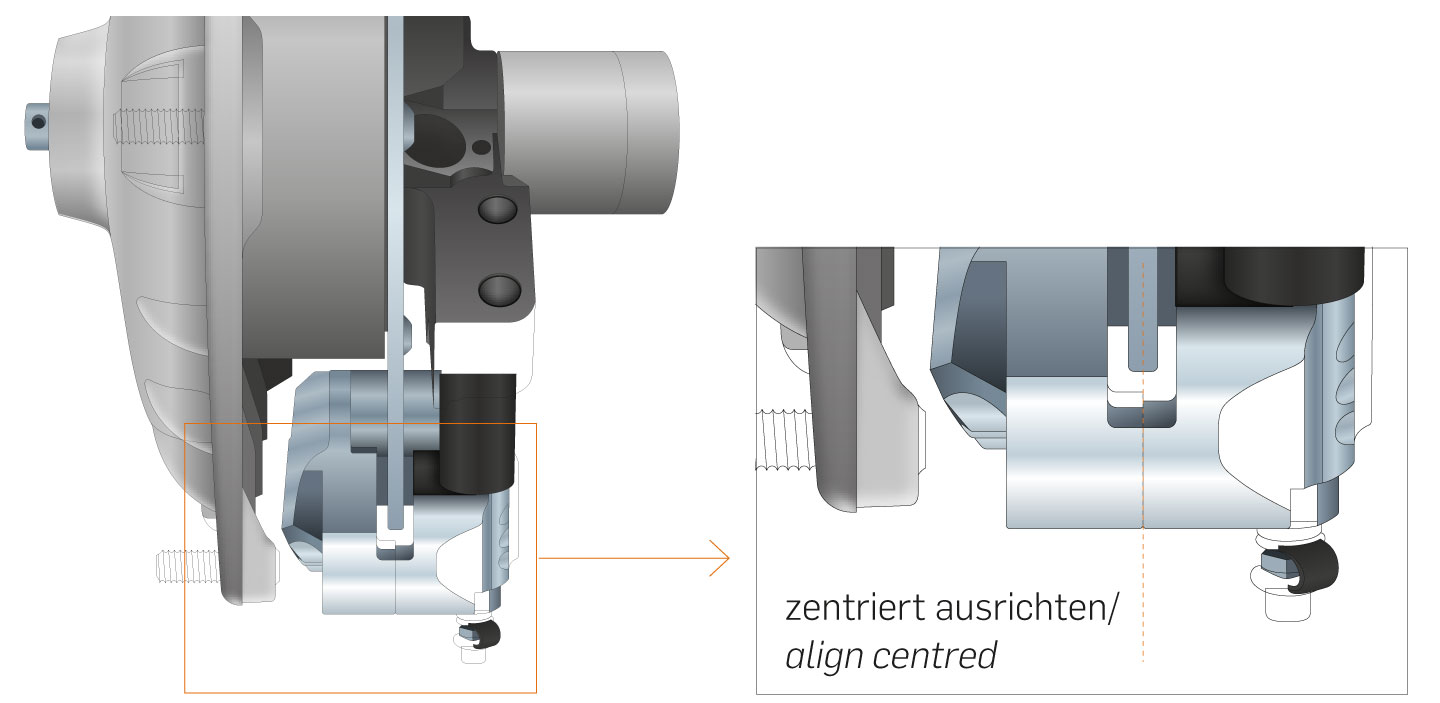
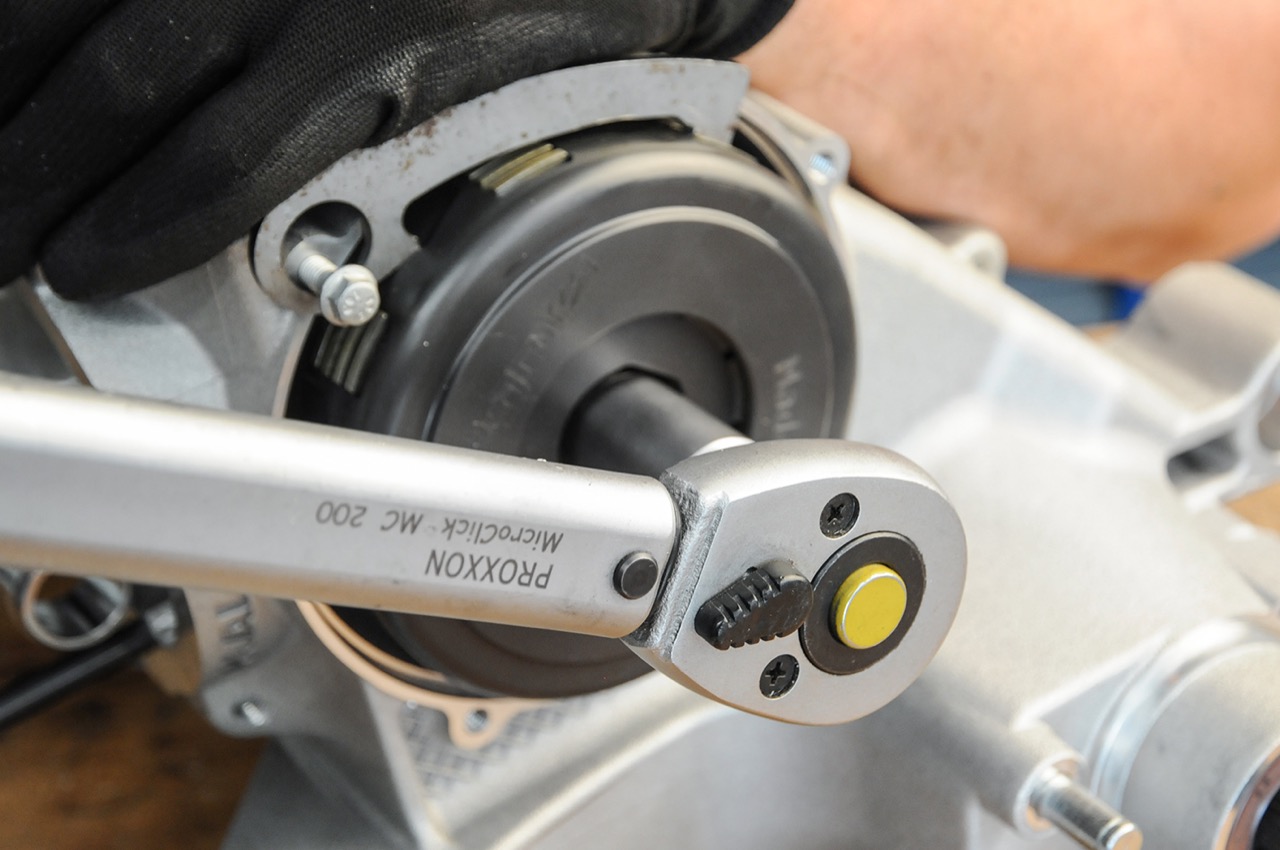
8. Fasten the brake caliper with the two screws and check the alignment with the brake disc.
9. Adjust the position of the brake caliper to the brake disc with the discs provided. Repeat steps 3 through 9 with the options until the caliper is centered over the disc as shown in Fig. 13. After the adjustment of the brake caliper mount, fasten the central nut of the brake drum with 90Nm. Tighten the brake caliper bolts to 16Nm.
In the fourth part of our little blog series we make the following changes to our test engine:
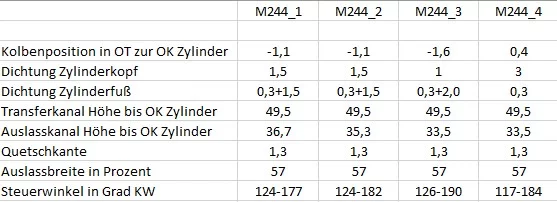
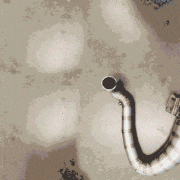
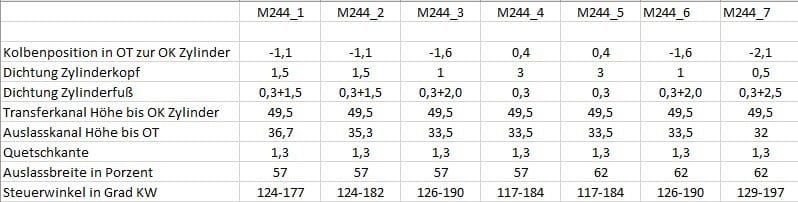
The cylinder is attached at the foot with two 1mm Spacers increased by a further 2mm compared to level 0.5. This changes the steering angle of the transfer channels from 124° to 126°. The outlet is adjusted to a control angle of 190° by milling. To do this, the outlet in the cylinder was raised by 1.8mm. The outlet width remains unchanged at 57%.
![]()
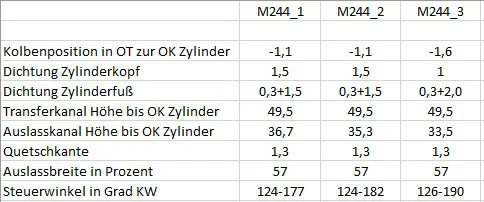
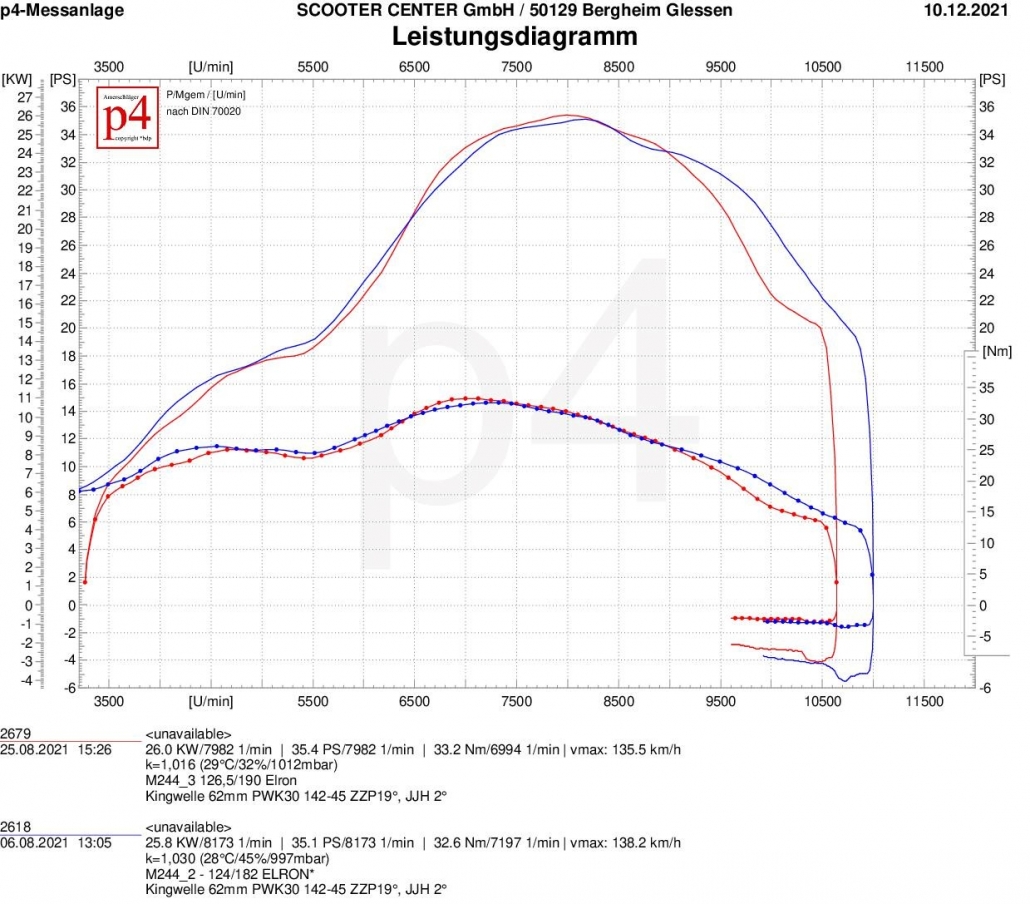
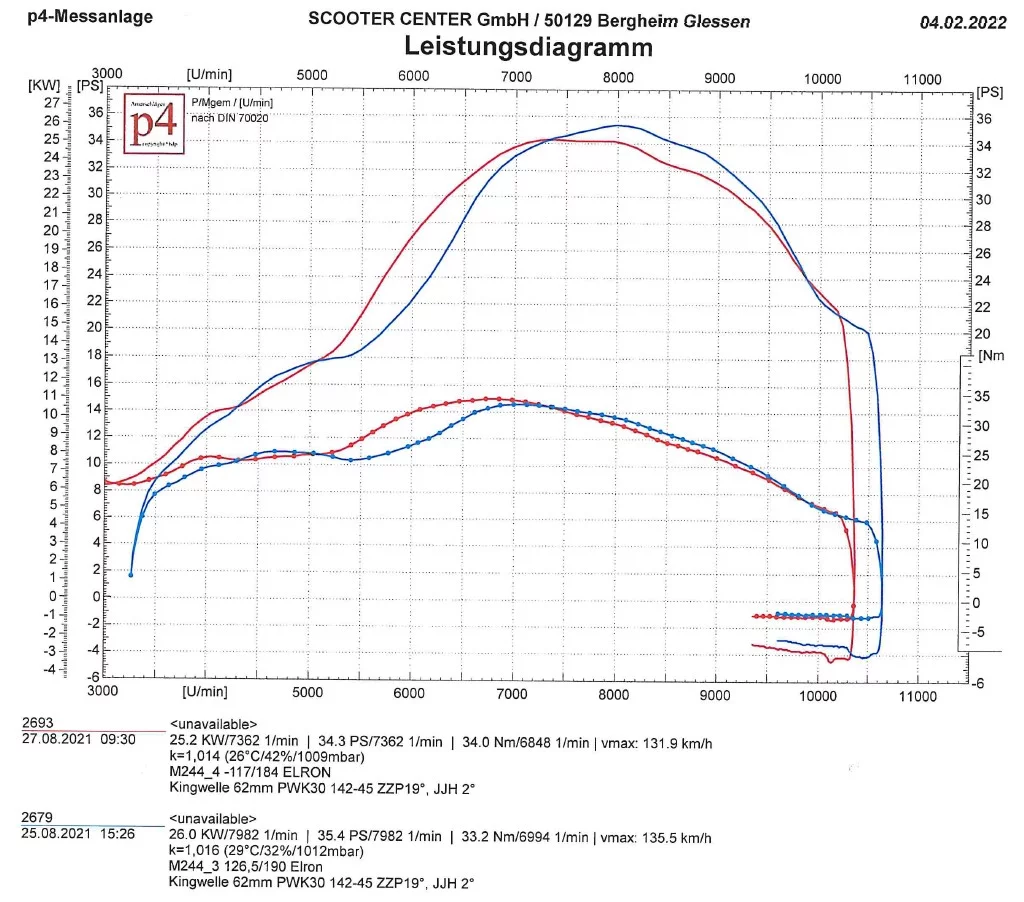
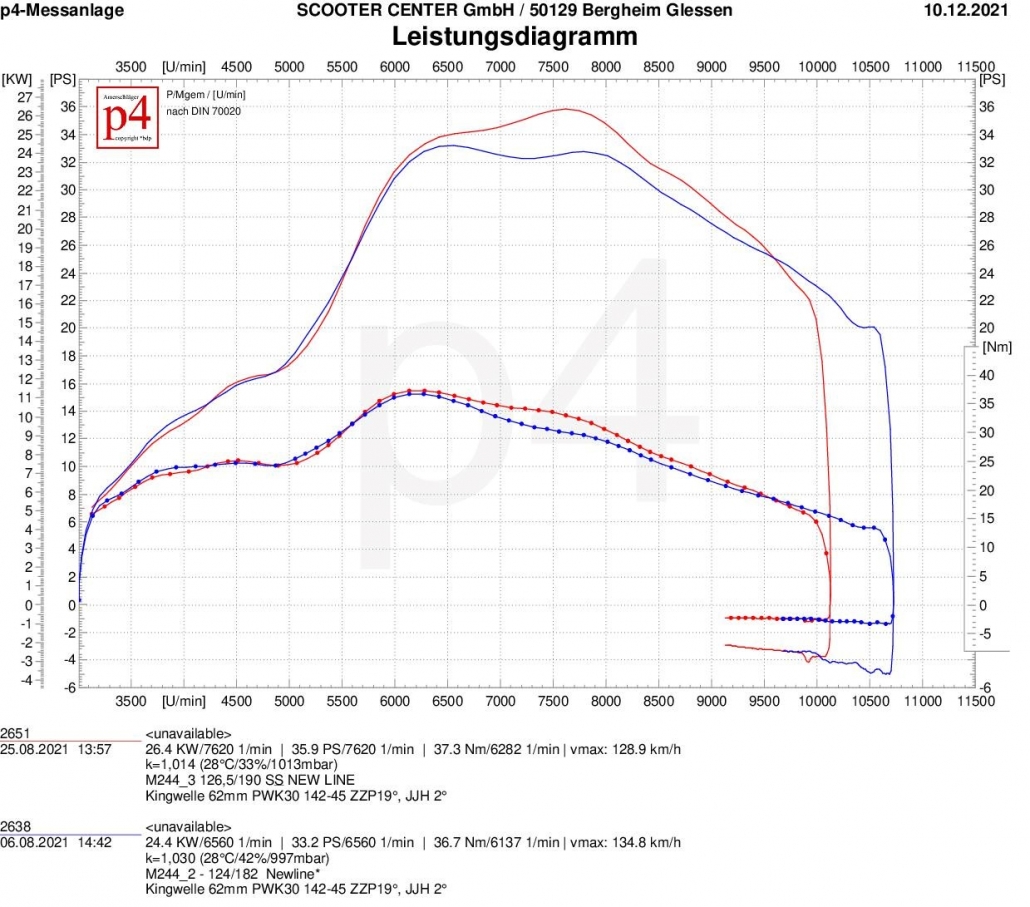
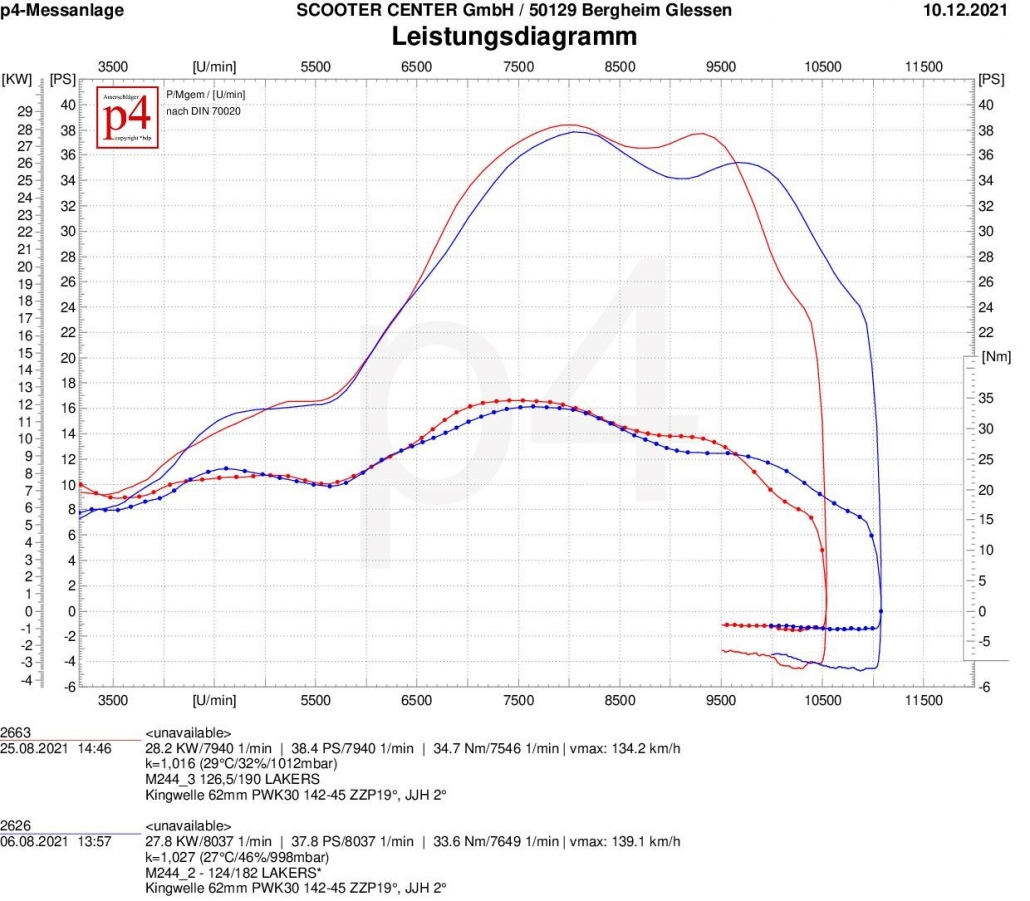
A little more nervous exhaust systems would show a clear shift in the direction of performance with the changes made, but the Elron is almost unimpressed by the specifications of the cylinder and retains control over the characteristics of the engine. A slight increase in the maximum values after the decimal point only indicates that the Elron has noticed that the cylinder is sending a clearer signal through the exhaust. However, the maximum torque remains at the same level as in the first construction stage.
The available speed range is reduced by 500 rpm to 3540 rpm.
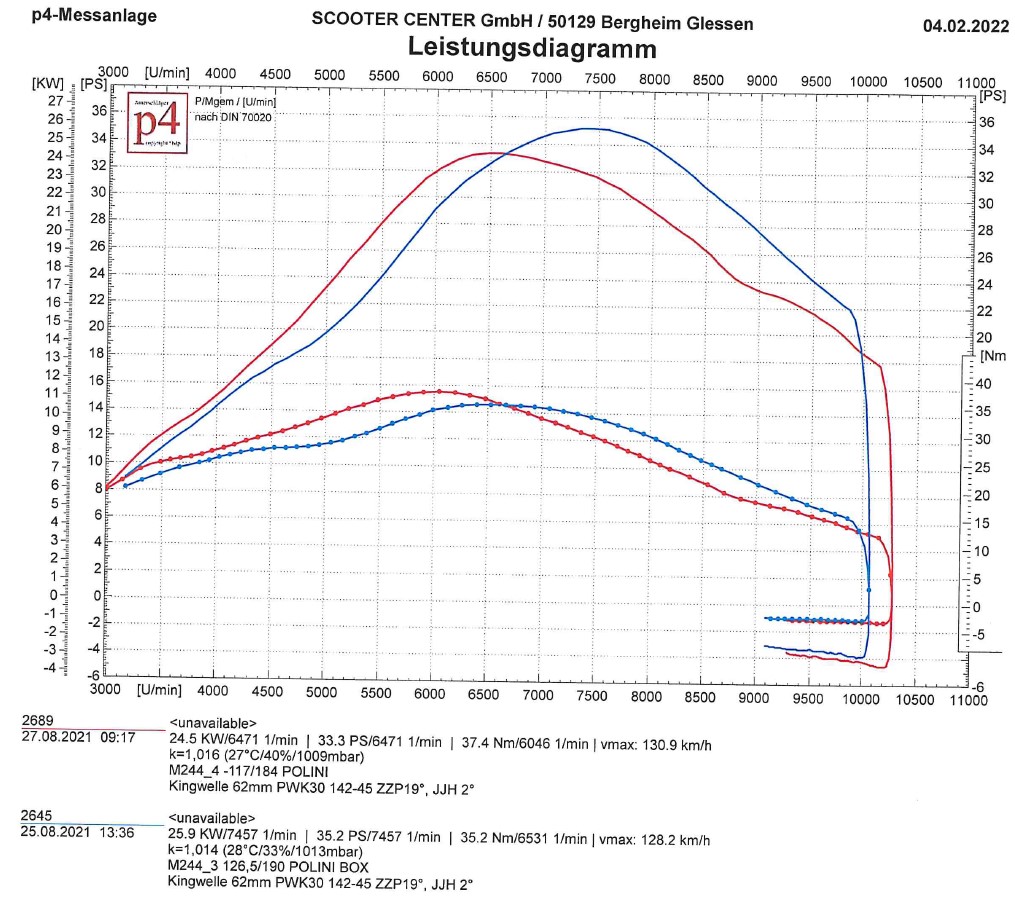
As a box exhaust, the Polini exhaust system reacts more as expected. Similar to the Elron, the can from Italy only shows small reactions. The lower effective compression makes the curve dip a bit in the rise between 4000 rpm and 6200 rpm. The system converts the slightly increased time cross-section at the outlet window with a gain of just over one horsepower at peak.
The maximum torque remains the same at 35.2Nm and is only shifted by a few hundred revolutions in the direction of higher speeds.
With a bandwidth of 3800 revolutions, the Polini system is slightly behind stage 2, but this test shows that the box does not necessarily prefer the very small steering angle. In a direct comparison to stage 1, the bandwidth and maximum values have increased significantly.
Our test subject had a short break in the previous construction stage due to appointments away from home; but now plays again in the third construction stage. So here is the comparison between levels 1 and 2.
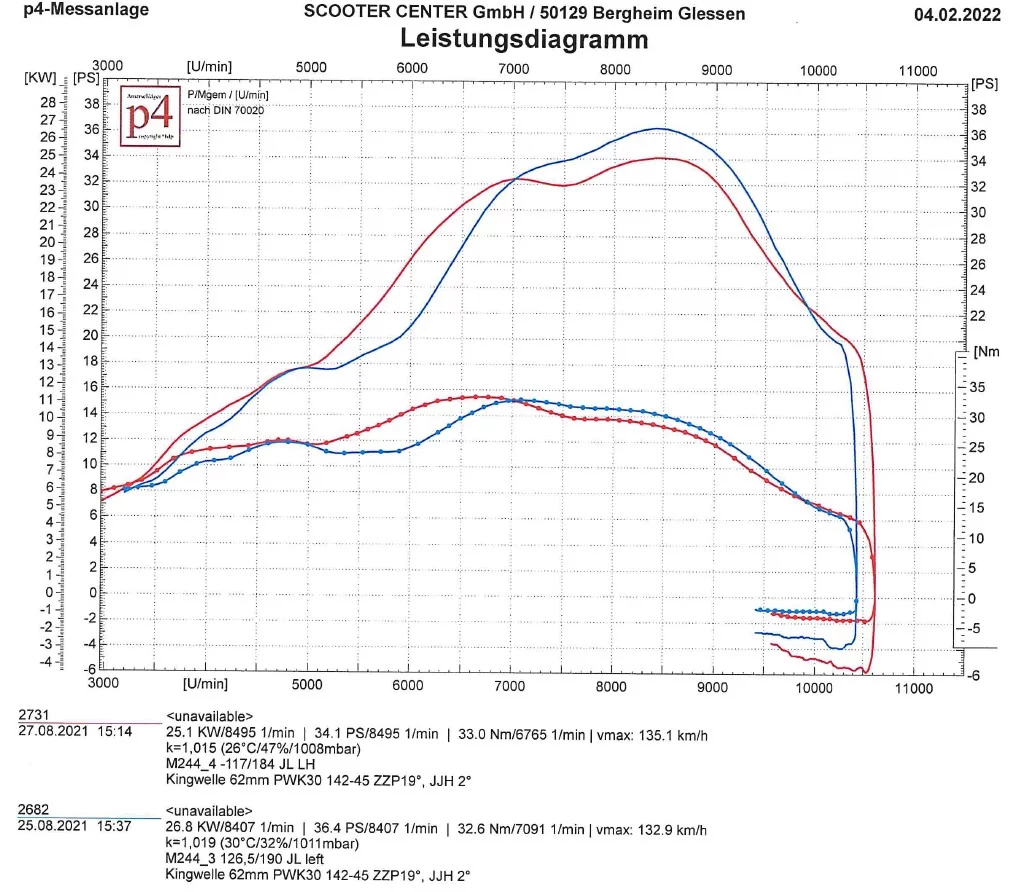
This also shows how clearly an exhaust can behave when it is operated from other steering angles. The JL, which is considered good-natured, turns out to be a very approachable partner in the search for performance.
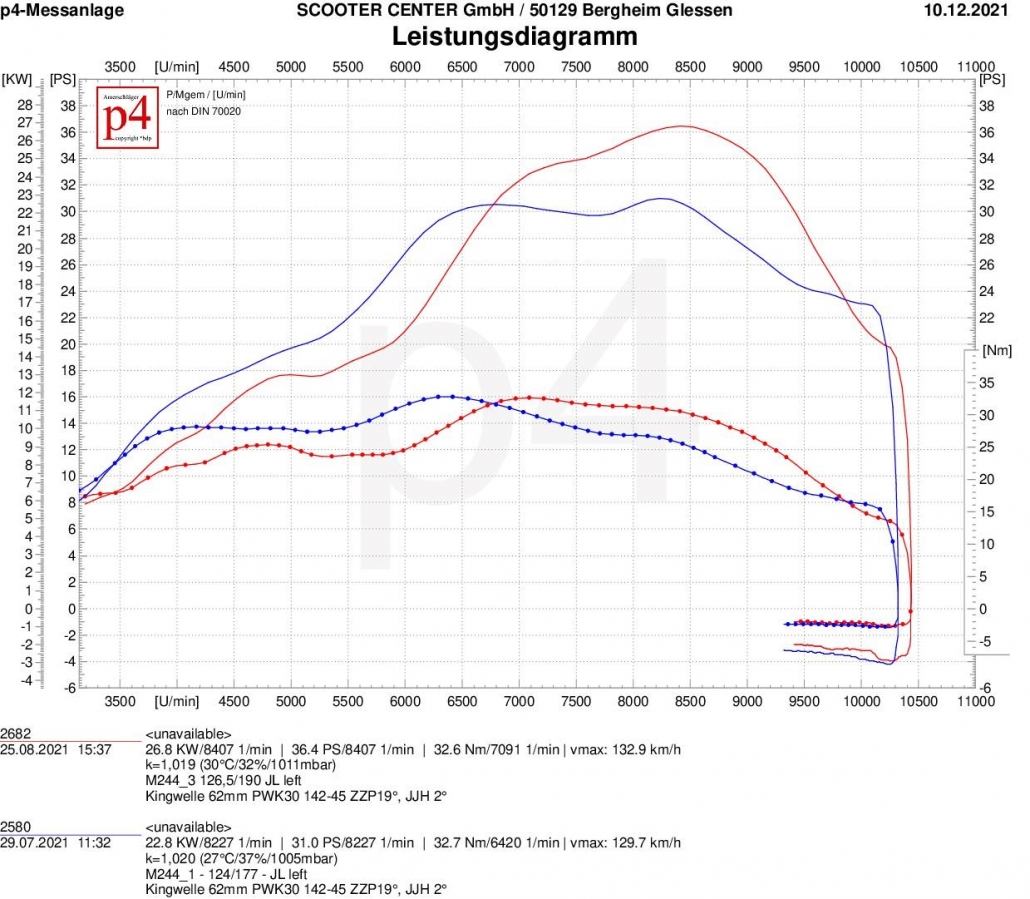
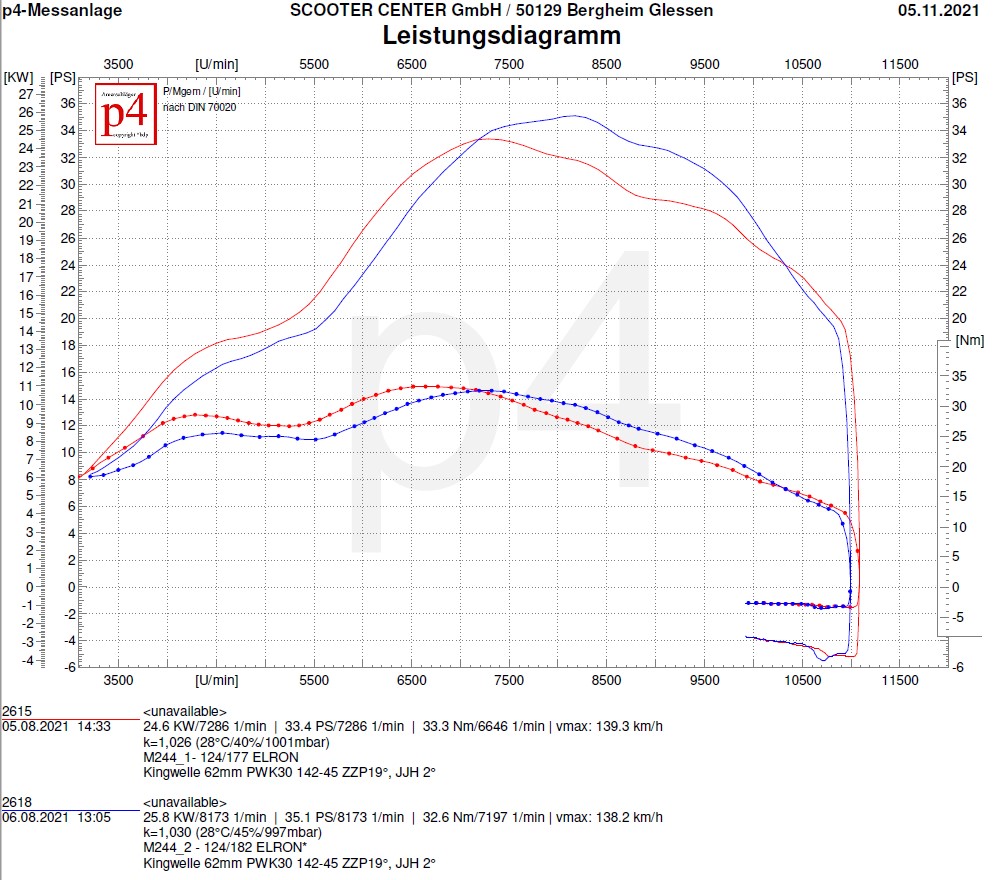
At the top, the JL provides almost five and a half more horses and climbs over the 36PS line in the graph. The torque remains at 32.6Nm at the same level as in the first attempt. However, the torque extends over a much wider range - beyond 7000rpm. The performance peak is reached with 36.4PS at 8400rpm. The JL falls below the 25 HP line considered in the bandwidth only beyond 9600 rpm and can therefore not be described as a lazy speed. In general, the graph shifts significantly in the direction of higher speeds. With a bandwidth of only 3400 revolutions, the JL even lags behind the Elron and brings up the rear in terms of bandwidth in this construction stage.
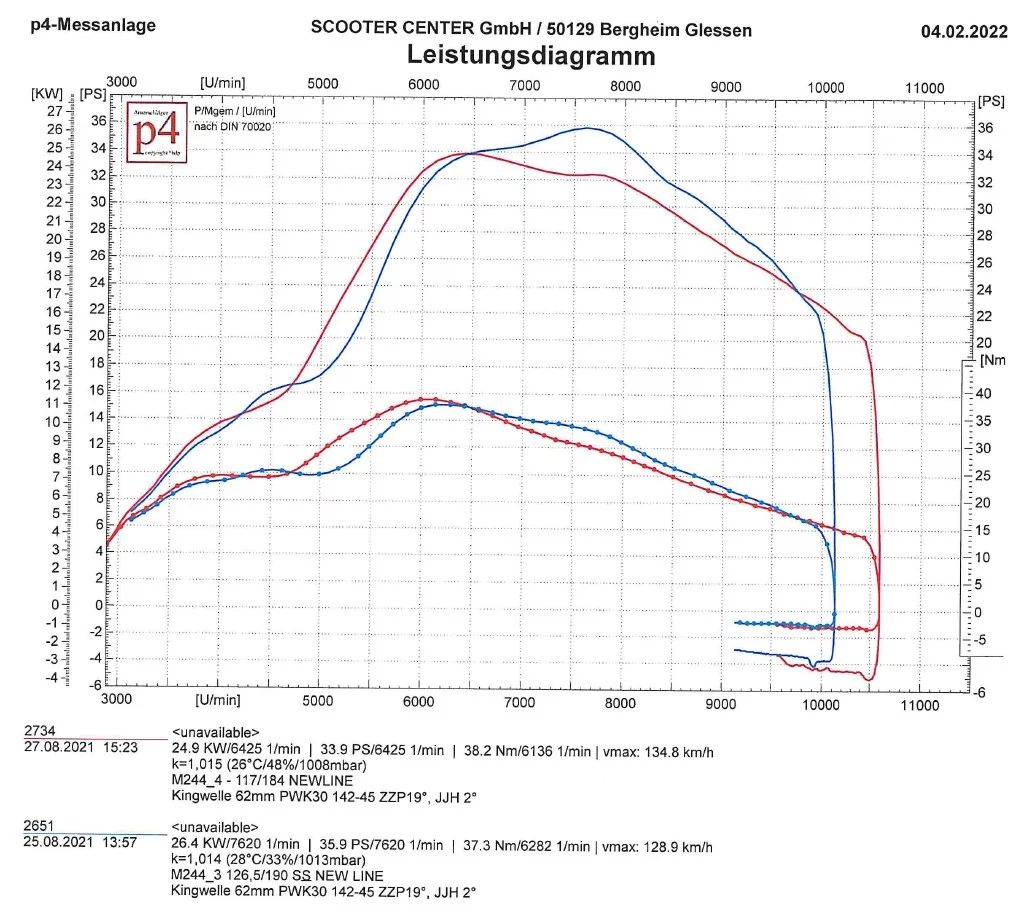
The edgy powerhouse from the north feels really comfortable in this expansion stage and takes two best values with it.
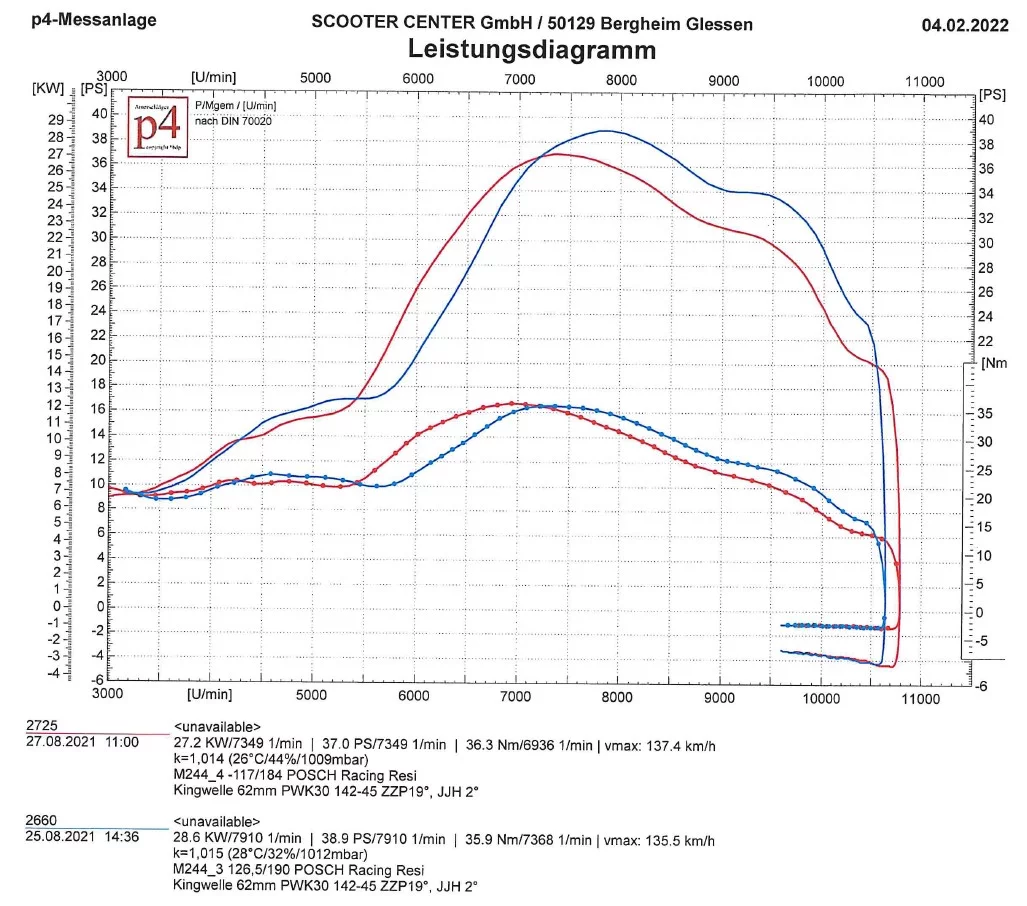
There are no notable changes in the rise in the newline, but it does quite a bit due to the larger advance angle in the engine speed range. With 37.3Nm, it takes the top position in terms of torque in the third construction stage. The available speed range is narrower compared to the previous tests, but here too the Newline achieves a range of 4000 revolutions. With these values, considerations germinate after a longer primary with 24-60 ...
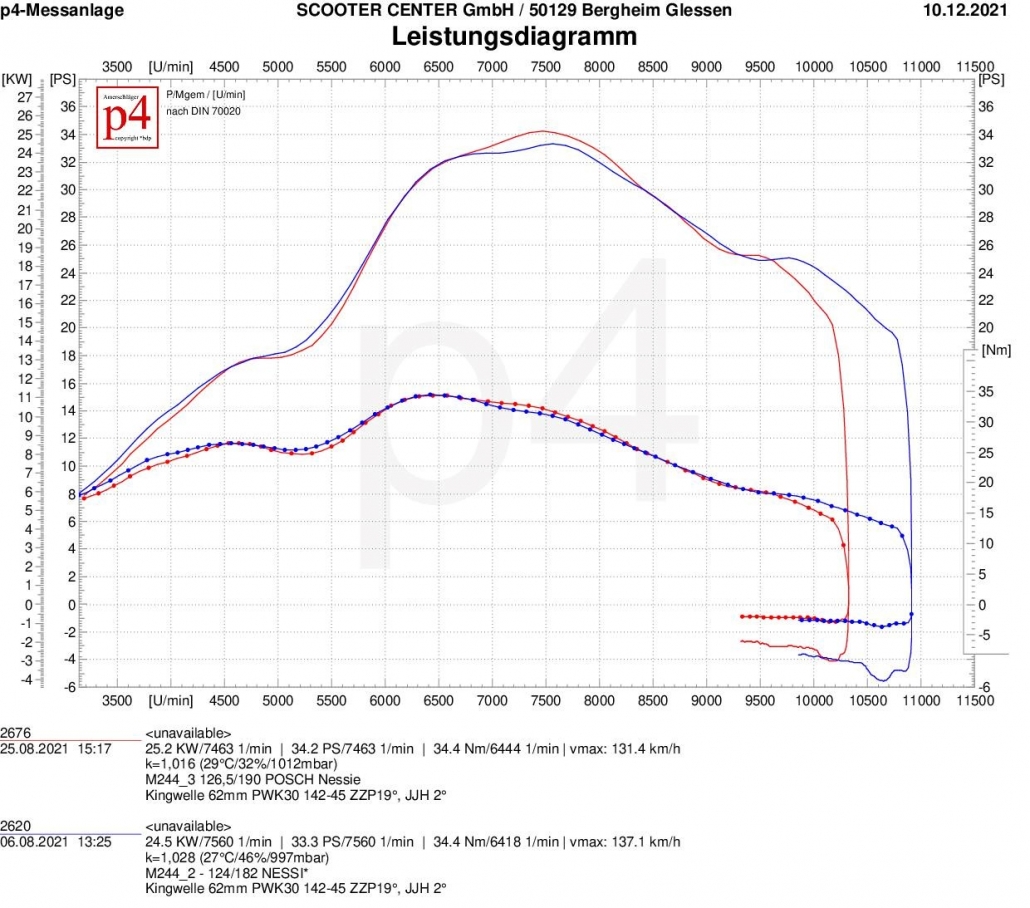
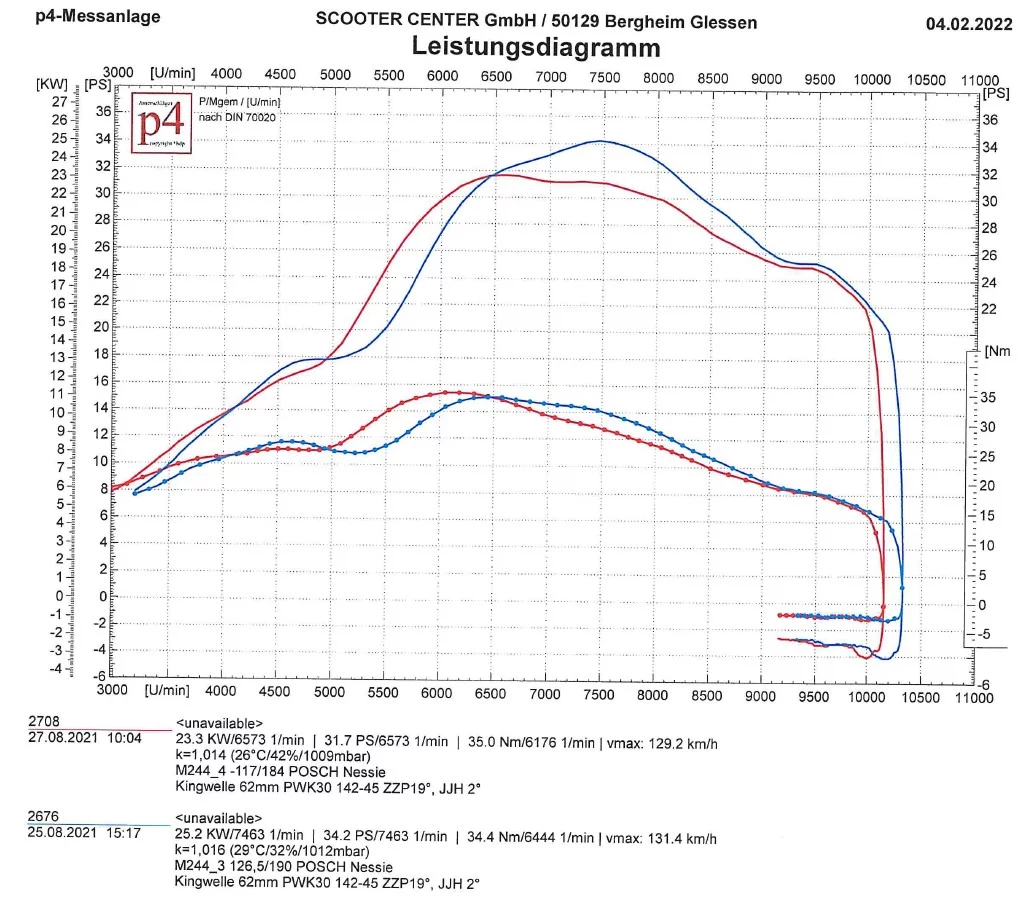
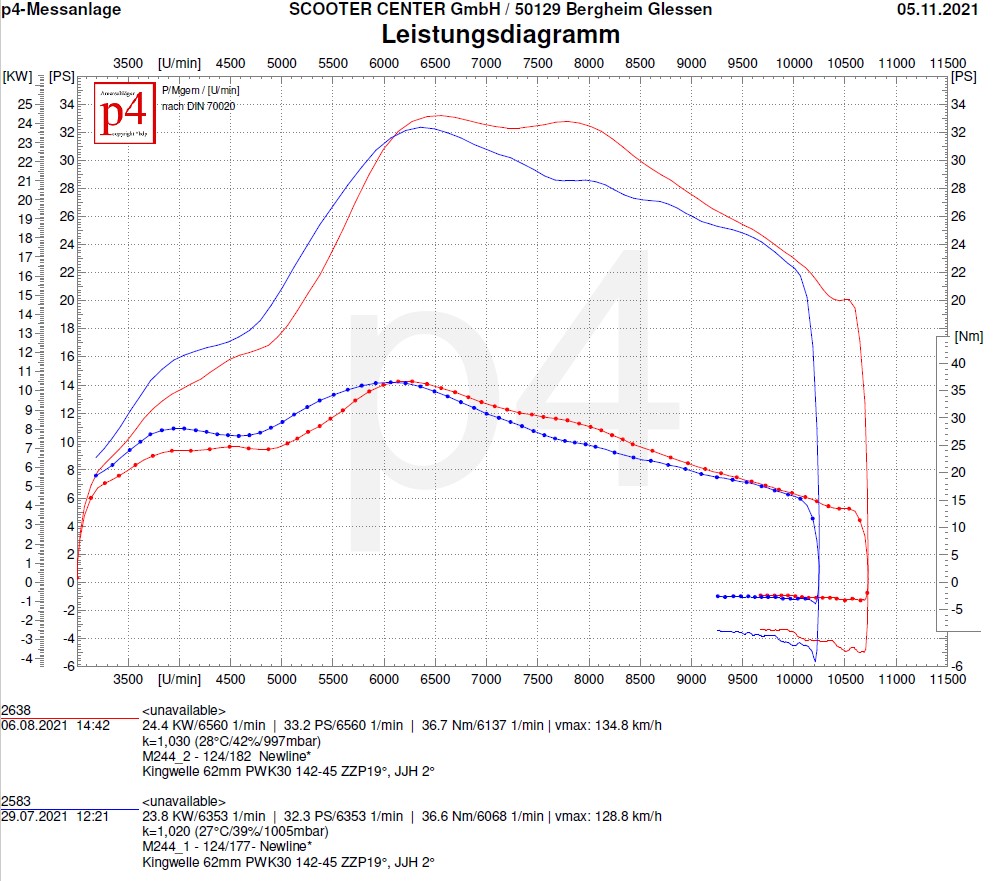
Like the Elron, the sea monster from Posch Performance is not quite sure what to do with the changed control angles. Maximum torque remains the same and peak power increases by one horsepower. While the Nessie was still way ahead in level 1 with 4300 rpm in terms of bandwidth, the available speed range in level three is a bit on the dip station and is in the upper midfield with 3700 rpm.
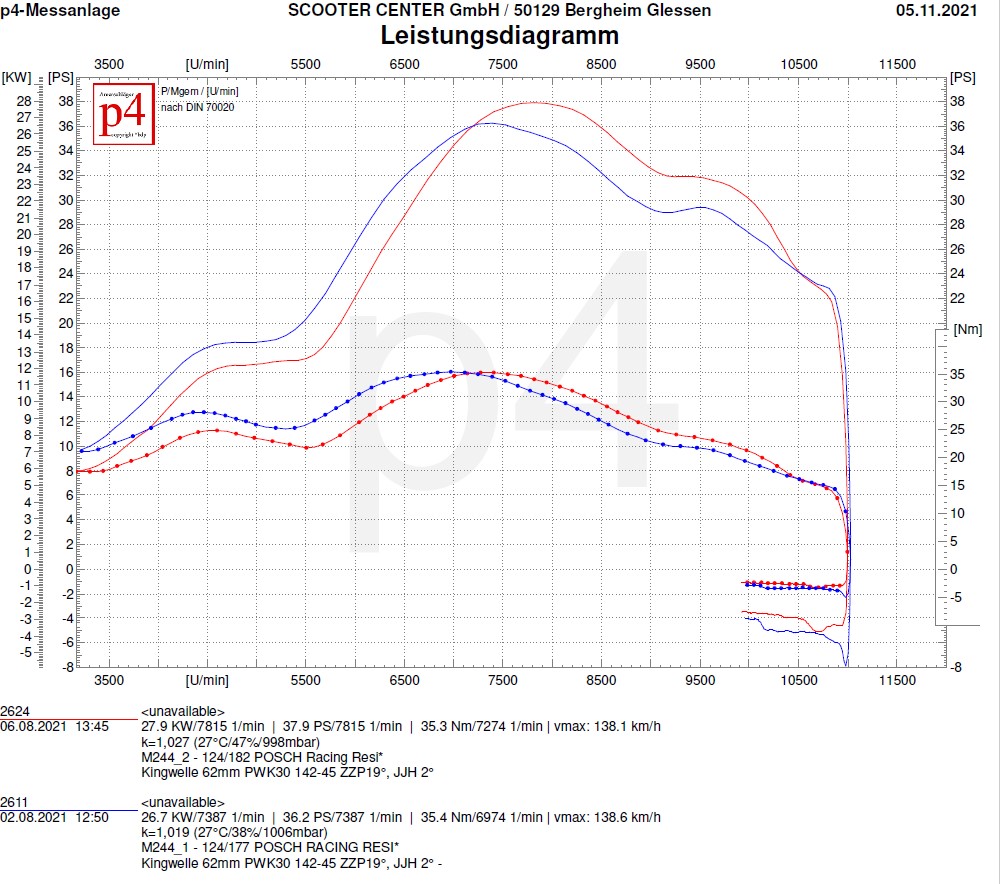
The Racing Resi taste the changes better. Rather devoted to the higher control angles, the Resi develops one more horsepower at the top and adds torque, which hardly affects the bandwidth on the 25hp line. In absolute terms, the Resi holds the position of the highest peak power with 38.9 hp in this level. We are slowly approaching the 40hp mark with the expansion stages.
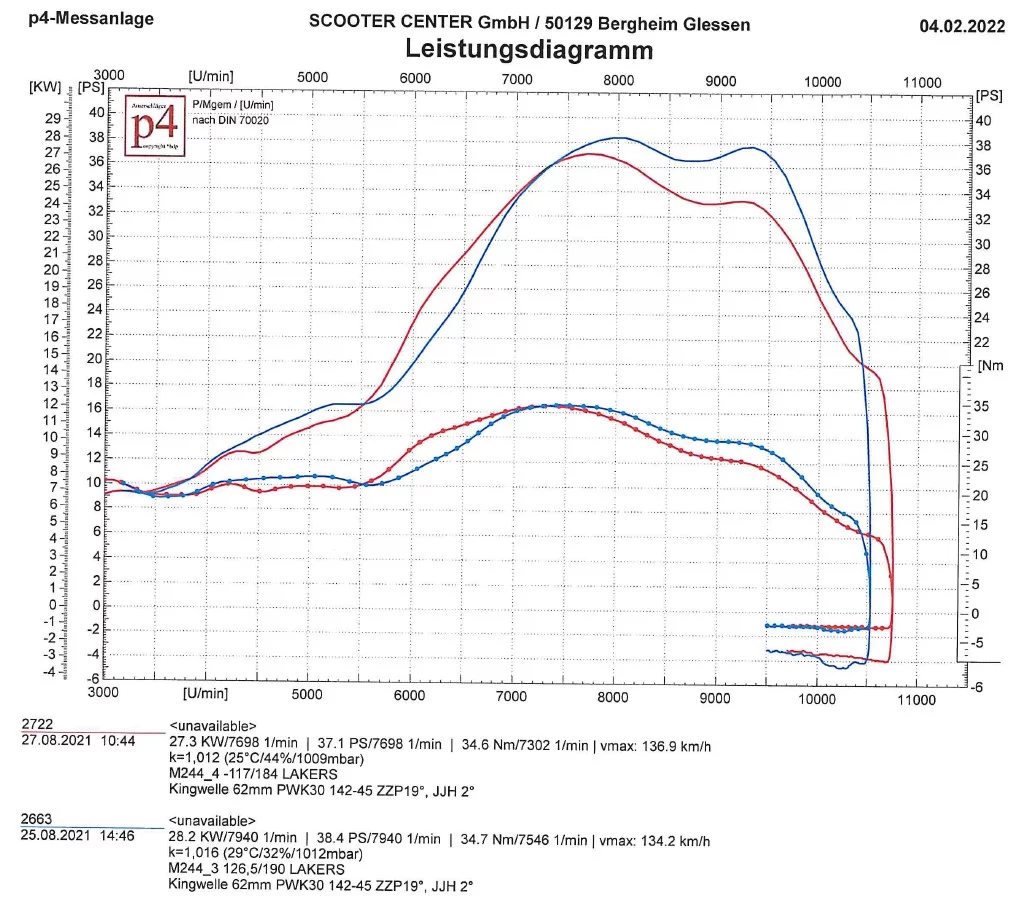
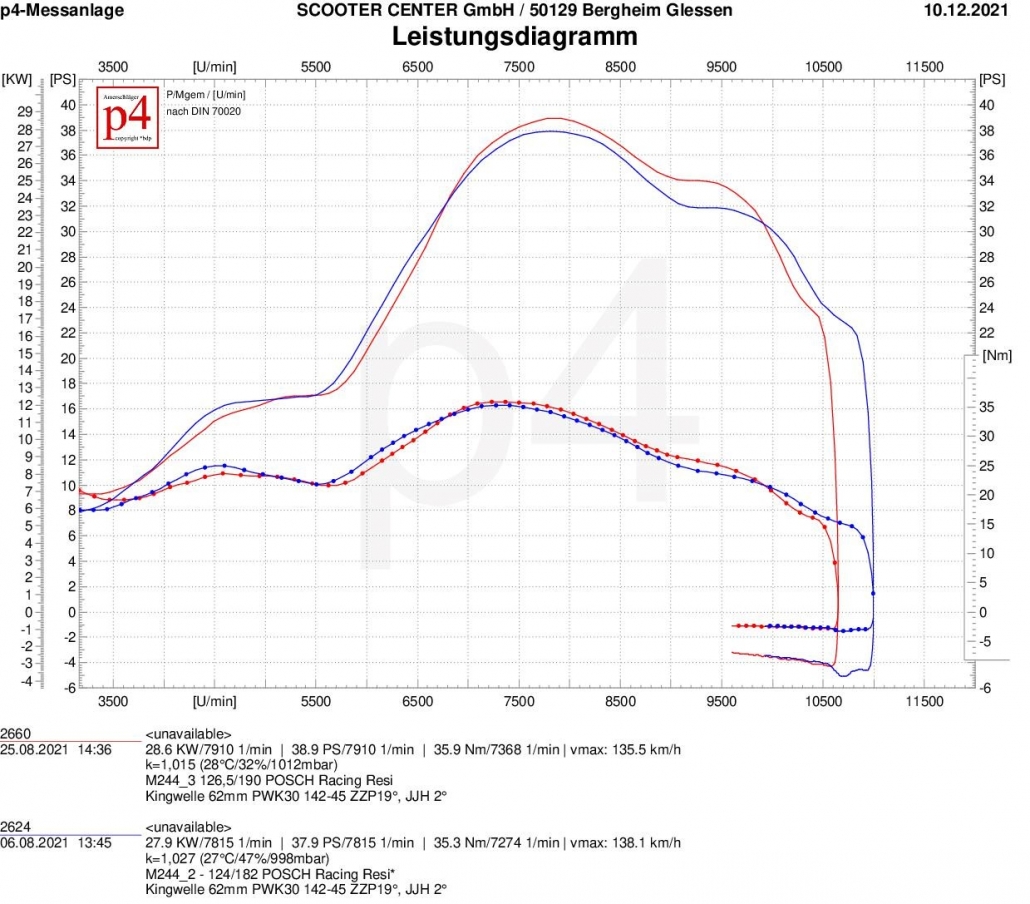
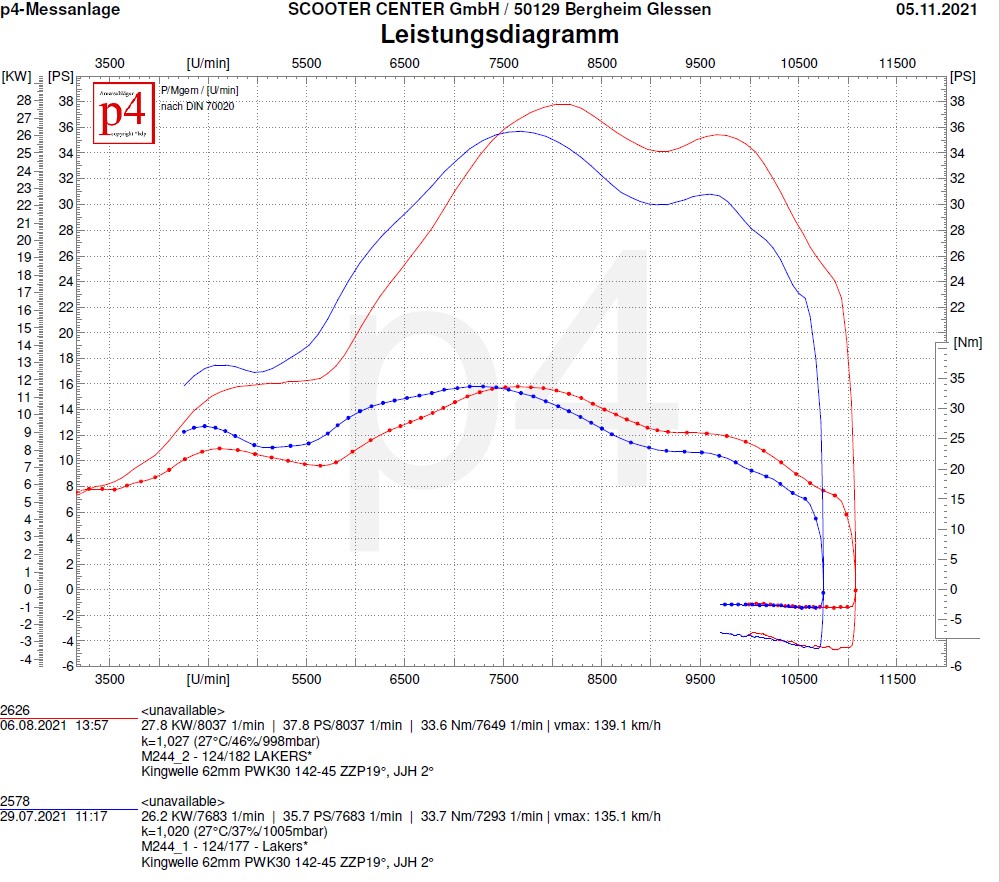
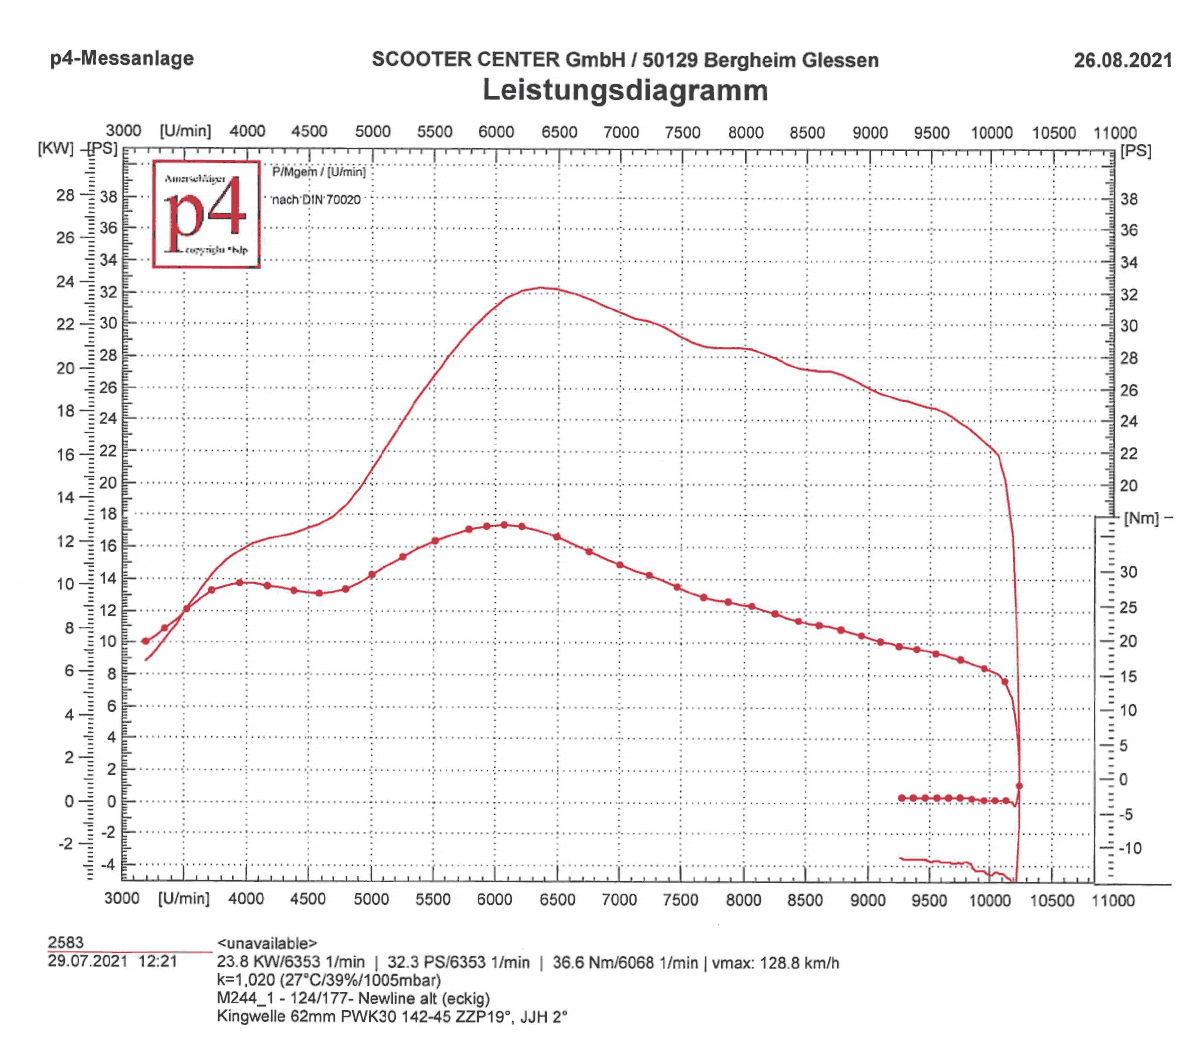
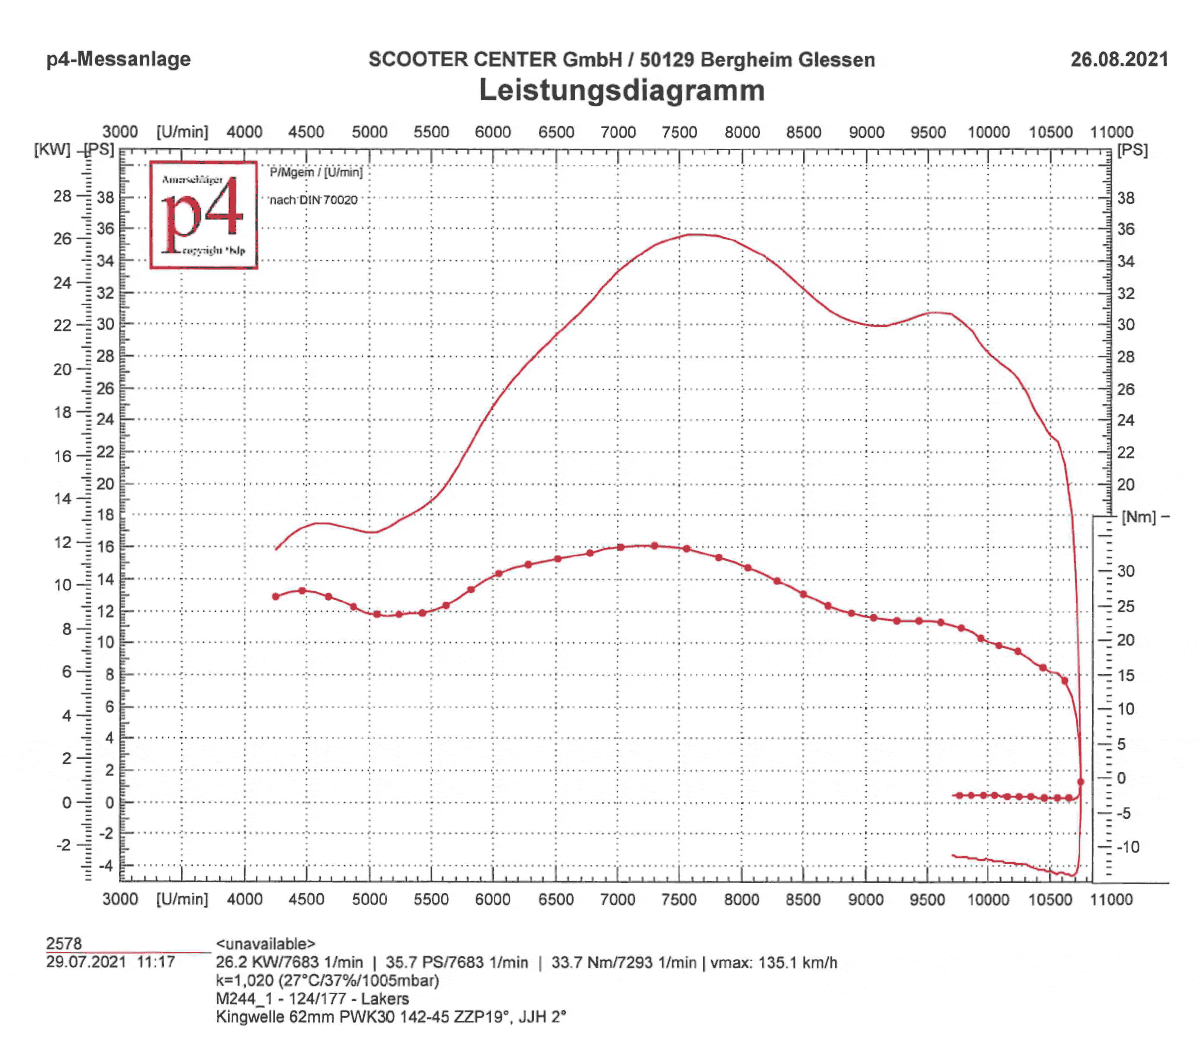
With 126° to 190°, the Lakers are not yet playing in their comfort zone. Although it also clearly converts the changed control angles into performance. With 38.4 hp at the top, it is only just behind the Resi. With a speed range of 3700 rpm, which already extends to 10.100 rpm, the Lakers shows where the journey can go with suitable peripherals.
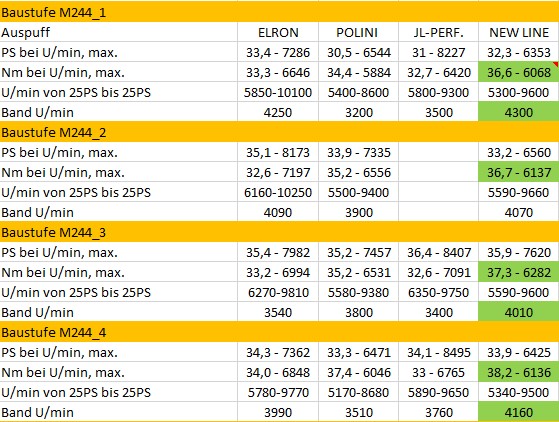
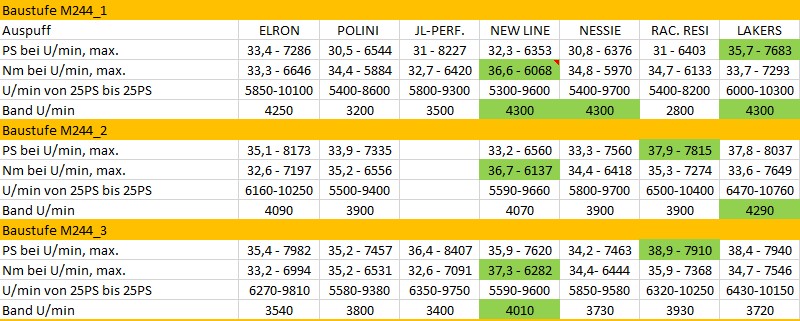
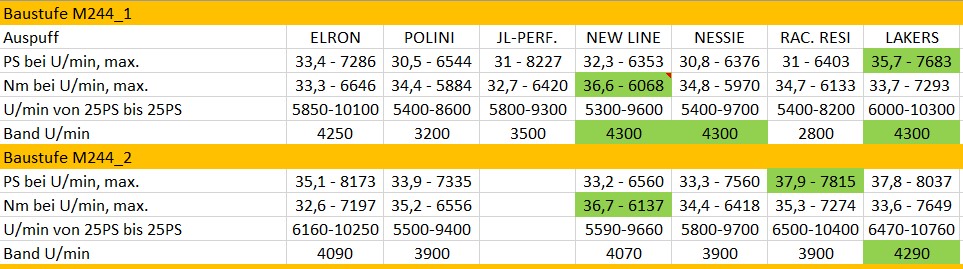
Here is an overview of the results. Best values are highlighted in green.
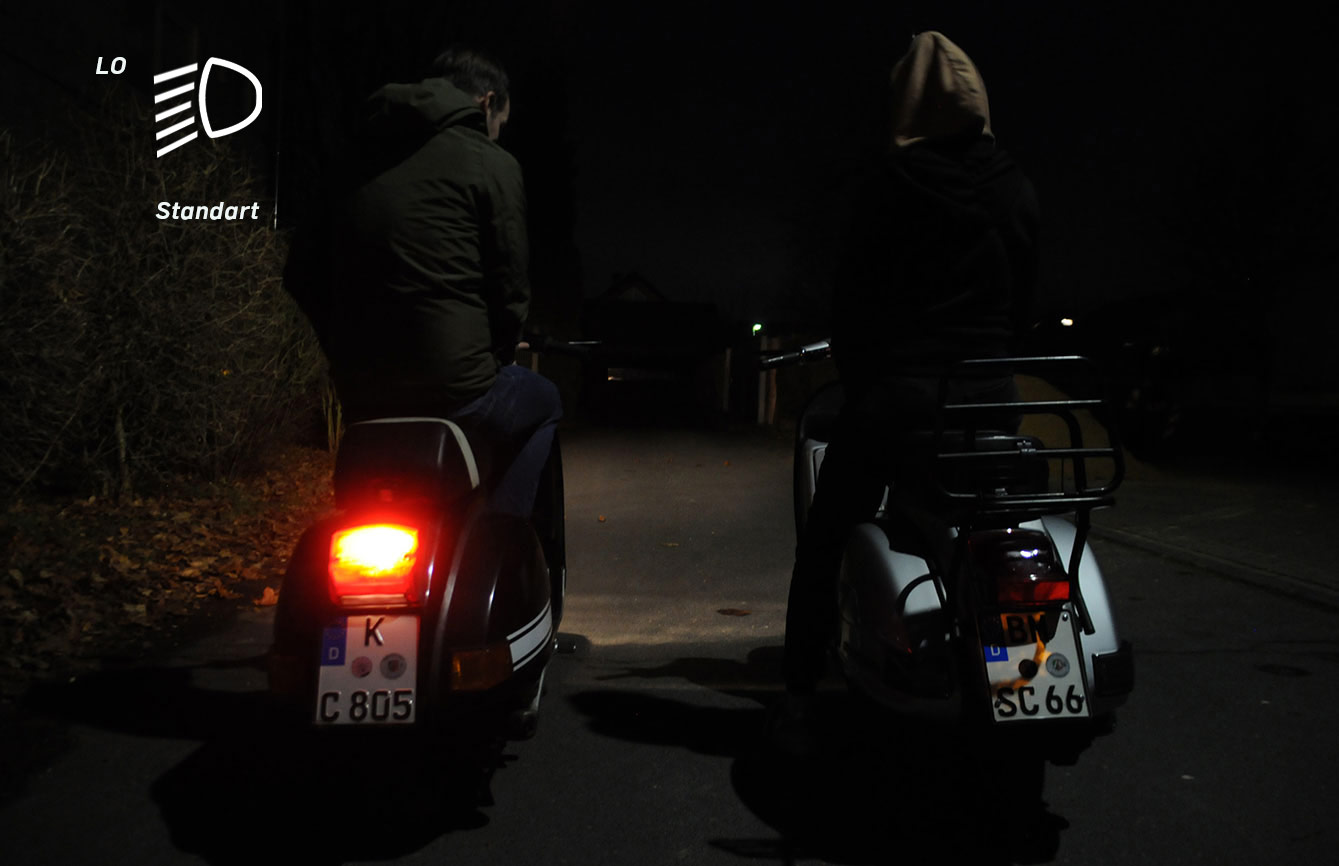
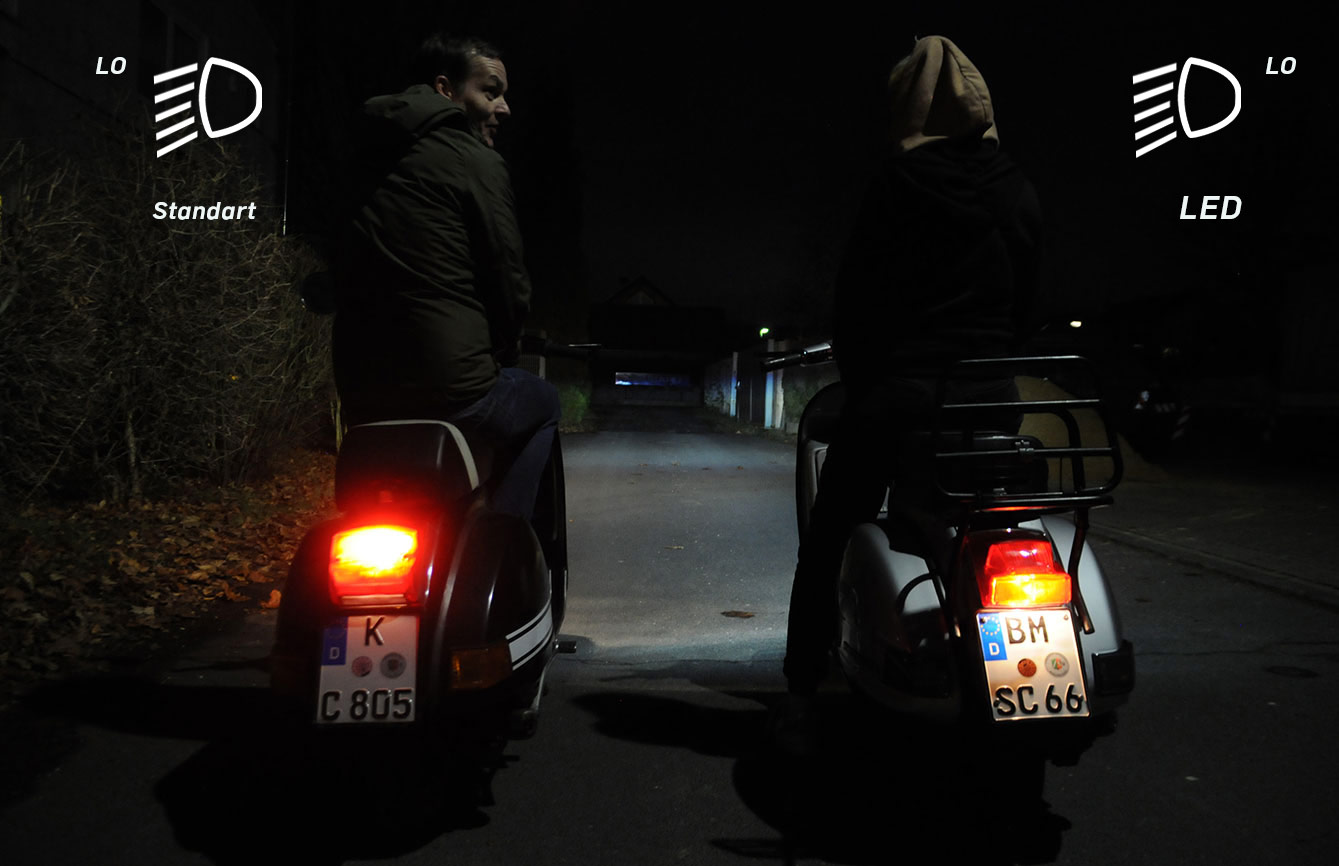
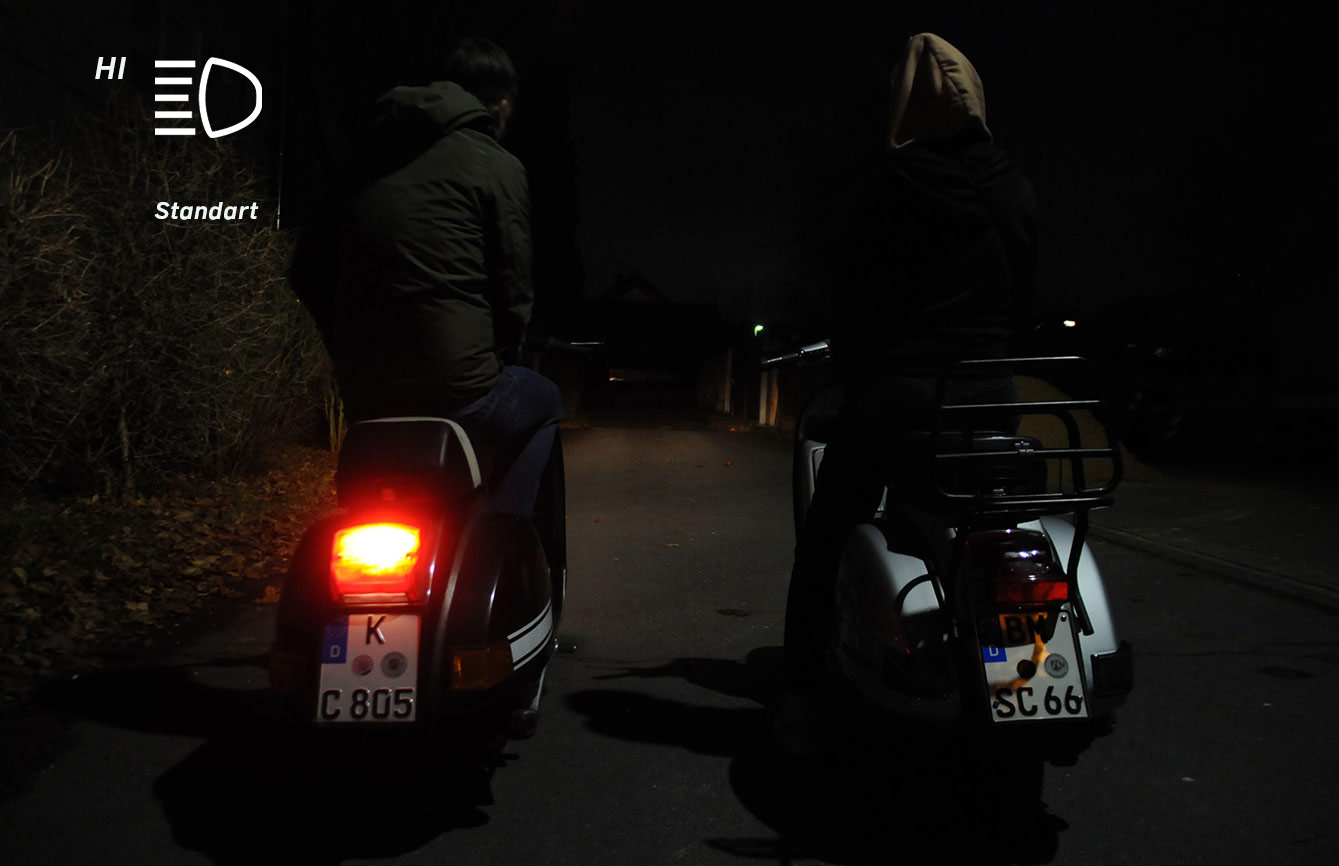
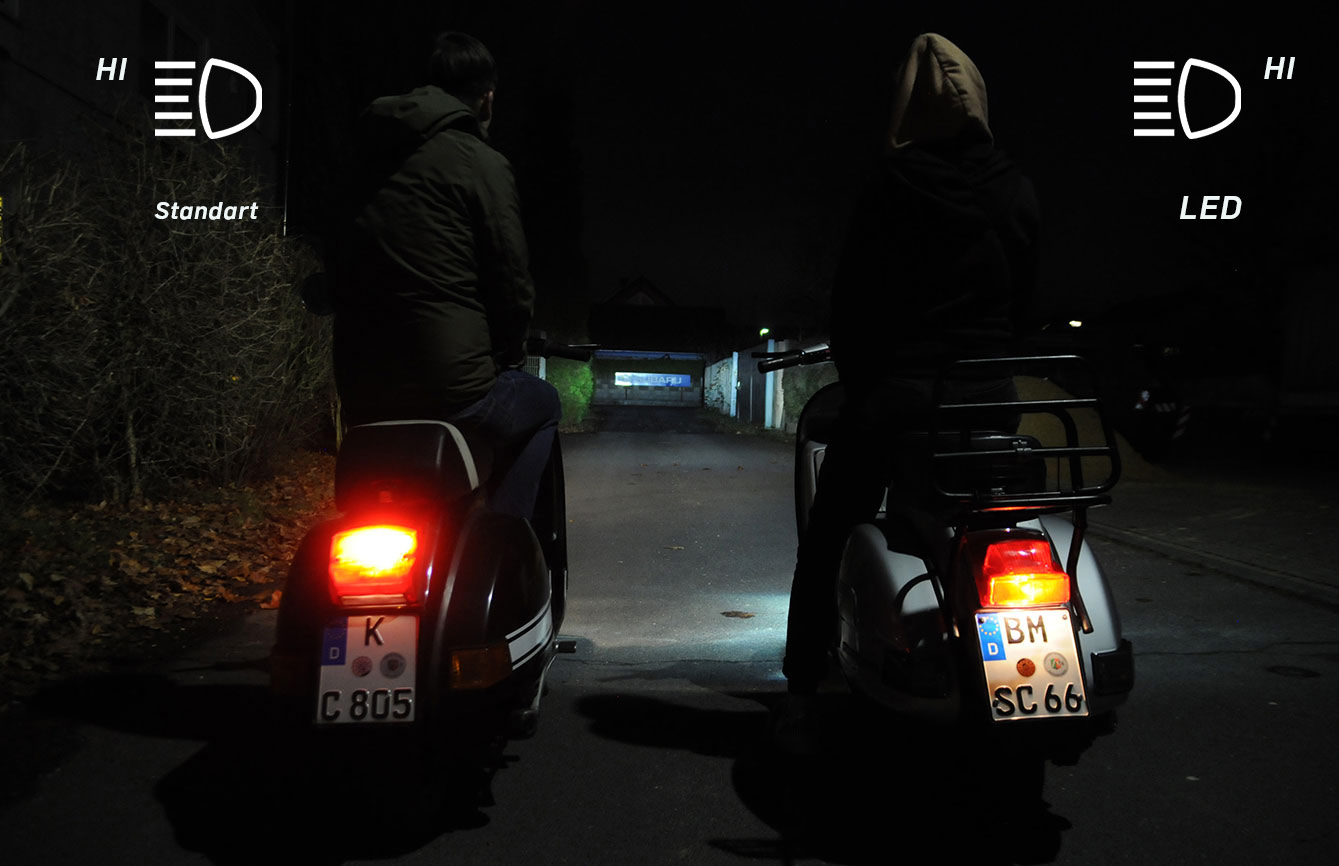
For most scooters, the limit with conventional Bilux light bulbs is a headlight bulb with 45/45 W. The ignitions, which are usually 80 W to a maximum of 120 W, do not provide any more. The luminosity is measured in lumens below 400. The LED headlight has a luminosity that is three times as high (1300 lumens). The power consumption is only 20 W. This corresponds to the light output of a conventional 100 watt spotlight. With a given alternator / power supply, a considerably better illumination can be achieved. In addition, there is more capacity for other consumers.
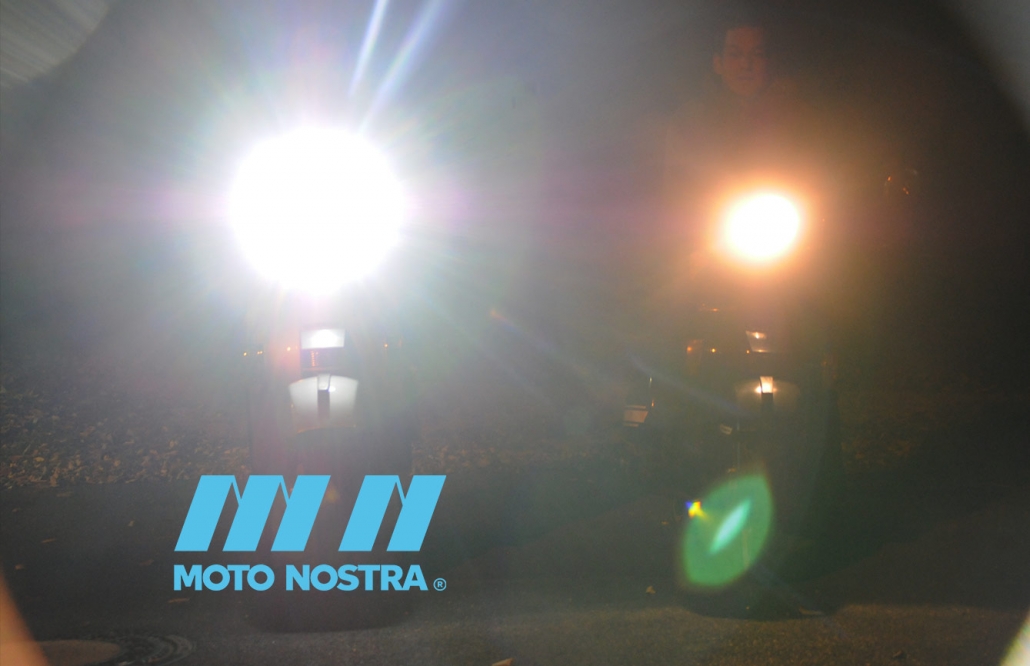
Evening light, high beam, what is the difference between the LED and standard light?
Parts used in this video:
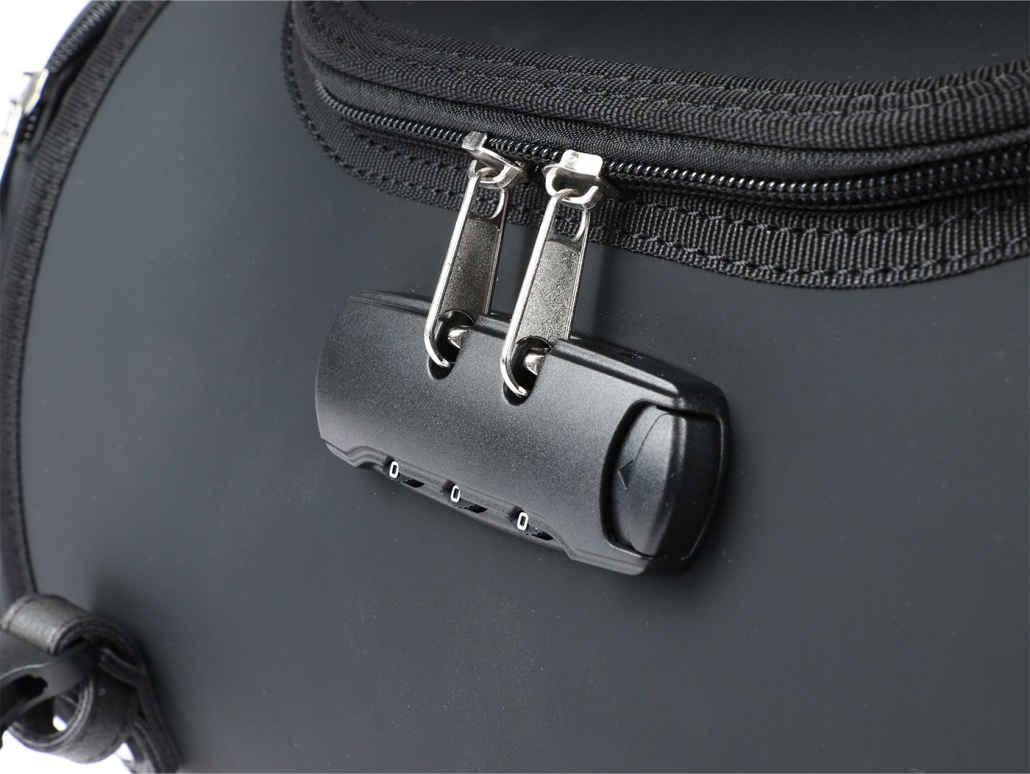
NOTE
The LED headlight works exclusively with direct current, so it requires a battery or another equivalent power source with 12V DC. Operation on an alternating current voltage source leads to an immediate defect.
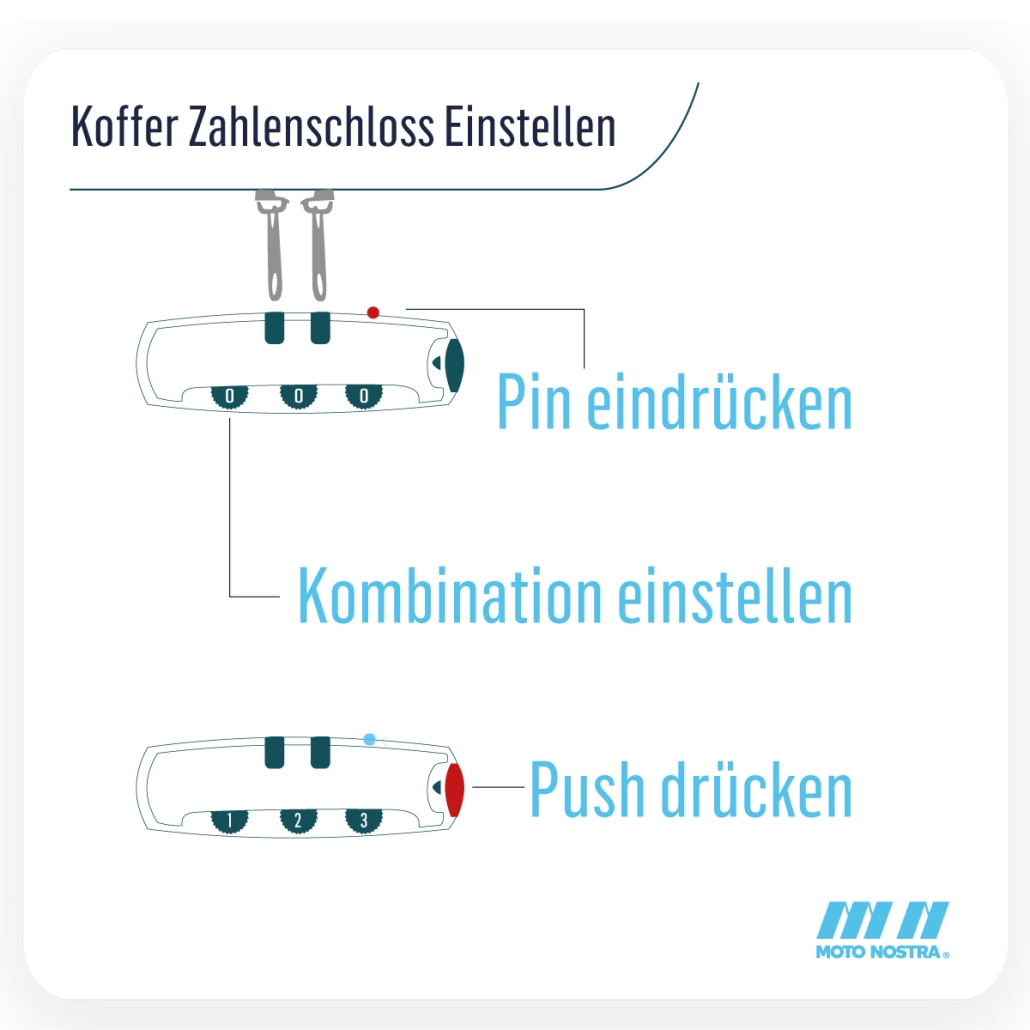
Assembly instructions for Print out as PDF
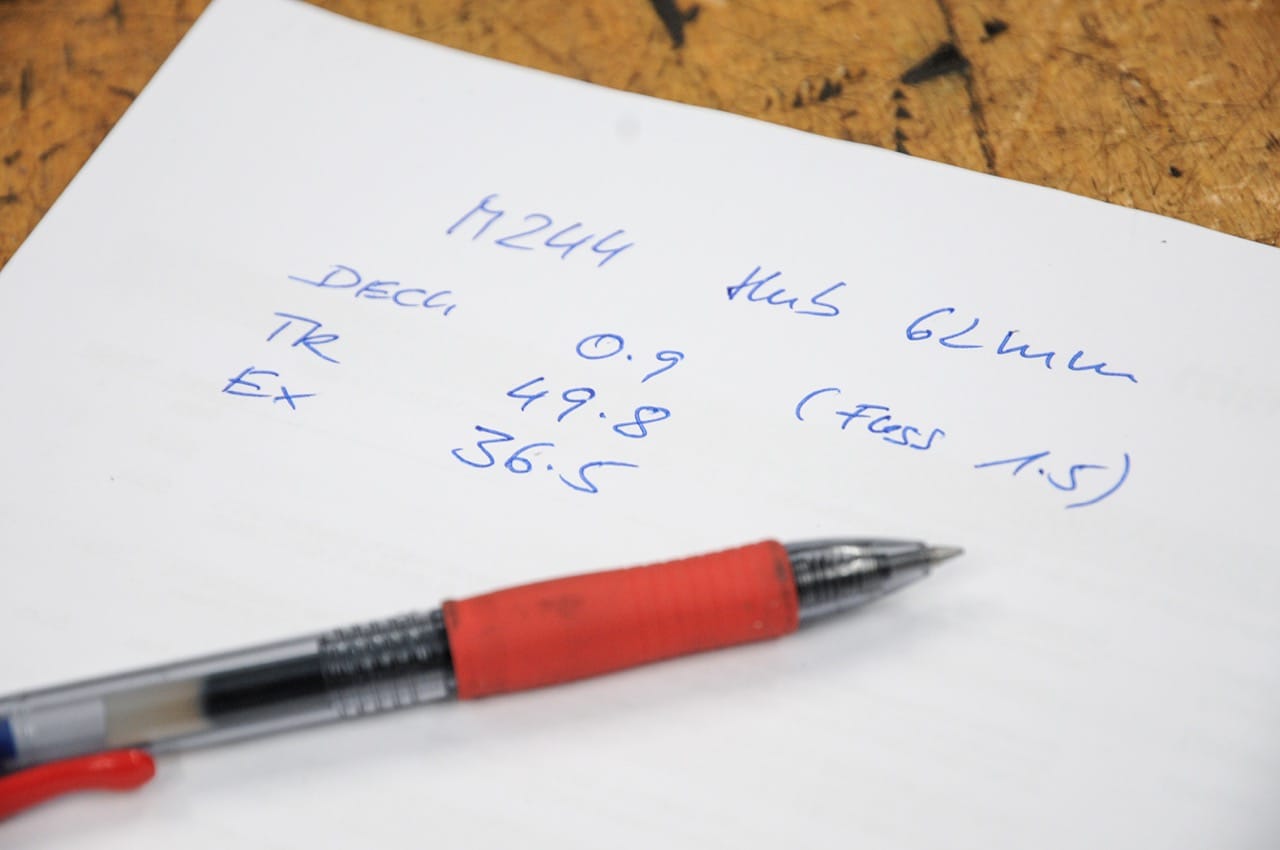
M244 - part 3
Im second part this Series we simply adapted the cylinder and the engine housing to each other and put the cylinder on the engine without further processing "Plug & Play".
This resulted in very moderate control angles:
Some exhaust systems get along well with these short steering angles and thus provide quite astonishing performance.
On the other hand, the exhaust systems, which are trimmed more for performance, require larger steering angles.
In the course of the test series, the character of the performance curve of one or the other exhaust system will change.
Therefore we remove some material from the M244 in the exhaust duct and set the upper edge of the exhaust to 182 °. The outlet width remains unaffected and remains at a chord dimension of around 57%.
As a spacer, we use 1.5 mm on the cylinder head and the cylinder base plus a 0.3 mm seal on the cylinder base. This means that the control angles remain at 124 °:

In the meantime we have also received a matching cylinder cooling hood from GRP specialist BSK. You can find the blog here -> QUATTRINI GRP CYLINDER HOOD
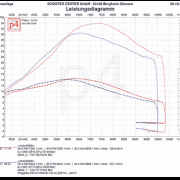
The Elron uses the larger steering angle rather cautiously. With a 1,7 HP increase in peak performance, a slight loss in torque and a little less band due to the 300 rpm later entry, the exhaust shows that it takes note of this requirement but does not yet represent the right playing field for the concept . However, the Elron takes this very calmly. Presumably, the exhaust will deliver a very pleasing performance curve even with significantly different control angles and thus the concept does not completely submit to the dictates of the control angle.
Test bench diagram as PDF: M244_1_2_ELRON
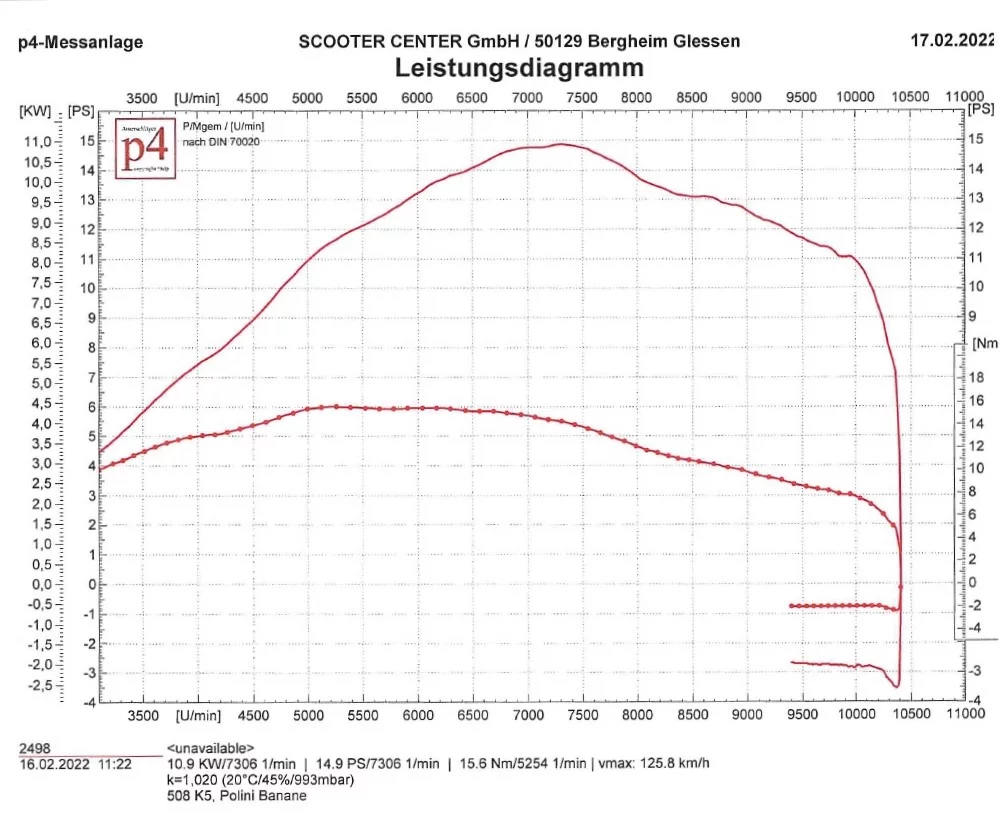
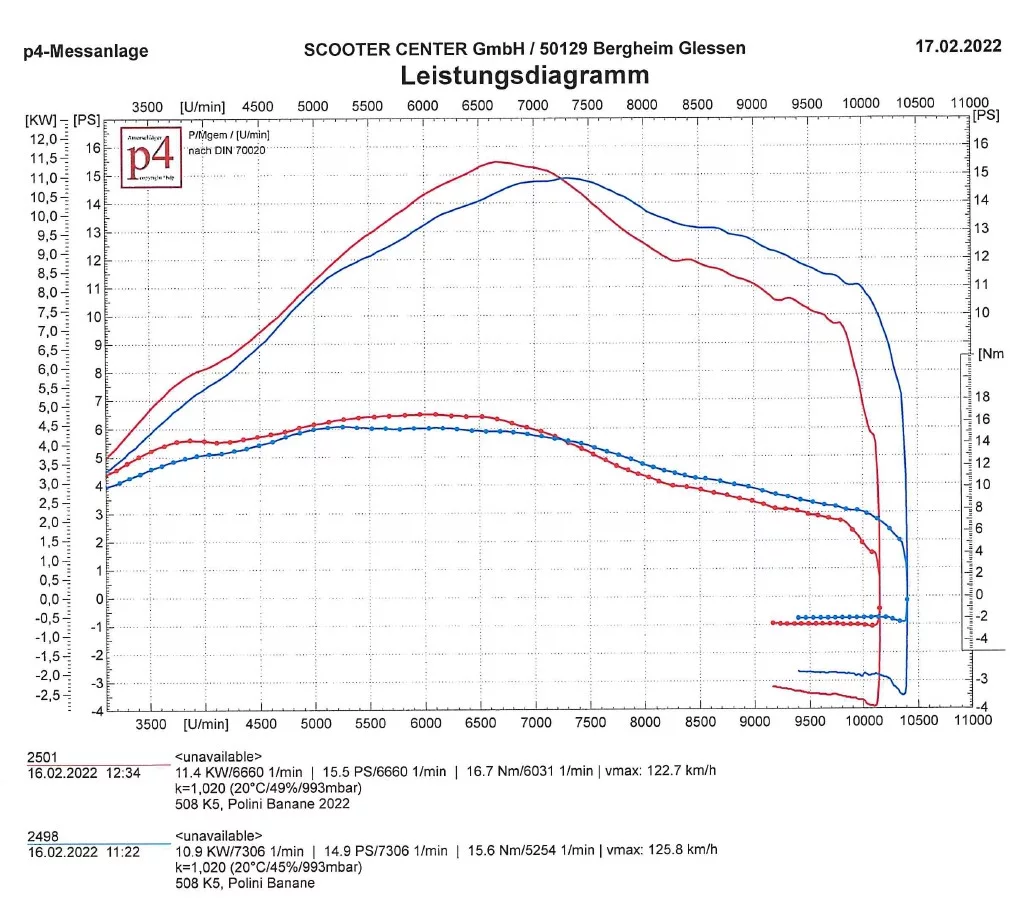
The Polini Box reacts very clearly to the small change in the outlet and provides a lot of power. The box adds over 3PS and not quite 1 Nm. The speed range is even wider by 700 rpm, whereby the graph does not even pass the 100 hp mark at 25 rpm until 5.500 rpm later and the output lasts significantly longer up to 9.400 rpm. The control angles of 124 ° to 182 ° seem to be clearly pleasant to the Polini Box.
Test bench diagram as PDF: VGL_M244_1_2_POLINI
The Newline generally shows a different character in terms of power increase at small steering angles than the Elron or the Polini Box.
Similar to the Elron is the rather unimpressed behavior on the changed exhaust control angle. The peak power increases by almost one hp, the maximum torque remains almost identical and the speed range becomes somewhat narrower, as with the Elron, due to the later start of resonance. Even in the second expansion stage, the Newline retains the top position when it comes to torque with 36,7 Nm at 6.137 rpm.
Test bench diagram as PDF: M244_1_2_NEWLINE
The Nessie, like the Newline, is intended for moderate control angles, and also shows the clear shift at the start of resonance. Viewed in absolute terms, the Nessie “only” adds 2,5 HP to the top, but in the range between 6.300 rpm and 9.000 rpm it can be clearly seen that the larger outlet angle significantly increases the performance over this range.
Test bench diagram as PDF: M244_1_2_NESSIE
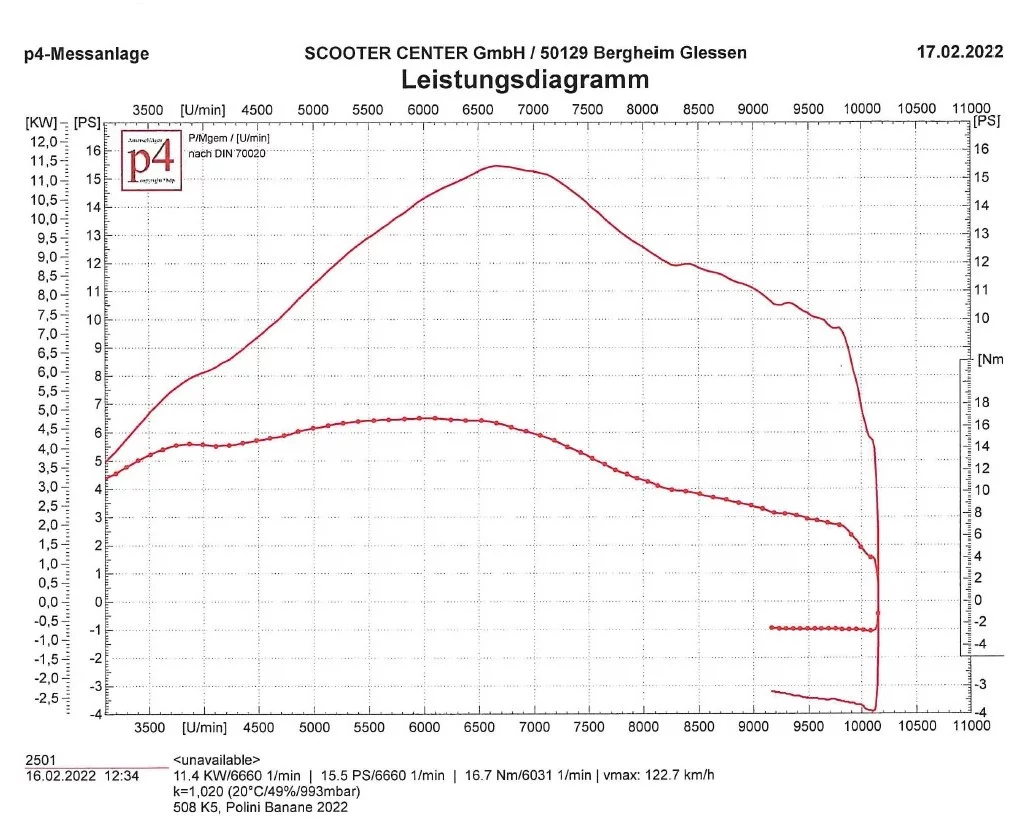
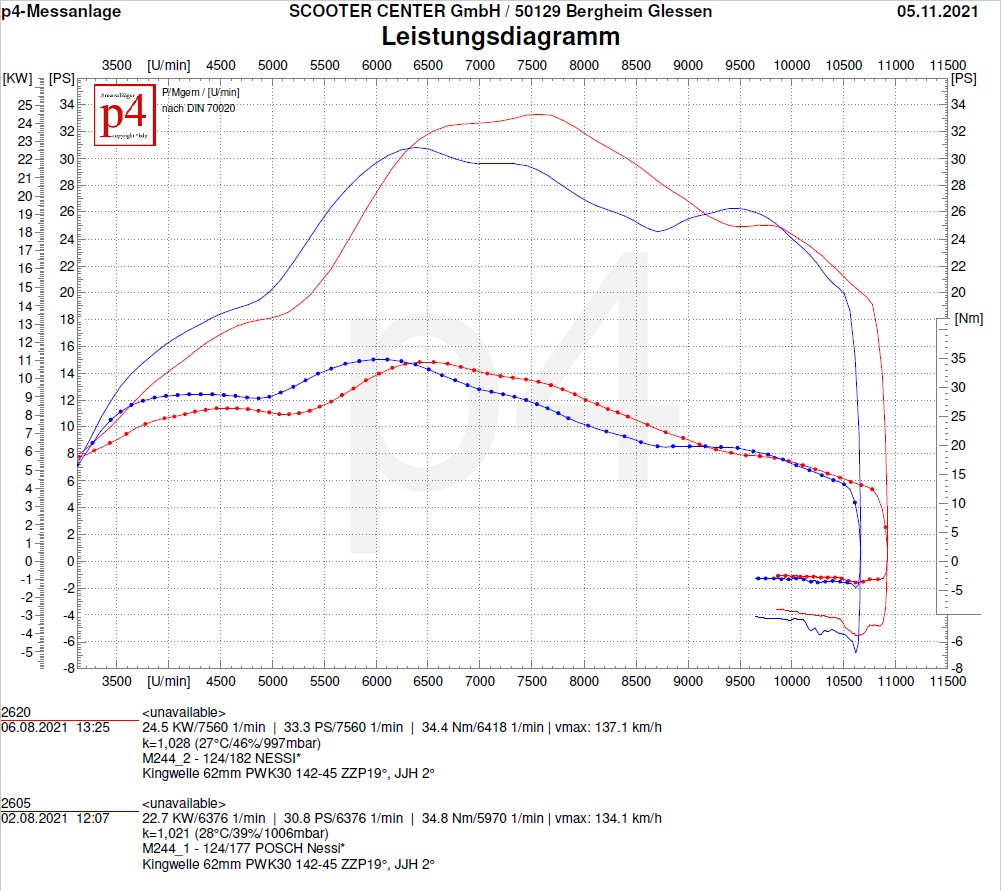
The Racing Resi with its imposing, bulbous appearance already gives the impression of performance and the greed for steering angles. Therefore, the slightly increased outlet angle is not enough to achieve absolute top performance. Here, too, the start of the response is much later. At its peak, the Resi increases by 1,7 HP and this can use the slightly increased exhaust control angle between 7.300 rpm and 10.000 rpm to increase power and torque.
Test bench diagram as PDF: M244_1_2_RAC_RESI
The robust racing exhaust from Lake Constance has already shown on the plugged-in version of the M244 that it is also a good all-rounder. As with all other tested resonance systems, the speed range also shifts in the direction of higher speed, but without the bandwidth being affected. With a band of almost 4.300 rpm, it provides the largest bandwidth in this expansion stage. With 37,8 PS at its peak, the Lakers, at least in this expansion stage, has to admit defeat to the Resi with 37,9 PS - but we are only just warming up on the subject of the steering angle.
Test bench diagram as PDF: M244_1_2 LAKERS
Here again the results in tabular form. The best values are highlighted in green for each construction stage
Part 4 is already in progress ...
This is part 2 of this Quattrini M244 - Series. In this first construction stage, M244_1, we have the M244 without any further changes, only with spacers on the cylinder head and the cylinder base our engine eingerichtet.
We have entered the resulting control angles in the list for the test plan.
In terms of design, this setup is in the middle of the range of expansion stages.
First we send the all-purpose weapon from Polini into the race.

Test bench diagram POLINI BOX exhaust on Quattrini as PDF: M244_1_POLINI
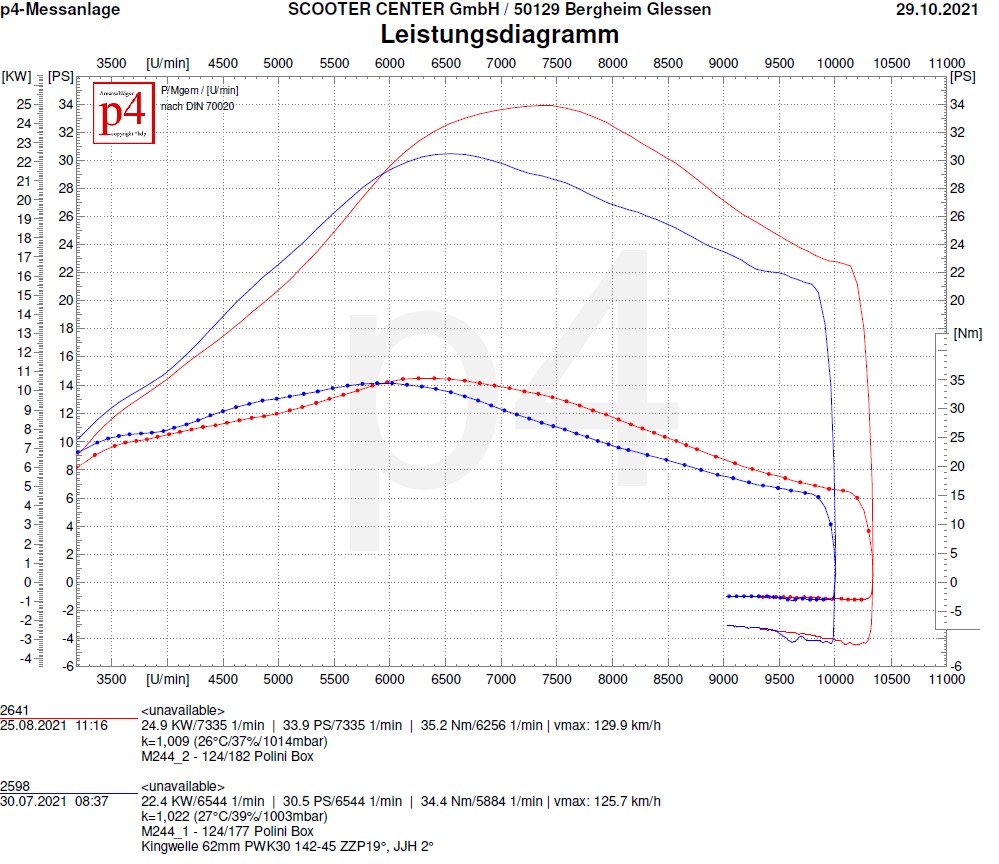
The result is quite clear. Already at 4000rpm there are 15 HP and 26Nm on the rear wheel.
The maximum values are 30.5PS at 6500rpm and 34.4Nm at 5900rpm.
Even at 9500rpm there are still 22PS on the rear wheel. This constellation already calls for a longer primary translation.
The next test subject comes from FalkR and listen to the name Elron's.


Test bench diagram FALKR ELRON exhaust on Quattrini as PDF: M244_1_ELRON
With regard to the maximum values, the Elron ranks as real resonance exhaust already above the Polini Box. But the tide is turning only beyond the 6500rpm in favor of the Elron. In the range before 6500 rpm, the Polini Box has the lead here. After passing the 6500rpm mark, the Elron gains significantly and is above the Polini Box up to the end of revs beyond the 10500rpm.
Another old friend is that JL performance.

Test bench diagram JL-PERFORMANCE exhaust on Quattrini as PDF: M244_1_JL_LH
The somewhat outdated concept of the JL still delivers reliable values today. The JL does not cope with the first stage of the engine quite as well as the Elron. With 31PS at 8200rpm, that's something like suffering at a high level. The rather gentle entry and a good performance of 16PS at 4000rpm make the JL a very drivable exhaust with a good start in Reso optics.
The Newline exhaust from Scooter & Service is with us in Scooter Center Shop .

Test bench diagram NEWLINE exhaust on Quattrini as PDF: M244_1_NEW_LINE
The new line from Scooters and Service from Hamburg already delivers its maximum power of 6300PS at 32rpm. Even if the playing field doesn't quite fit the Newline, which would like to see a little more steering angle, the manual work from Hamburg delivers a remarkable 6000Nm already at 36rpm. The torque beast in this expansion stage
As the first representative of the "Performance" department, we let Nessie from Posch Performance work on the M244.


Test bench diagram NESSIE - POSCH exhaust on Quattrini as PDF: M244_1_POSCH_NESSIE
Until just before 6500rpm, the world is pretty fine for the Nessie. Then the curve takes a course that suggests that the Nessie would like to see significantly more outlet angles.
Nevertheless, the Nessie with 34.8Nm at approx. 6000 rpm can be counted among the clearly high-torque systems.
Of course we also tested the Racing Resi from Posch Performance.


Test bench diagram RACING RESI- POSCH exhaust on Quattrini as PDF: M244_1_POSCH_RAC_RESI
The Racing Resi from the same manufacturer runs very similar to the Nessie and also requires more ventilation over longer control angles. With almost 35Nm at 6100rpm, the Resi is also well ahead in the league of absolute torque animals.
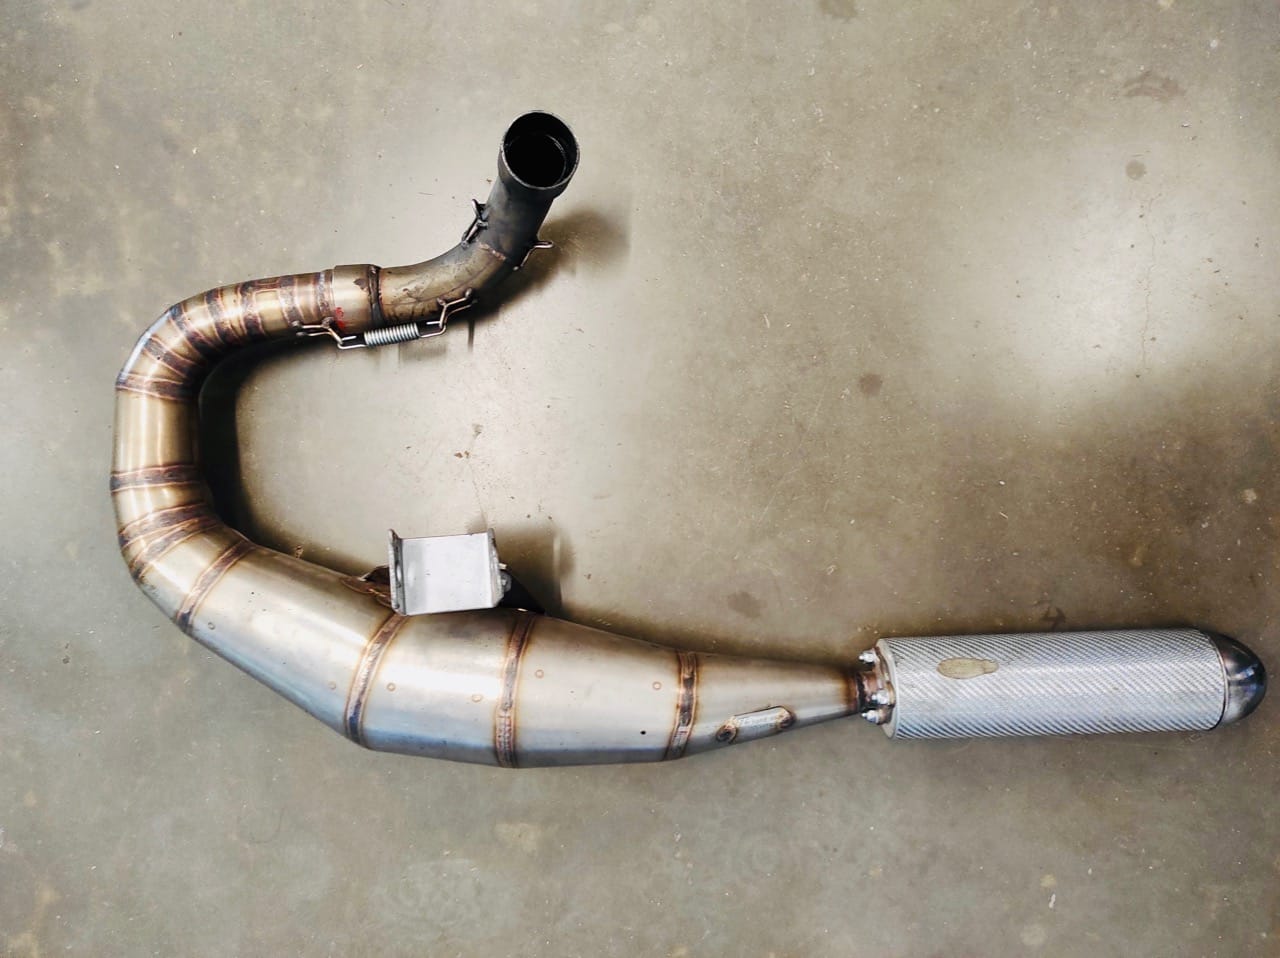
The Lakers as a thoroughbred racing exhaust, stands well in the feed despite the high performance and engine speeds to be expected with the low control angles.
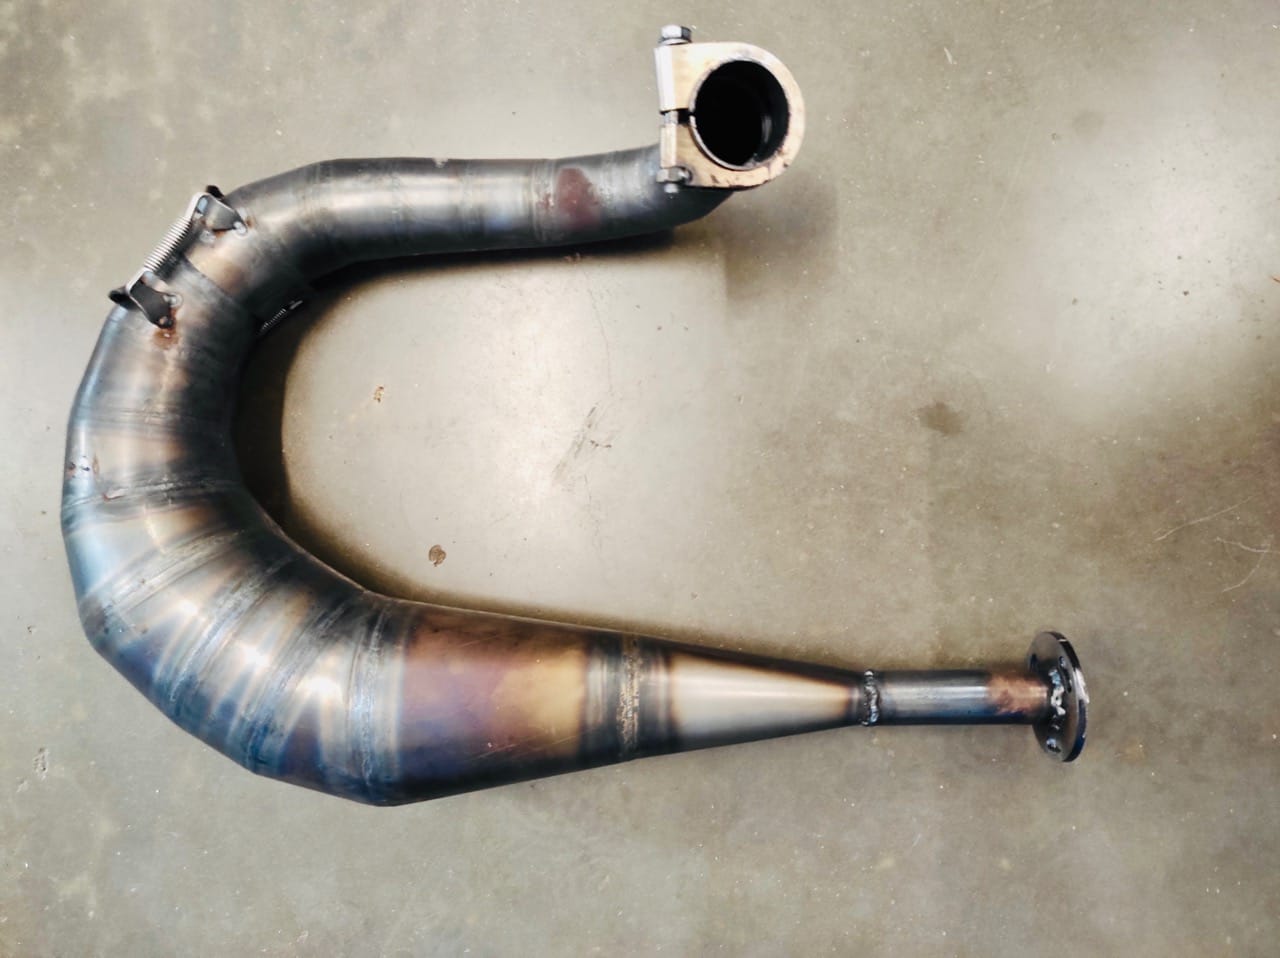
Test bench diagram KINGWELLE LAKERS exhaust on Quattrini as PDF: M244_1_LAKERS
With almost 36PS at 7700rpm, it is the front runner in terms of performance in this expansion stage.
In the later expansion stages, when higher control angles and a wider outlet come into play, this exhaust can probably live out much better.
Quattrini cylinder M244 in the first construction stage, M244_1 "Plug & Play" without further changes only with spacers on the cylinder head and on the cylinder base on the Malossi engine and Kingshaft crankshaft adapted.

Be curious to see how the second expansion stage will continue ...
Towards the end of 2015, rumors grew that Max Quatrini launches a potent cylinder for the PX200.
The time has come at the beginning of 2016. The M232 and the big brother M244 are available on the market.
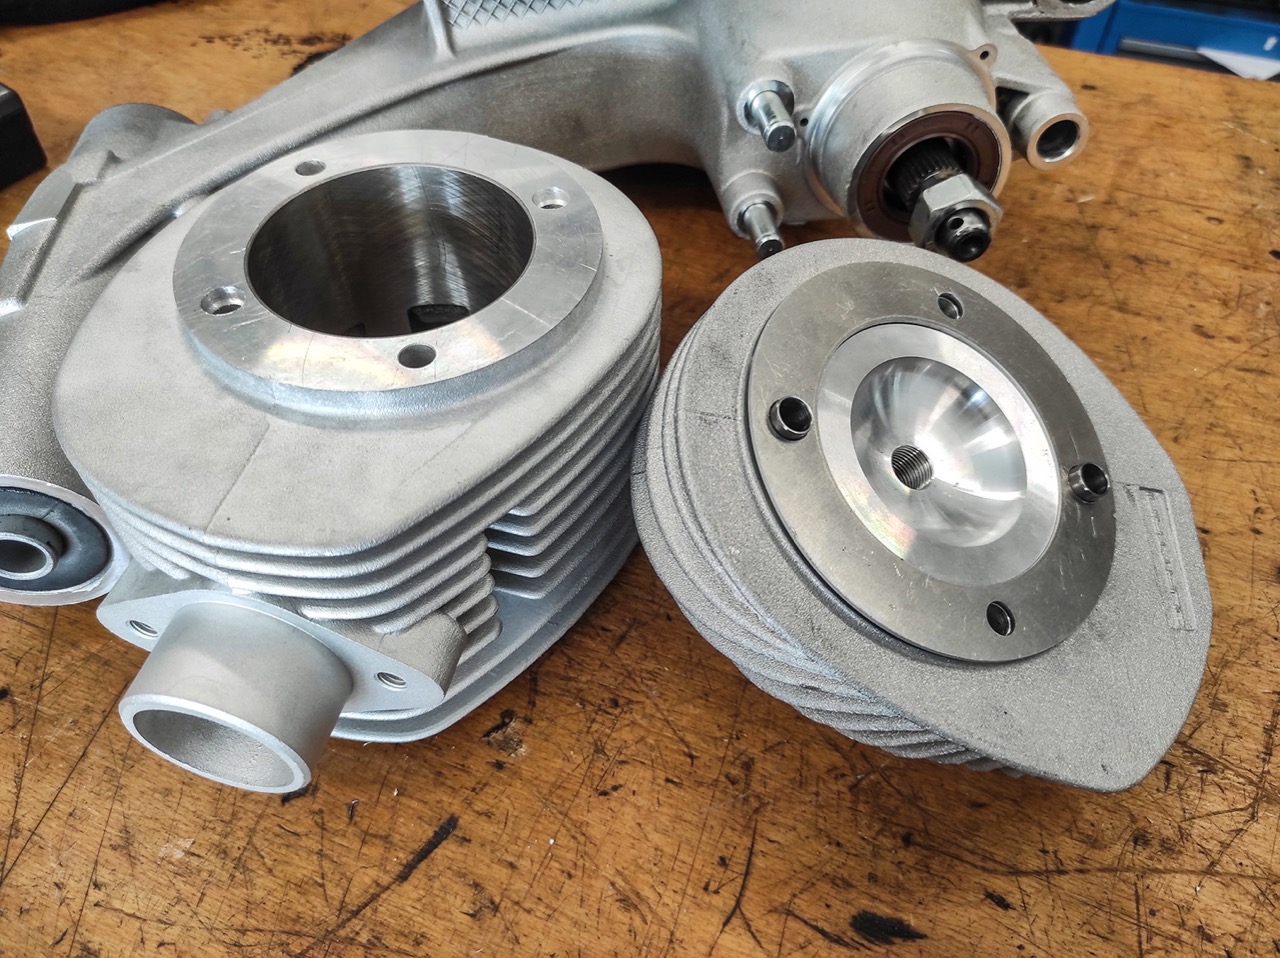
A construction that took some getting used to seemed to follow the concept, a cylinder with a maximum bore of 72mm in the M244 and without a supporting cylinder base.
Due to the design of the crankshaft by Quattrini, with a connecting rod of 126mm, which is rather long for the Vespa engines, the piston does not work so deep in the engine housing and therefore does not need a long, classic cylinder base.
Today, in 2021, the cylinder is enjoying increasing popularity due to its very high torque values and the smooth-running design thanks to the long connecting rod of the Quattrini crankshaft.
Reason enough for us to build an engine with it and play through many possible scenarios for you and see what comes out of it. We have tested exhaust systems and carburettors for you in various stages of expansion.
In the delivery note attached here for our technology department, you will find all the components that we have used for this engine and that, in our opinion, function permanently with this concept.
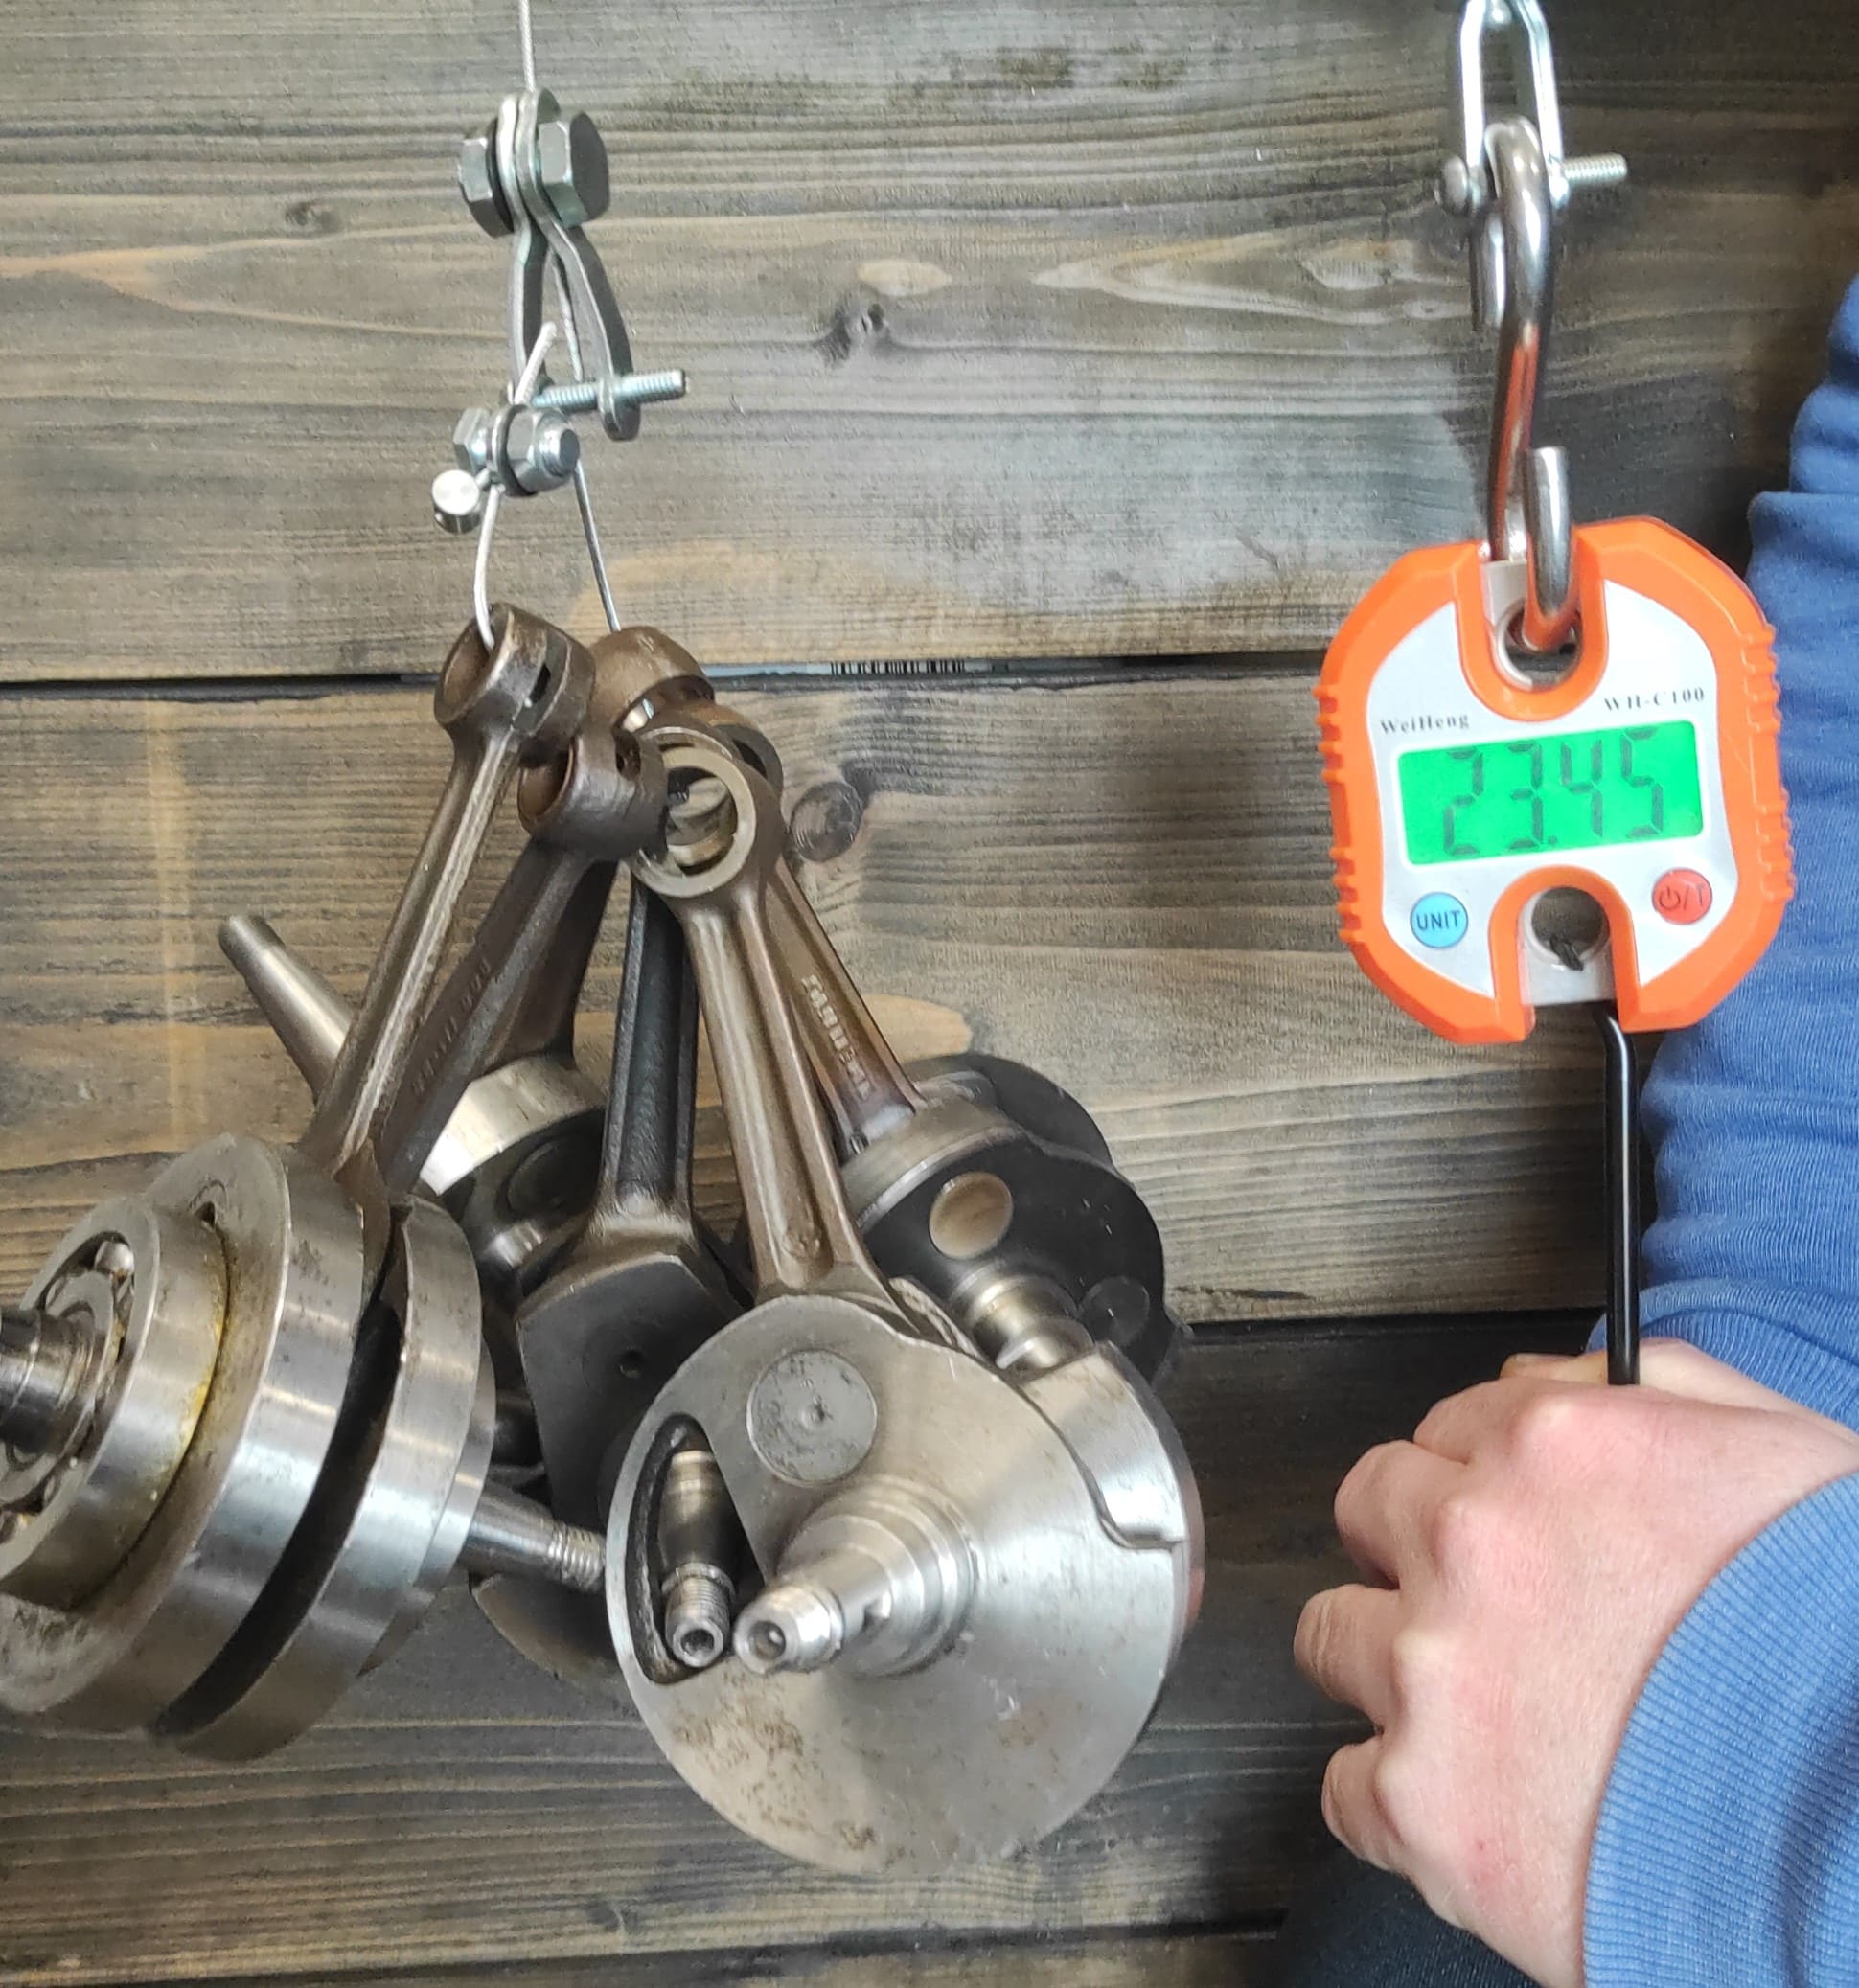
In total, we have over 200 test runs with the Quattrini M244 Completed on our P4 test bench with various engine expansion stages. We have more than 50km measured runs documented and almost 20 liters of fuel burned.
We would like to share the experiences gained from this test with you in this blog series.
The expected high torques of the M244 speak in any case for a reinforced motor housing.
The experience from many kilometers on the road with our own scooters has taught us that engines in the range from 22 to 25 HP can be implemented as "durable" in conjunction with a Piaggio engine housing.
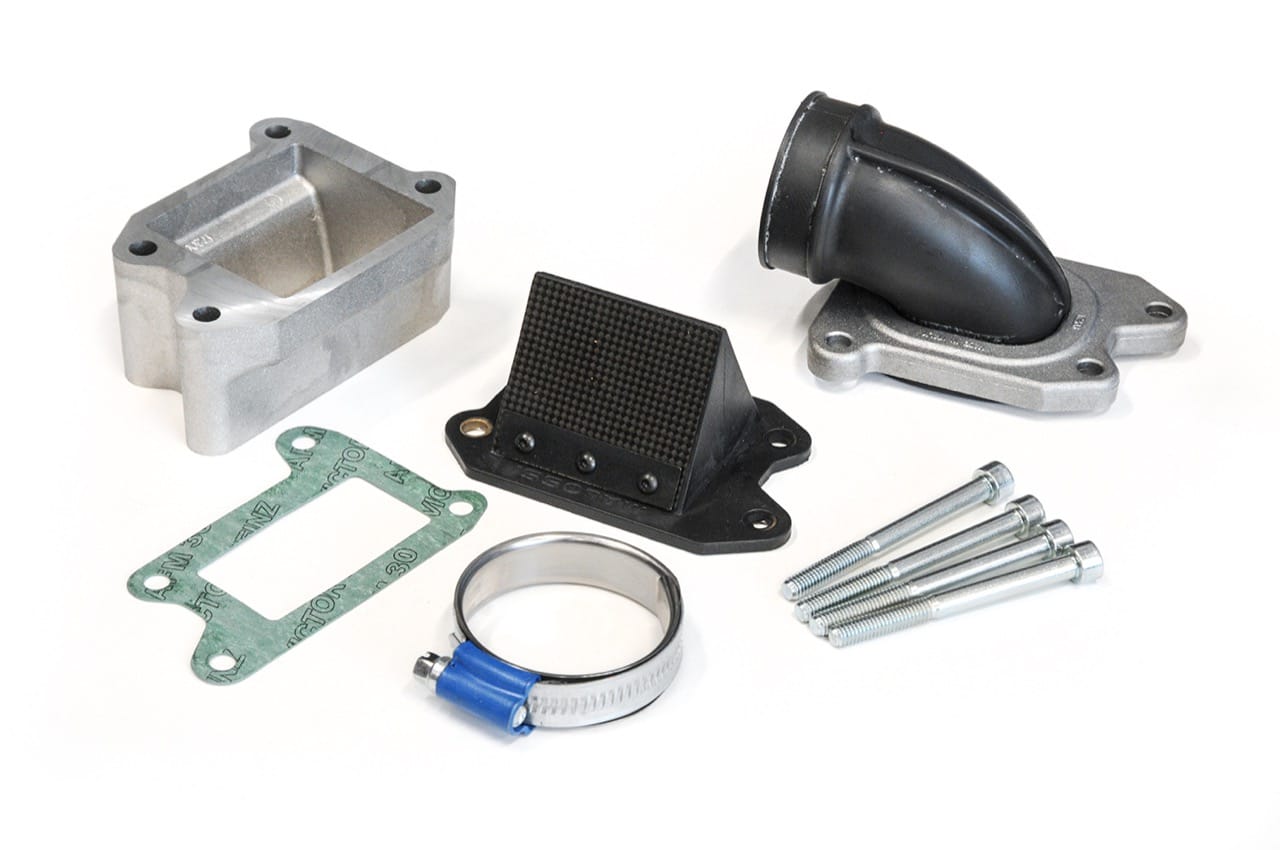
Our M244 Quattrini cylinder but should be expanded a bit in the course of the test. This is why the choice here is a motor housing from Malossi with membrane inlet.
A pair of Displacement of over 220ccm at erhigher engine speed, can no longer be supplied with sufficient fresh gas via a classic rotary valve on the narrow Vespa crankshaft. That's why we choose this Malossi motor housing with membrane control .
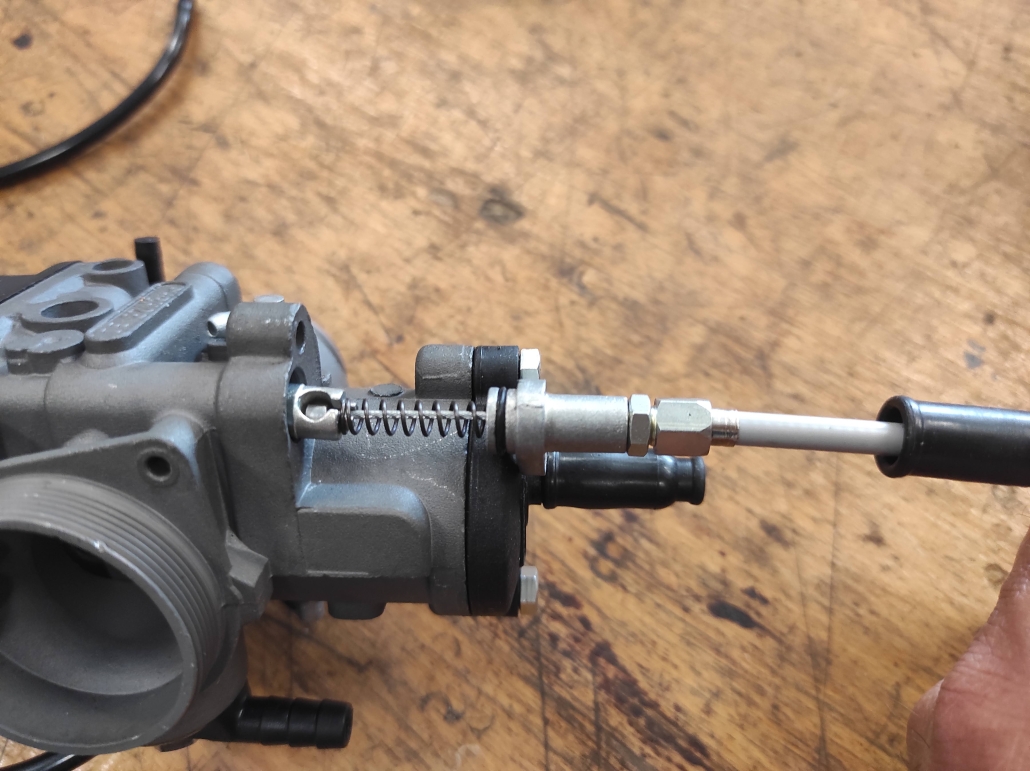
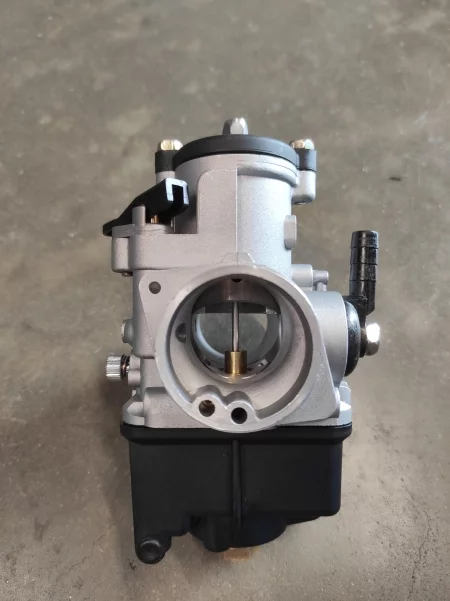
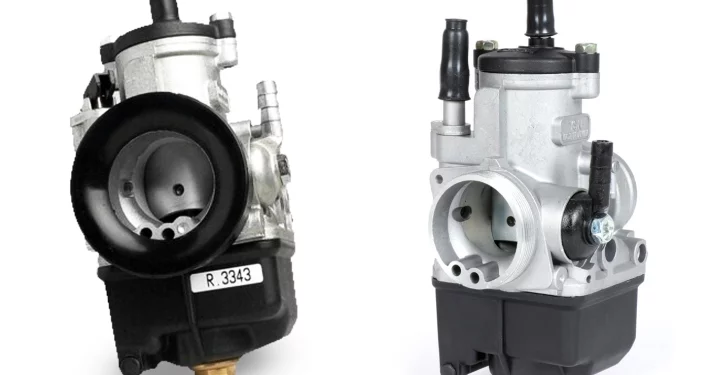
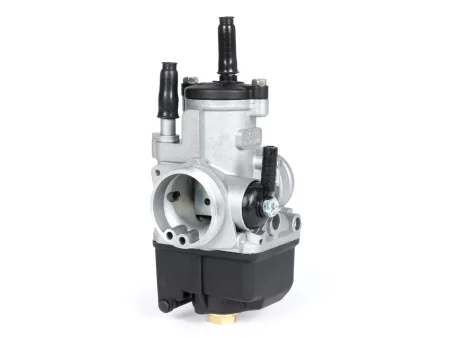
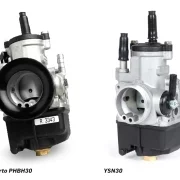
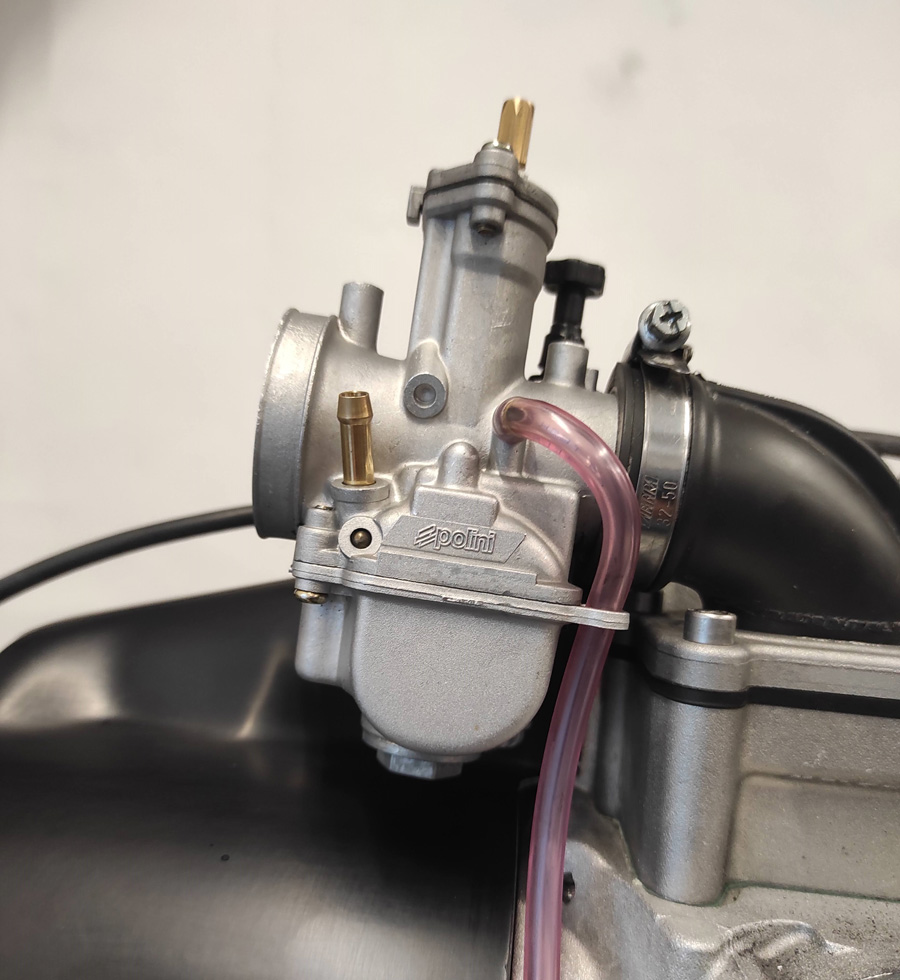
To make the fuel mixture we have one Polini 30mm carburetor used. In this experiment he stands for one Carburettor with 30mm bore. In the course of the tests, we also tried a PHBH30 in a counter-test. We will present the result of this in the following part of this blog series.
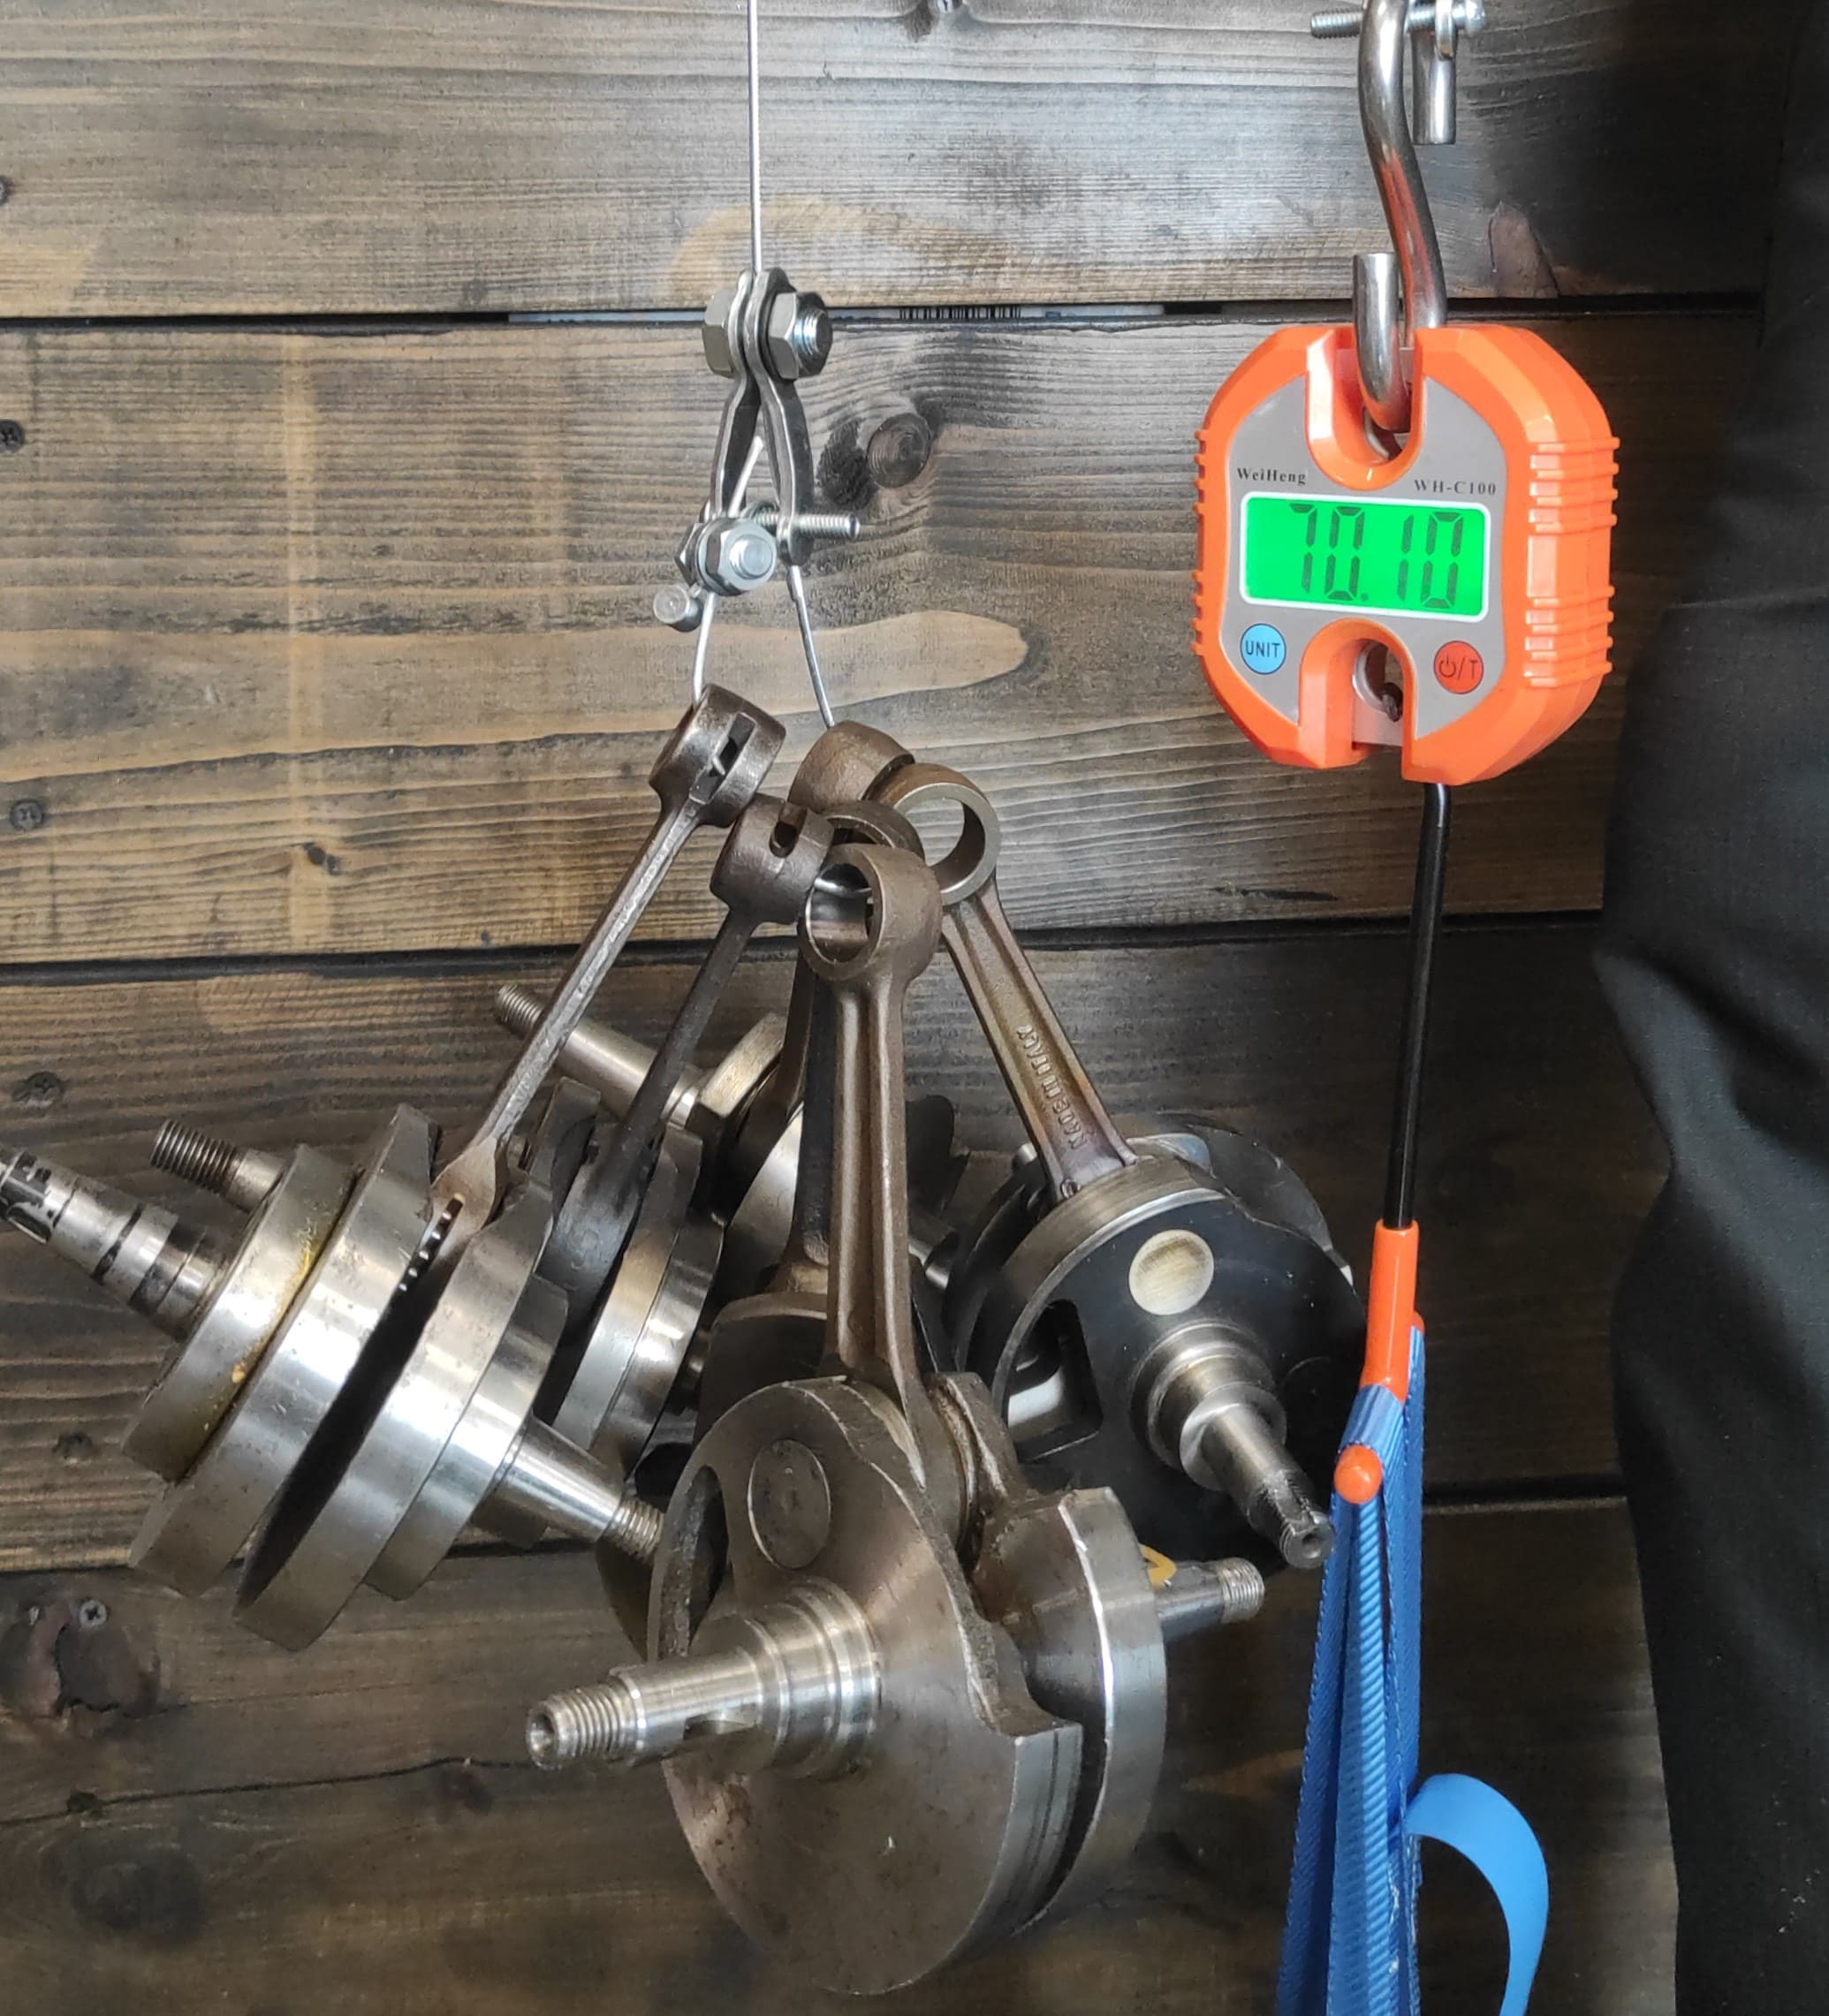
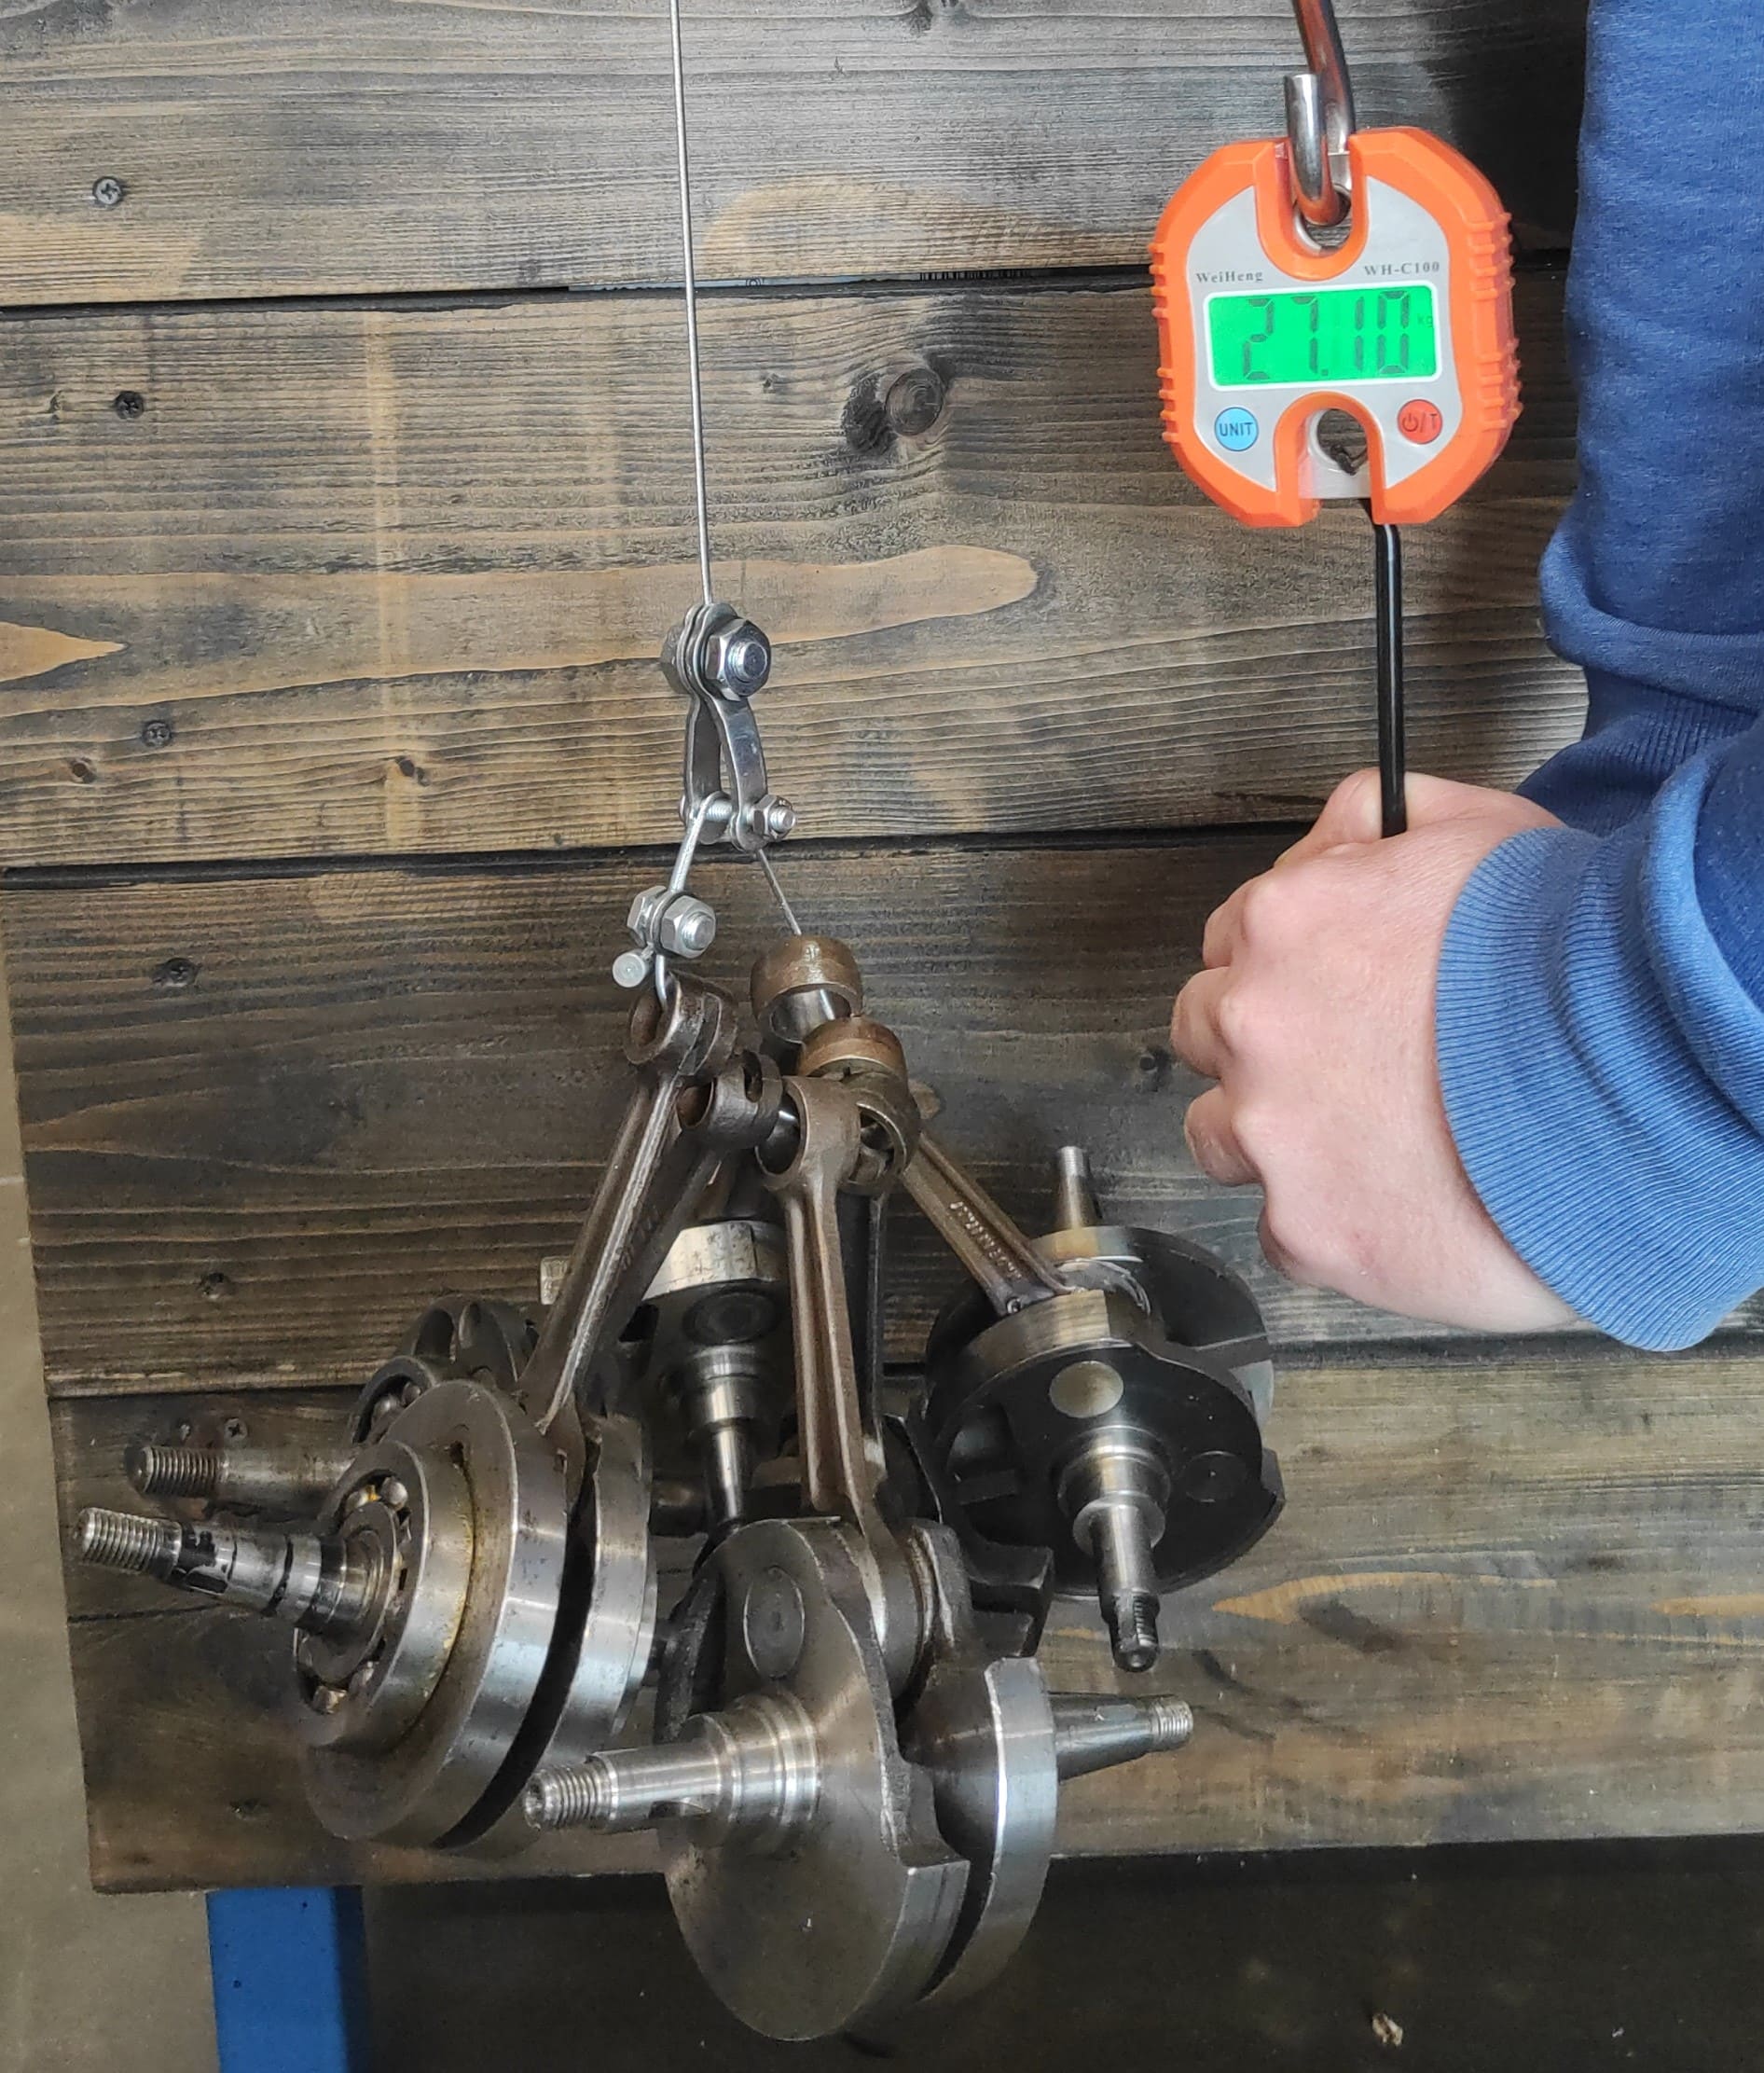
On the topic crankshaft we trust king wave. Here we find exactly what we are looking for to build a high-torque, smooth-running and durable engine.
The choice falls on one king wave with 62mm stroke and 128mm connecting rod. Due to the 2mm longer connecting rod and increased stroke, we have the opportunity to work with the control angles by moving the cylinder using spacers on the cylinder head and the cylinder base in the stroke direction. The longer connecting rod in connection with the weighty crankshaft also brings a significant plus in smoothness.
The stroke of 62mm results Cubic capacity 252,4ccm - already very promising to build a torque-oriented engine.
The ignition should keep our tourer running smoothly, so we chose the one here bgm ignition with the PX pole wheel with a mass of 2300g.
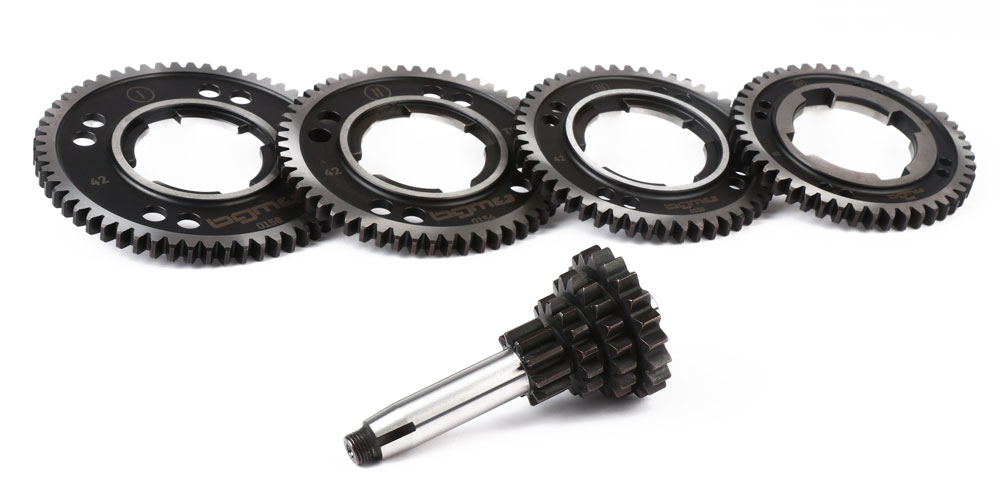
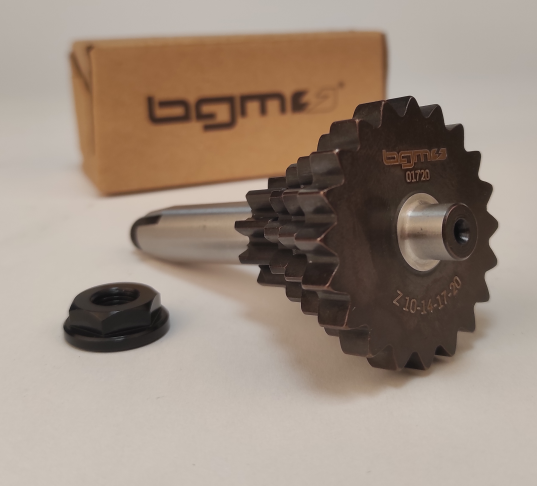
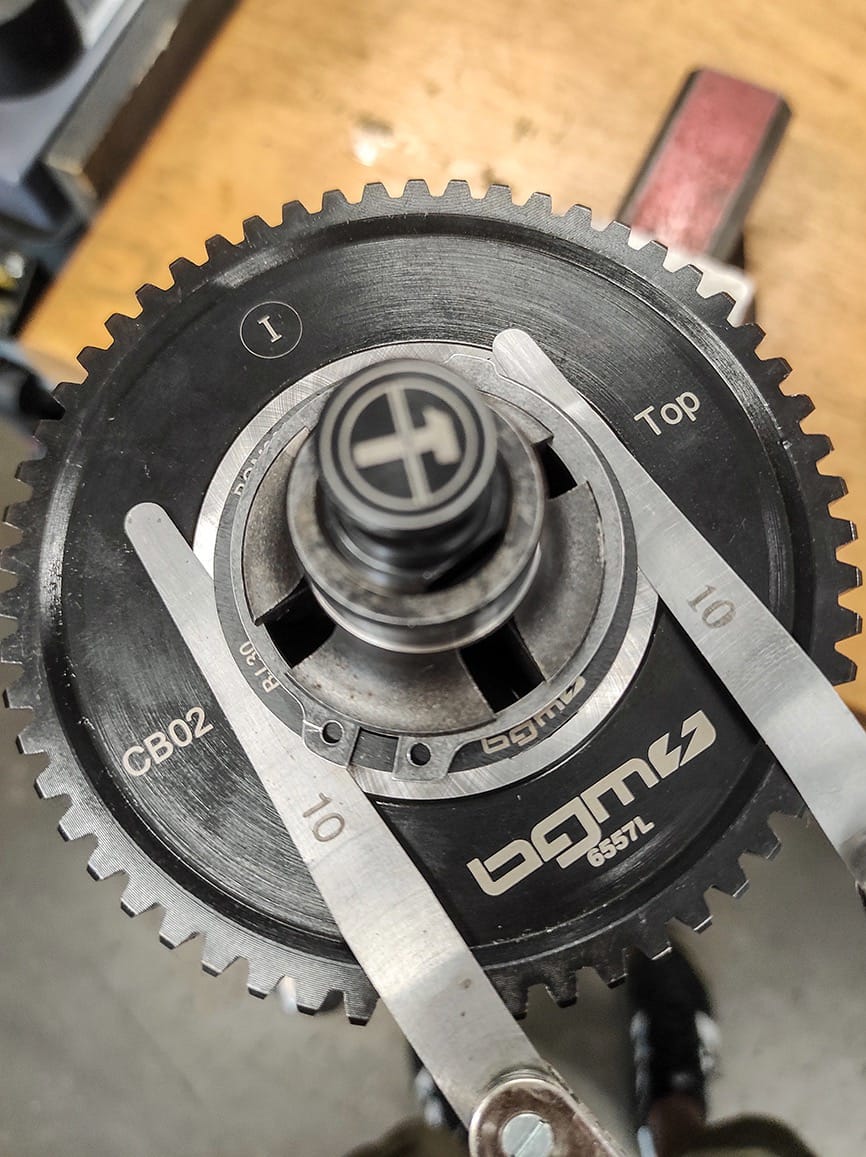
The performance of the 252ccm unit is controlled by a bgm superstrong Clutch, the bgm primary 25-62 and one bgm Transmission with the graduation 12-13-17-20 passed on to the rear wheel. The short, fourth gear on the auxiliary shaft keeps the most frequently used gear more stable. With one tooth less in fourth gear, the teeth become significantly wider in the tooth base and thus offer a significantly higher load capacity than the variant with a gear wheel with one more tooth.
The requirement for the test setup is that we work from a rather good-natured touring design to a sporty design. Just to be able to depict a section through the possible variants. As a starting point for the test series, we set a basis with small control angles in order to be able to test as many sensible variants as possible later
To determine a starting point, the crankshaft is mounted with bearing dummies and the cylinder is attached to determine the control angle.
Based on this initial data, we can consider to what extent we can sensibly set up the cylinder with spacers and work on the outlet in later stages of expansion.
After measuring back and forth a bit, we decide to start from the middle position of the control angle with one Transfer angle of 124 ° and a Outlet angle of 177 °.
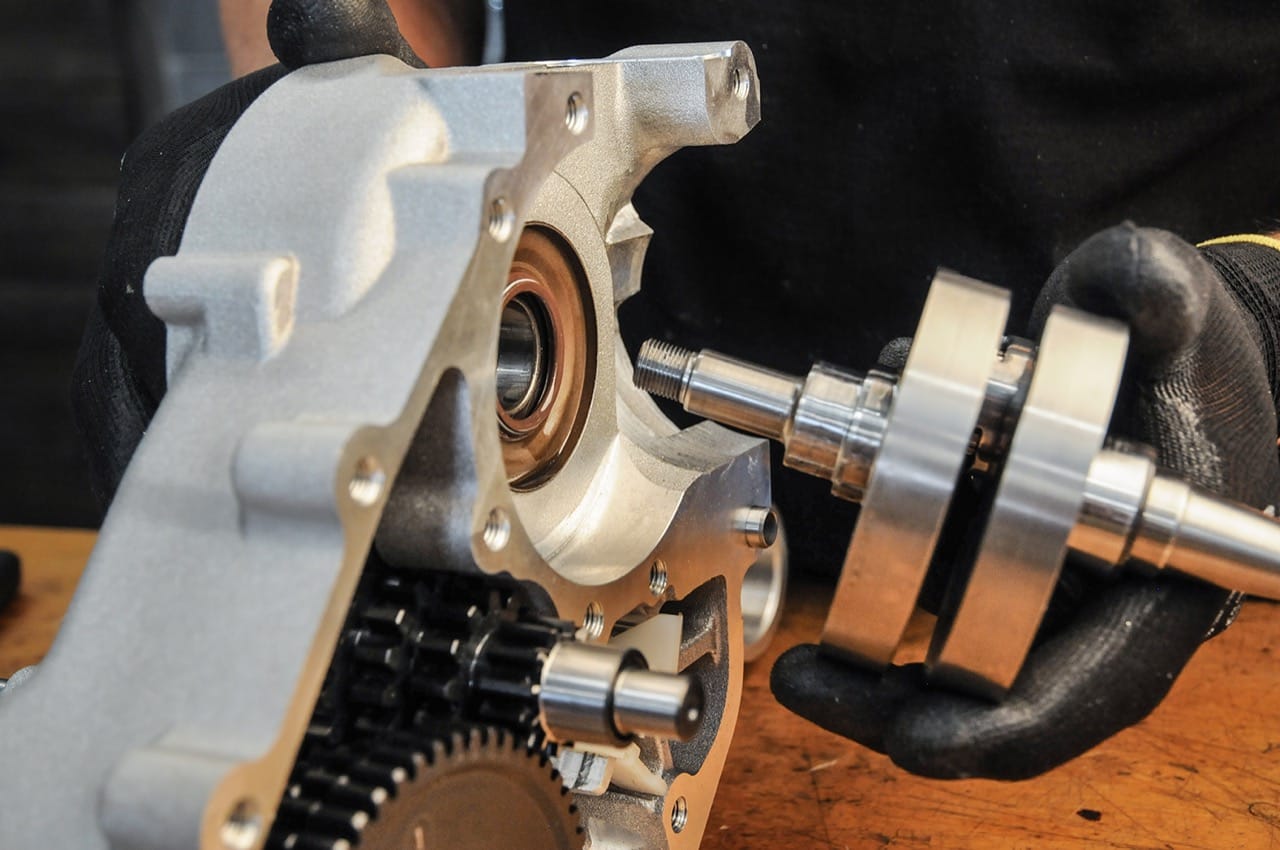
The factory new Malossi motor housing will be finished by king wave for the crankshaft with 62mm stroke and the enlarged diameter of the crank webs with 99,4mm. The bearing seat for the bearing on the alternator side is also checked and reworked in individual cases, as the bearing seat is manufactured by Malossi with a very tight tolerance.
We also offer the completely machined housing with a high-quality crankshaft from Kingwelle as a set. We use the set for this engine KWM46228.
The one attached by Malossi Bearing Kingwelle does not recommend 6205 for the alternator side. We follow Kingwelle's recommendation and use a here NU205.
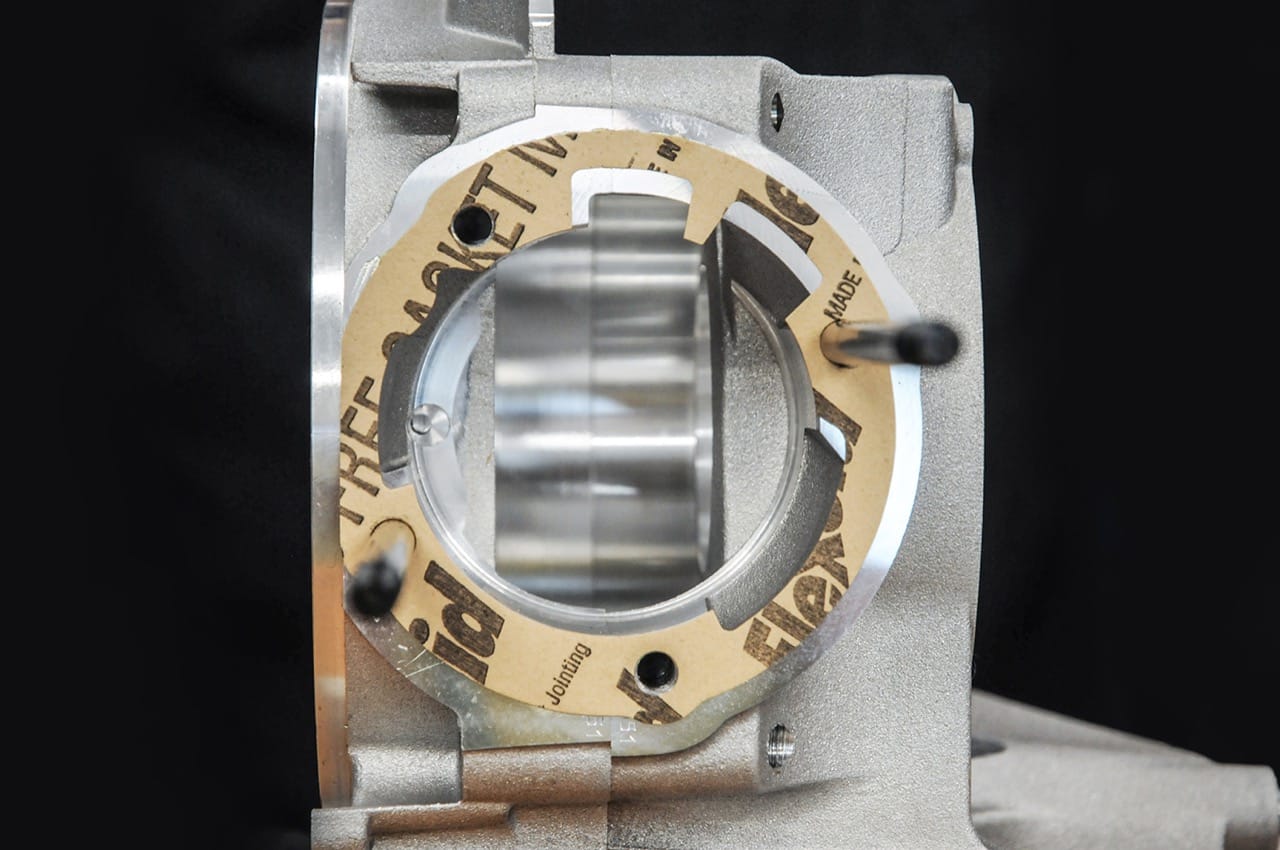
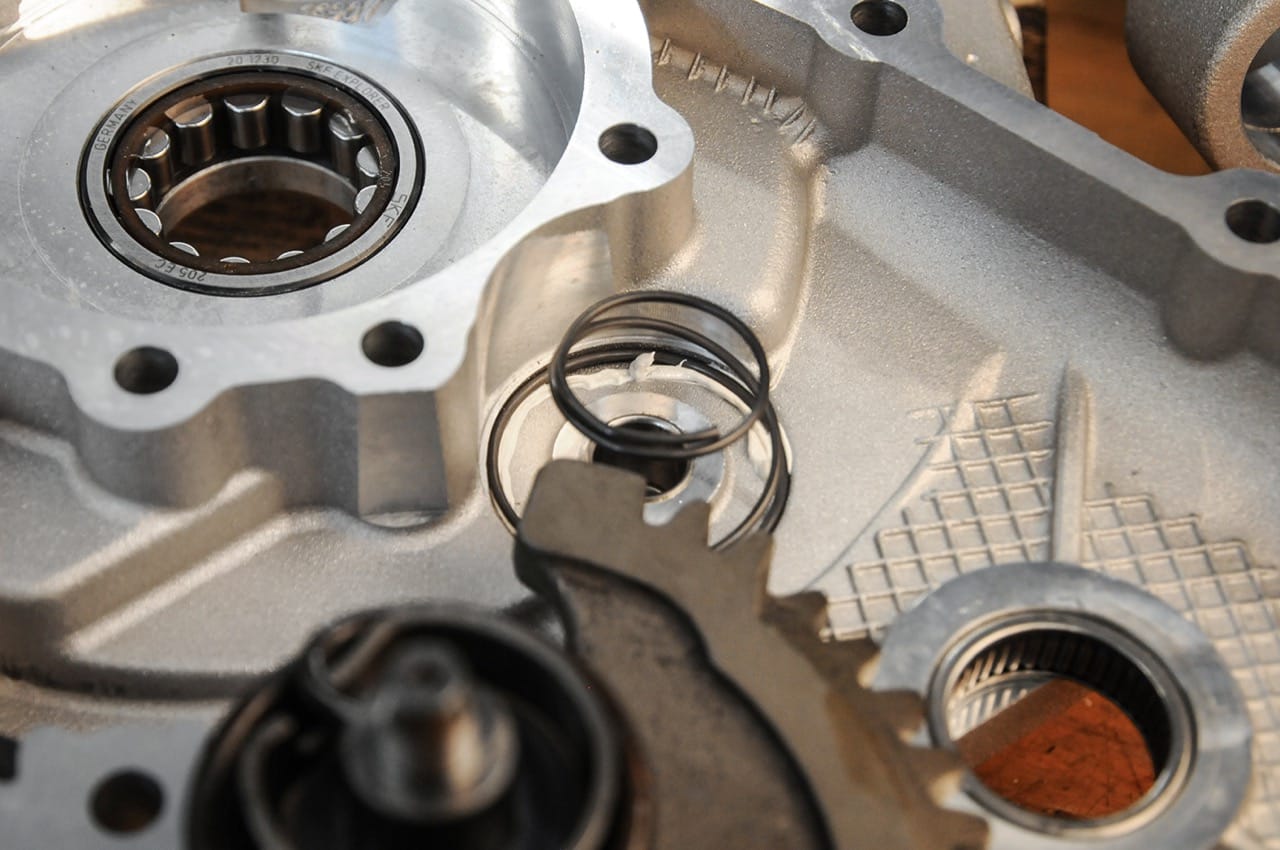
Before inserting the bearings, we process the motor housing and adapt the cylinder and the overcurrent ducts to each other. On a Piaggio engine case, this tends to degenerate into an evening event. The Malossi housing is already designed for the channels of the Malossi Sport and MHR cylinders and requires little rework for the Quattrini M244. Most of the work goes into removing the sealing surface on the cylinder base, which allows the M244 to be used on Piaggio engine housings.

Adjusting the transfer channels to the motor housing is done quite easily. The cylinder base seal shows how little needs to be adjusted here.
All bearings are traditionally used by shrinking in order to avoid damage to the bearing seats by simply pulling in the bearings. The shrinking or cold / warm process offers the advantage that no mechanical stress acts on the surface of the bearing seats and the seat is not widened as a result.
Another peculiarity of the Malossi motor housing is that the supplied original silent rubbers are too narrow for the motor housing. Or rather, here Malossi has simply oriented the seats for the silent rubbers deeper in the housing than was originally the case. This allows the motor housing to move over the silent rubbers in the direction of the frame.
We have been here with one quite a while ago Spacer set BGM7952SP A remedy was created for the silent rubbers and thus ensured a secure fit of the silent rubbers in the correct position.
The M244 with a 62mm stroke of the king shaft brought to 252ccm, will transfer a lot of torque to the rear wheel. A guarantee to achieve a high cruising speed at a reduced speed. That enables the primary. Starting from a massive and early onset of torque mountain, the primary can be selected to be long or even very long. With 25 to 62 teeth, we use the longest primary offered by bgm. The reinforced primary repair kit from bgm creates a durable primary drive.
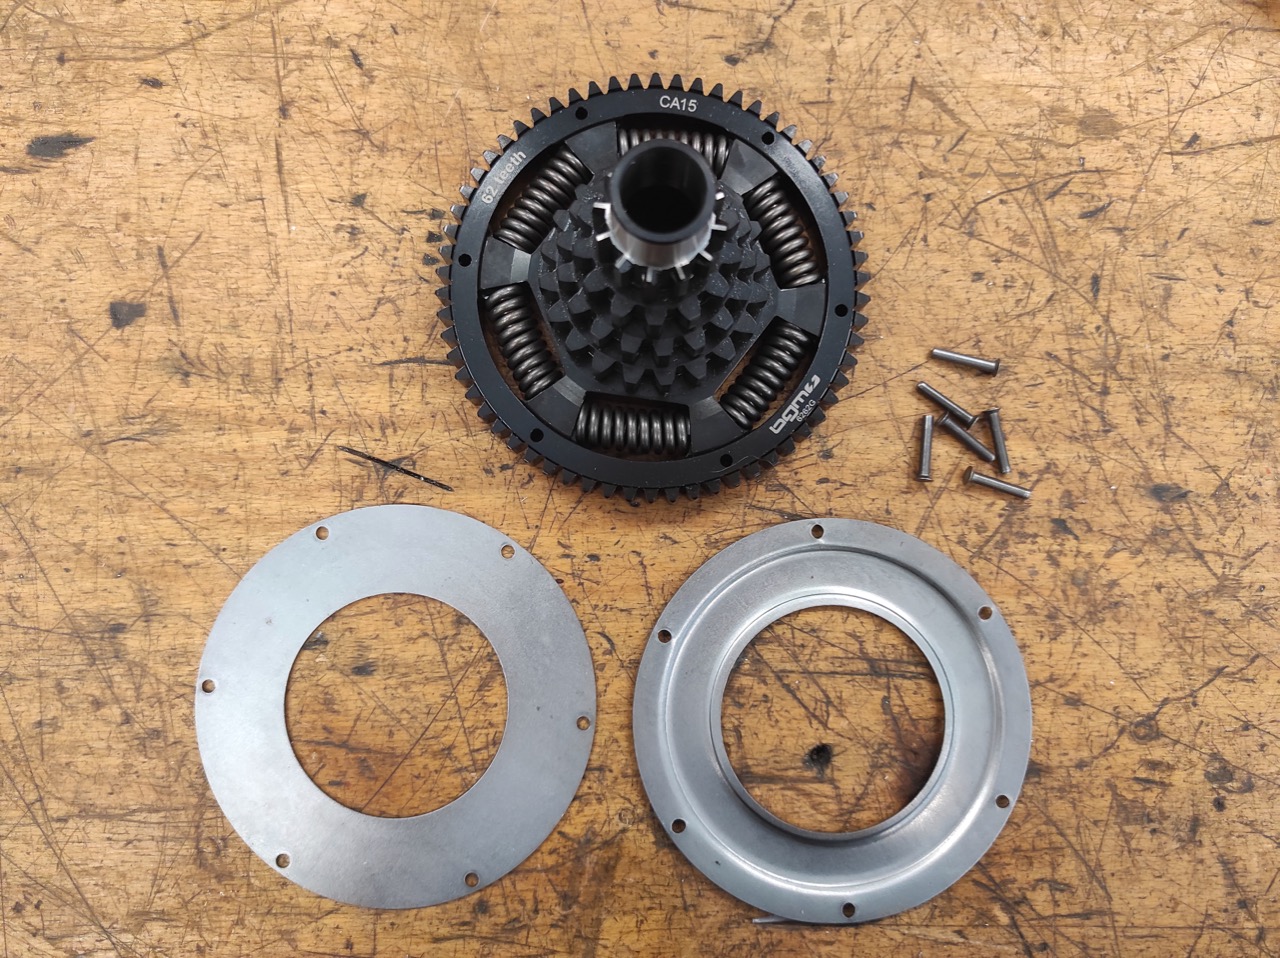
Shift pins and crossbar are included threadlocking assembled.

The bgm secondary gear is set with the smallest possible clearance with the bgm shoulder rings.
Further adjustments to the motor housing are no longer necessary and all other innards find their way into their place.


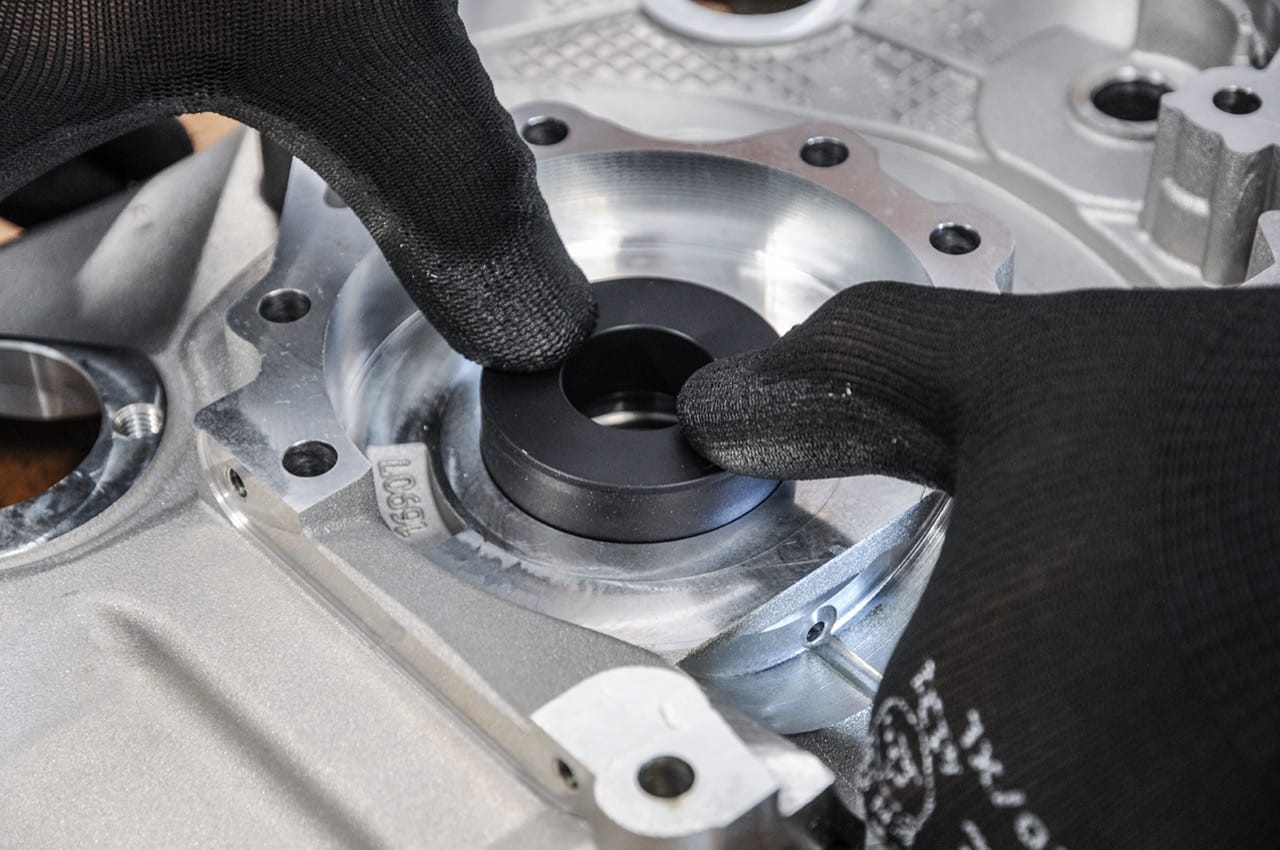
To assemble the crankshaft, the shaft sealing ring is moistened with a little oil so that the sealing lips slide cleanly onto the crankshaft and are not damaged.
The Malossi engine case, contrary to the Piaggio engine case, is without a solid seal composed. Instead of the paper seal, as in a modern engine concept, the housing is Surface seal sealed.
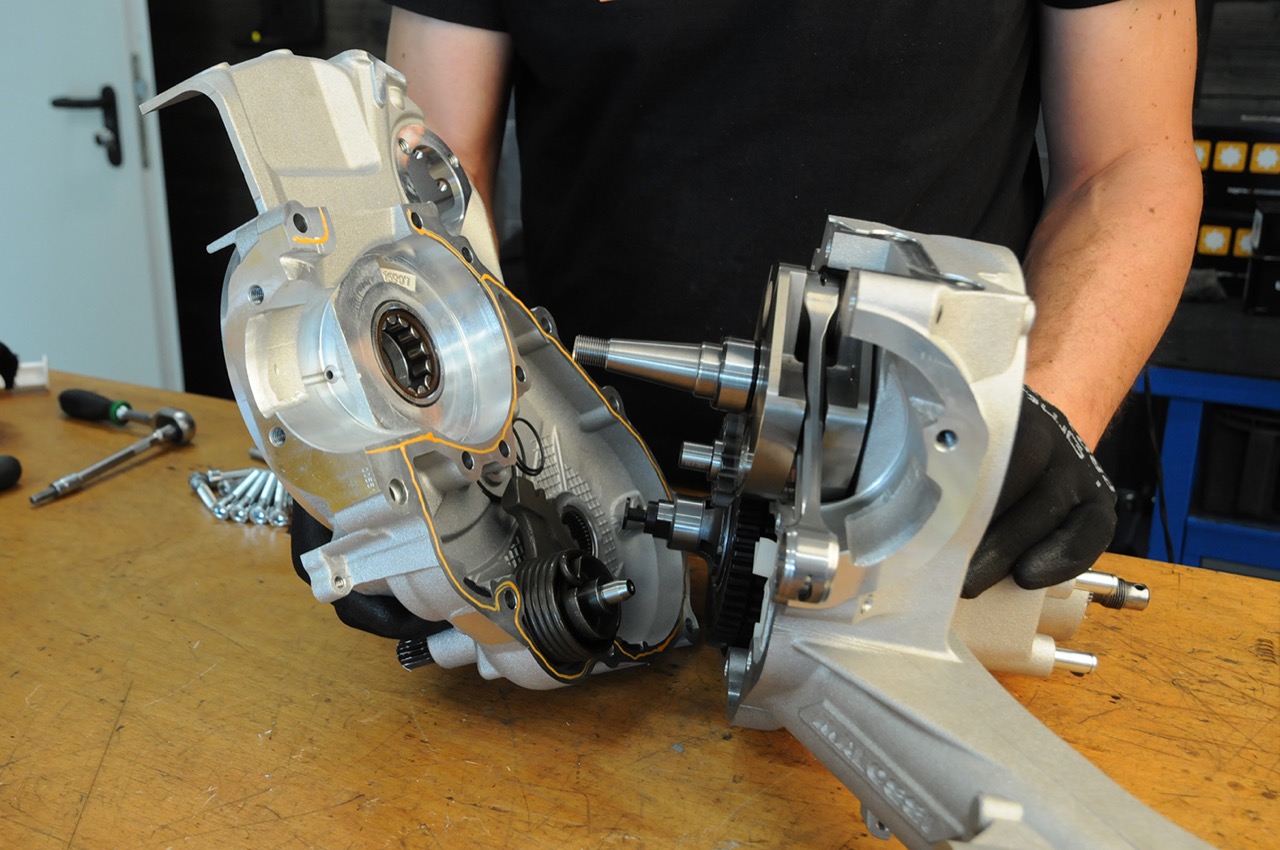
To connect the housing halves, Malossi uses M8 hexagon socket screws. Due to the different lengths of the screws used, a look at the Application listto find the correct attachment point.

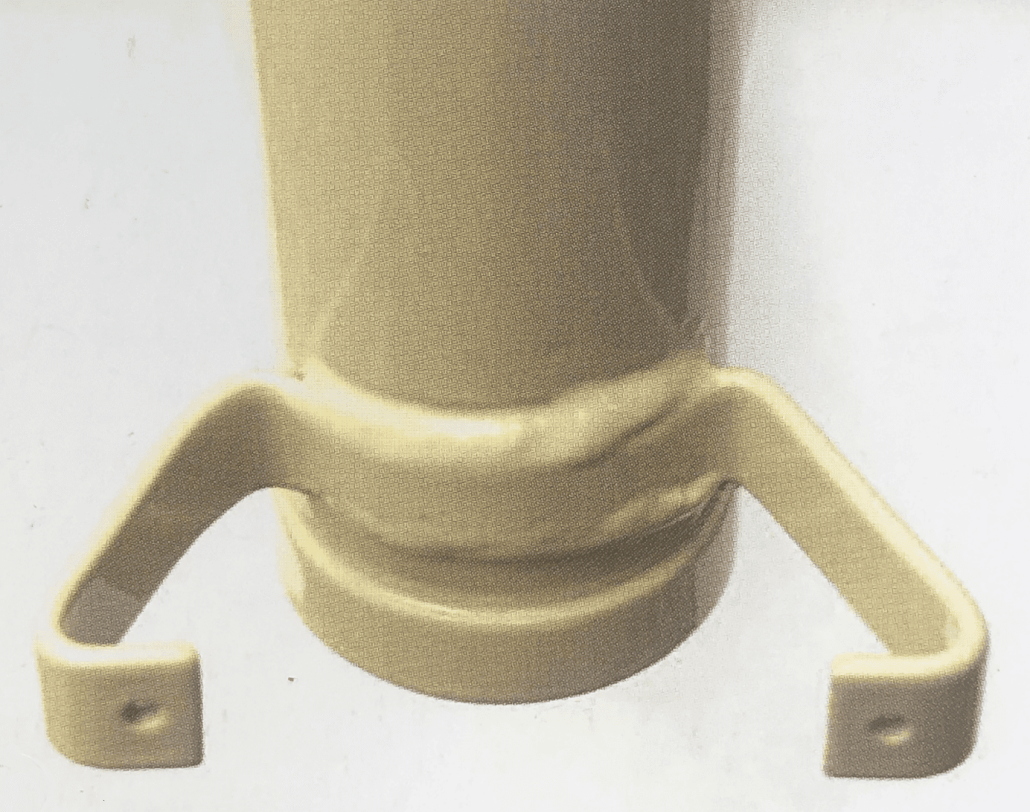
The King Shaft is supplied with its own thrust washer and special key. The thrust washer has a clear radius that fits exactly to the radius of the crankshaft. A breaking thrust washer is almost impossible.
The Kingwelle has a special feather key on the drive side, which is specially manufactured for Kingwelle and fits exactly into the groove of the coupling hub.
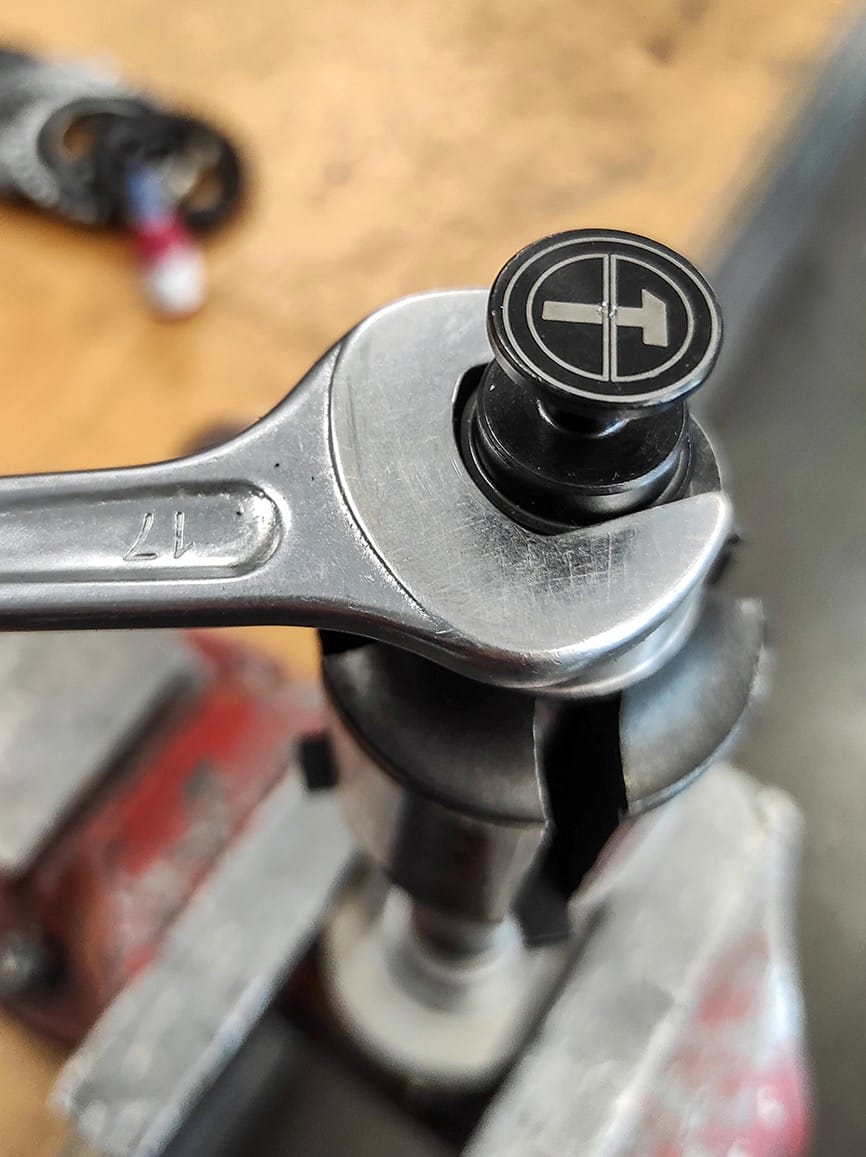
We use one as a coupling bgm Superstrong CR a. With the standard equipment, 10 bgm springs XL, the CR clutch manages a reliable transmission of power up to 40hp. The king shaft coupling nut has a fine thread of the dimension M12x1. The nut comes with screw lock and a Tightening torque of 70Nm attached.
The engine is then completed with the rest of the components.
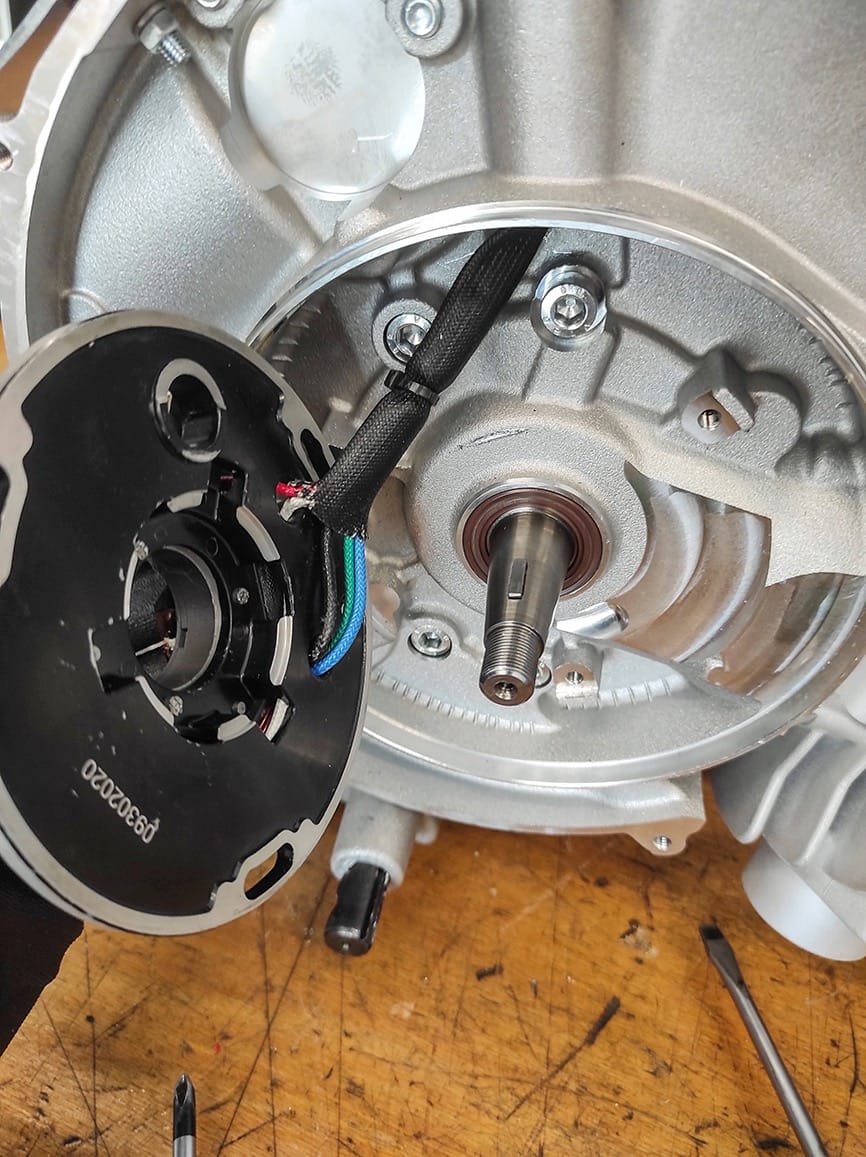
Intake manifold with the Malossi 2-valve membrane. Clutch cover, switch latch, cover for the starter motor and the bgm ignition system with static ignition timing.

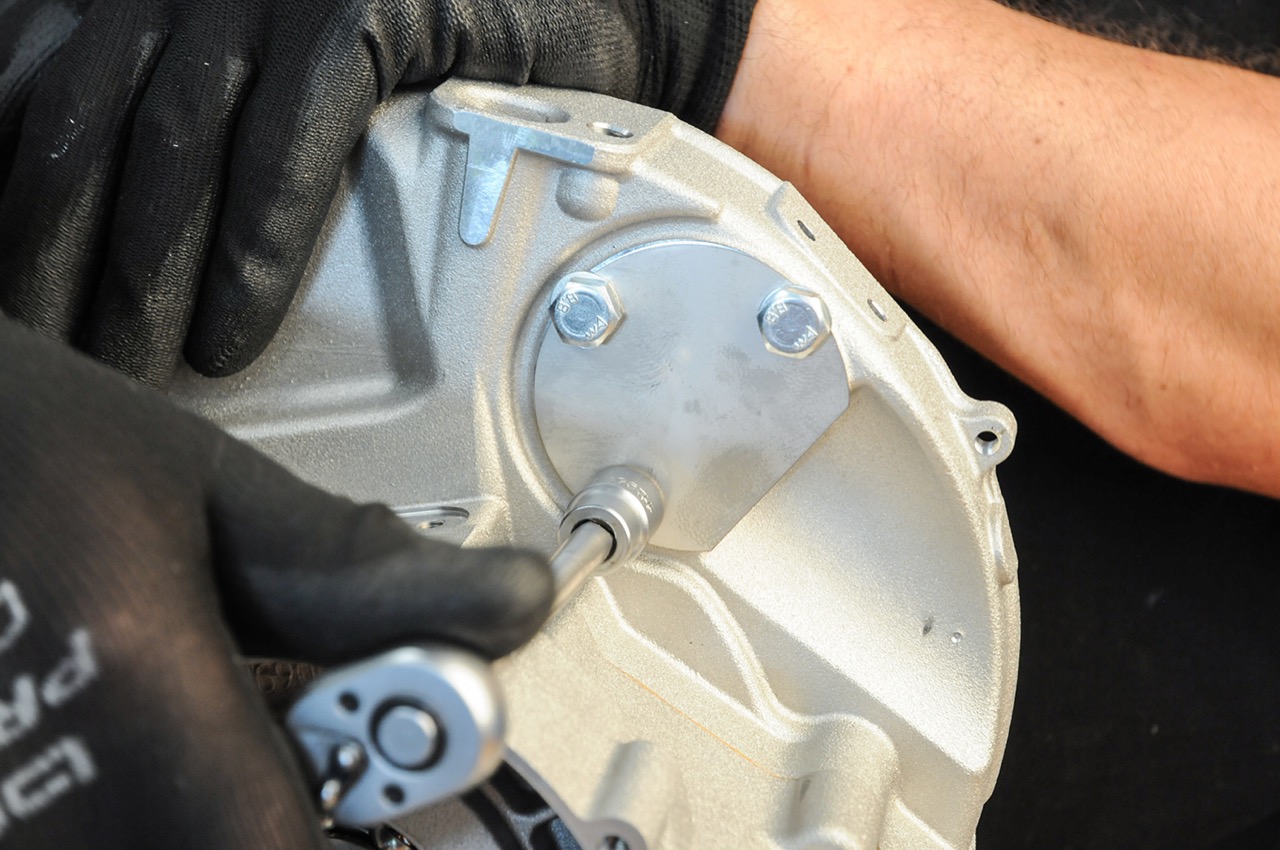
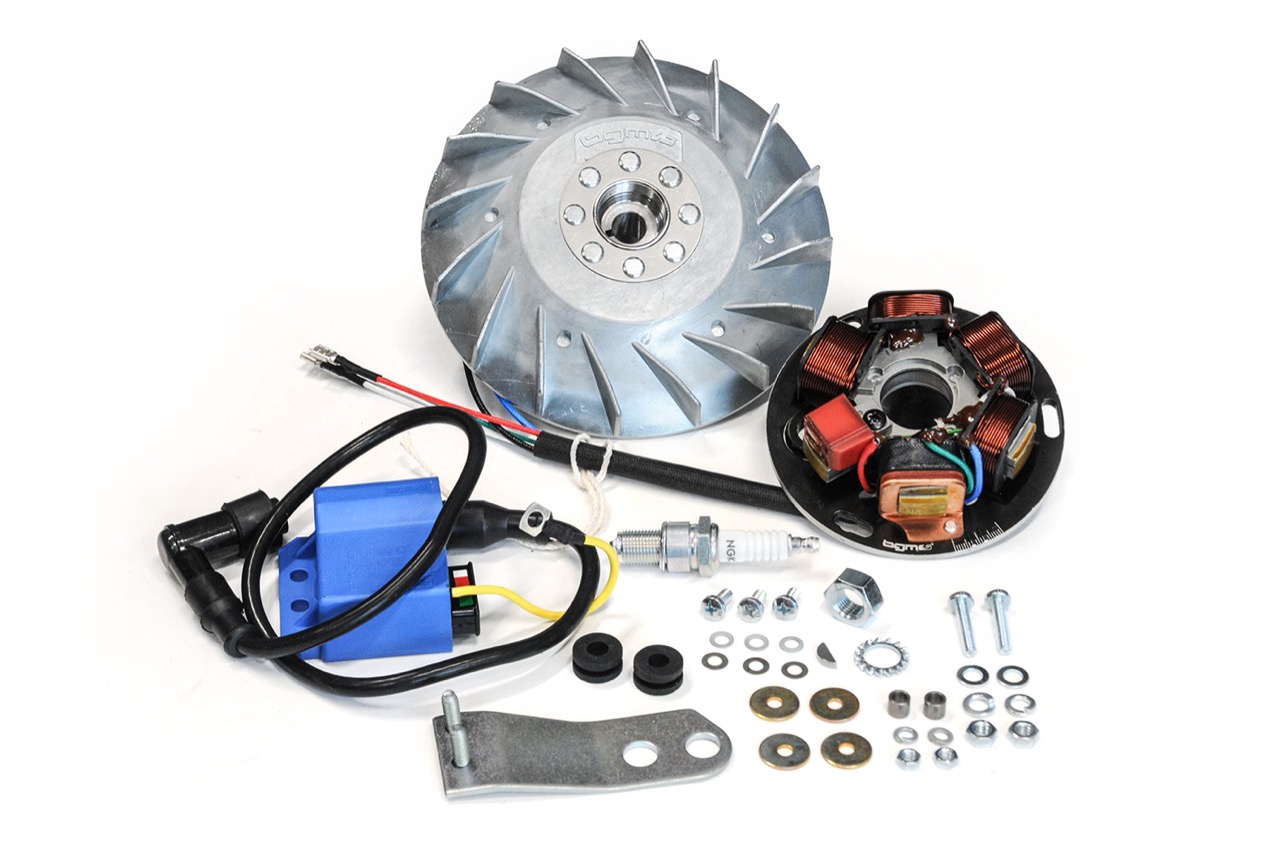
The Malossi motor housing is reinforced in many places. This can lead to contact between the base plate and the bearing seat when the ignition is installed. The base plate of the ignition must sit tension-free in the centering, so in individual cases the base plate and / or the motor housing must be slightly reworked to ensure a tension-free fit of the base plate.
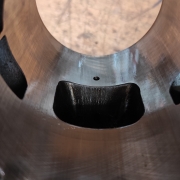
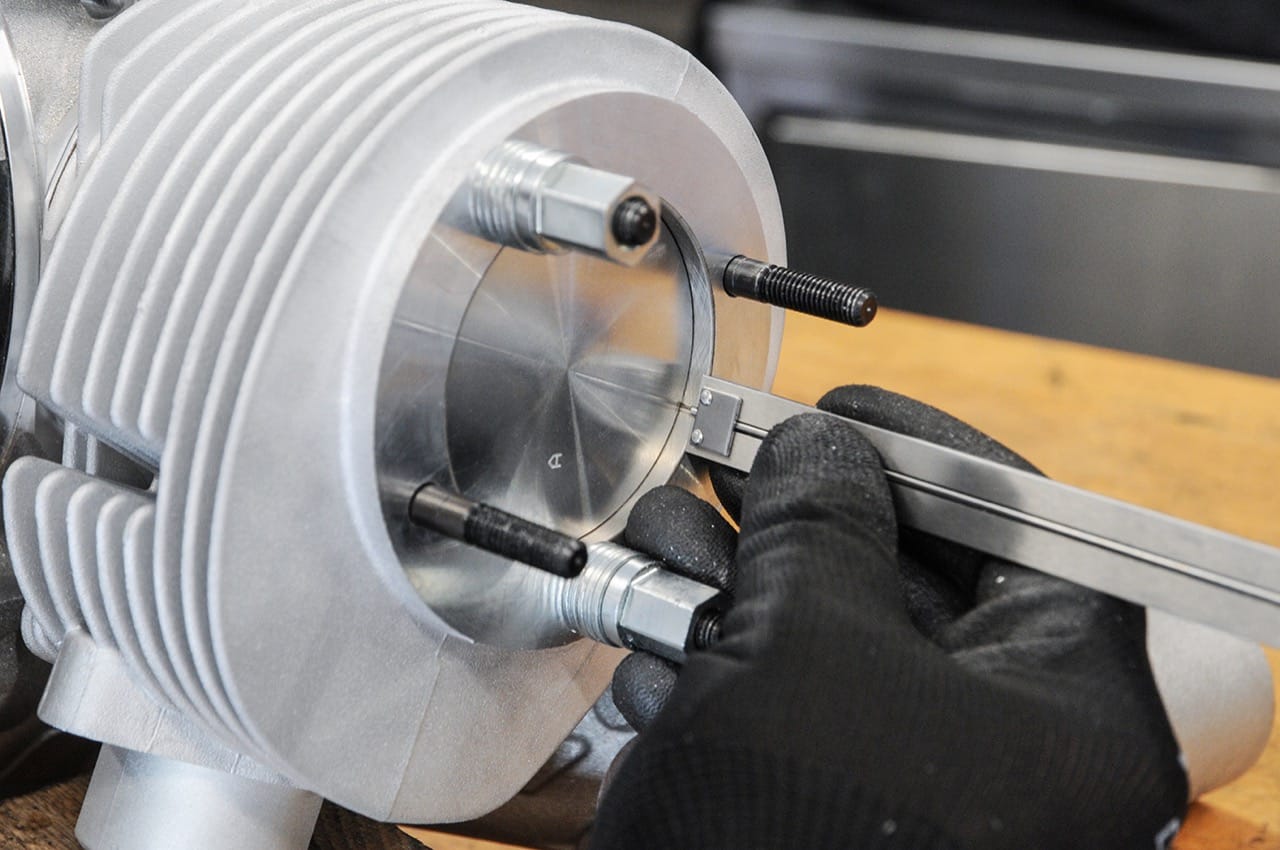
Before the final assembly of the cylinder, we check the pinch size using solder.
Due to the increased stroke, we aim for the squeeze dimension in the range from 1.3mm to 1.4mm and set this using the enclosed cylinder base seals.
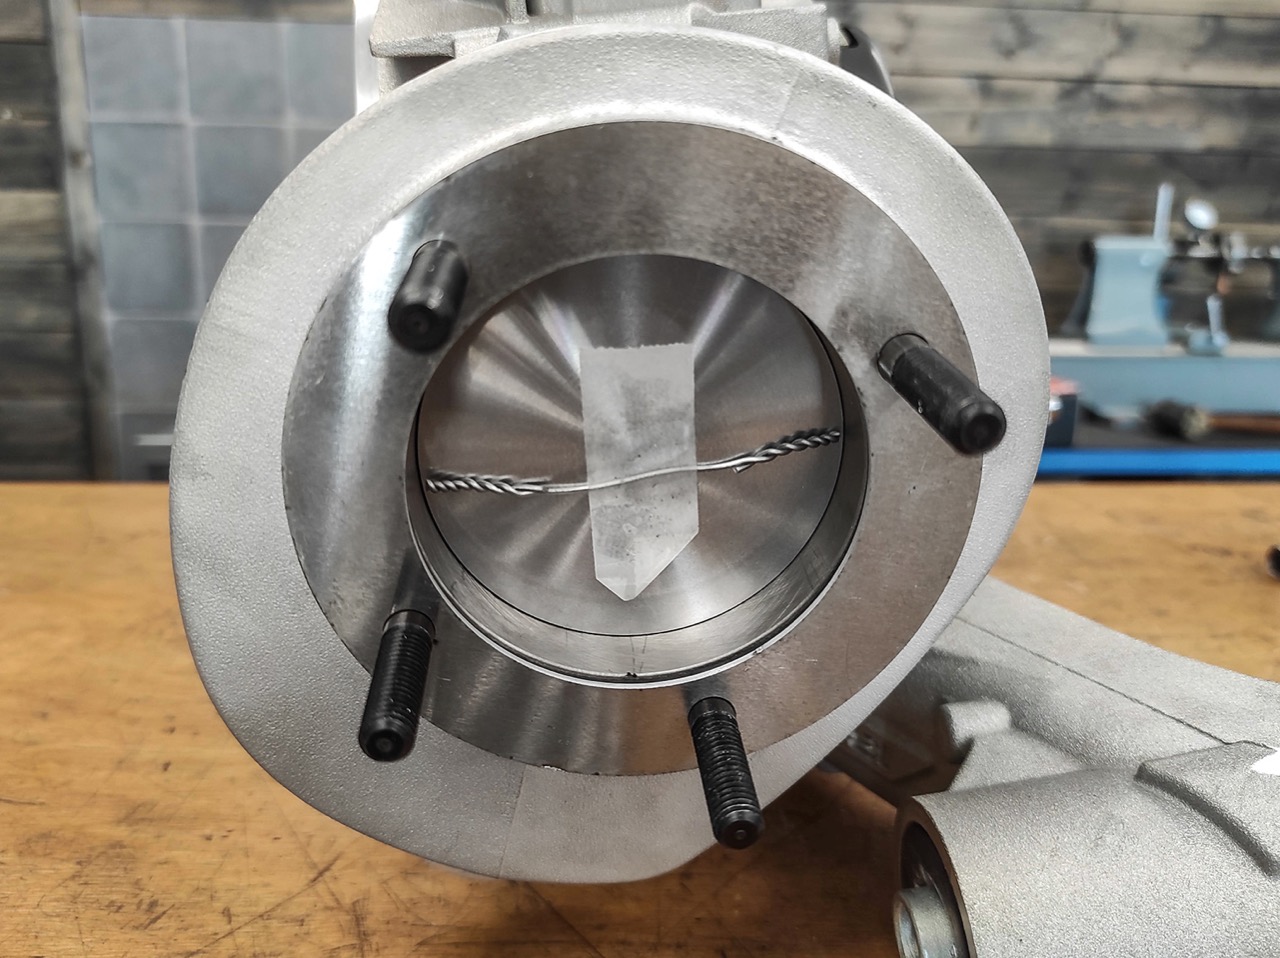
By compensating for the larger stroke, there is no need for centering on the cylinder head. For this reason, holes for fitting sleeves are made in the cylinder head and cylinder. The adapter sleeves prevent the spacers used for the cylinder head in the course of the test from protruding into the combustion chamber and causing unwanted damage there.
For the test runs, we set the ignition to 19 ° BTDC.
The runs of the first expansion stage We will introduce M244_1 to you in the next blog post before…
Just a quick note - none of the runs were below the 30PS Mark on the unprocessed M244


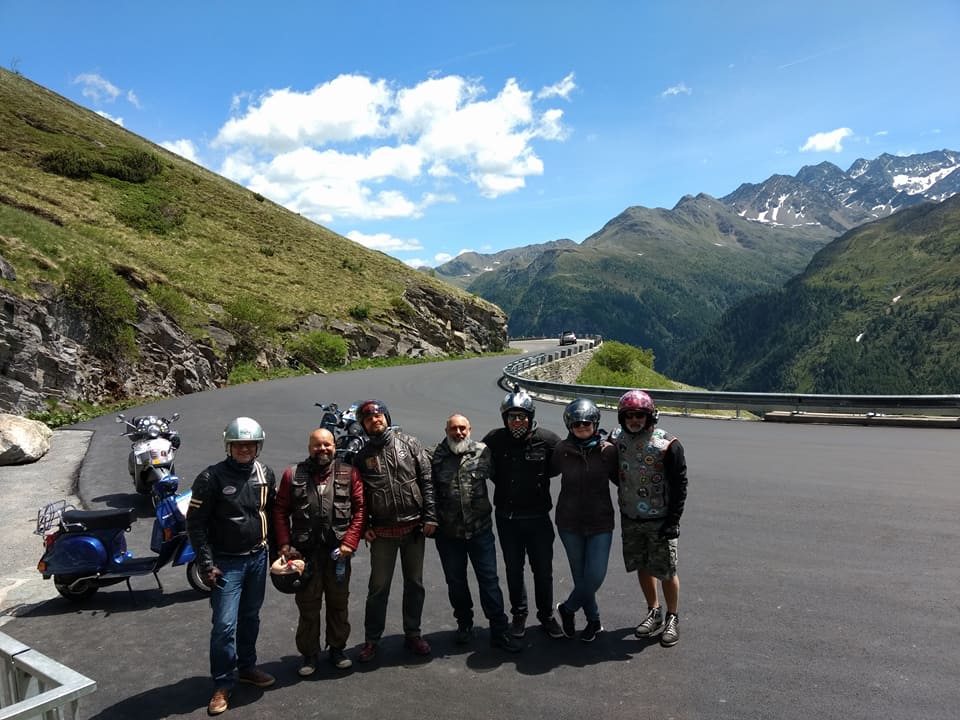
Slowly it is enough to just make kilometers on the way to and from work. It is time for longer journeys with Platónika and our trip to the Vespa Alp Days is the best opportunity!
In my personal ranking of the events, VAD has a special place:
Now the reasons are different, I travel to work. As part of the Scooter Centerwho is the official sponsor of the event. And of course, Platónika is coming with us.
I am preparing to show you all of these adventures firsthand. But now some nice memories of 2017.
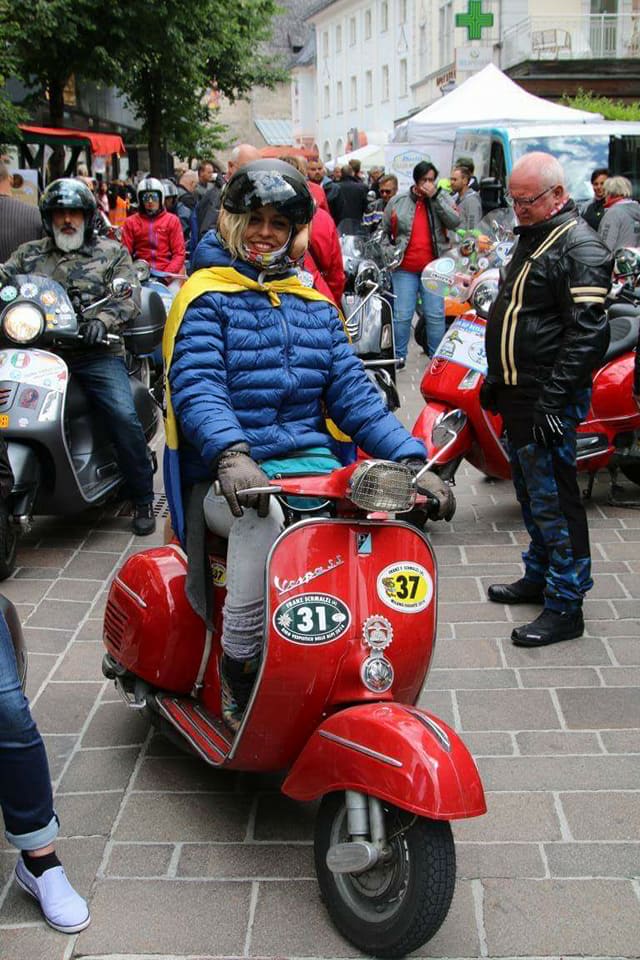
The good friends I've made
The Colombian Representation
Super Sport 180 from Franz
See you there!
https://www.the-alp-days.at/
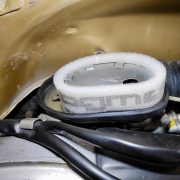
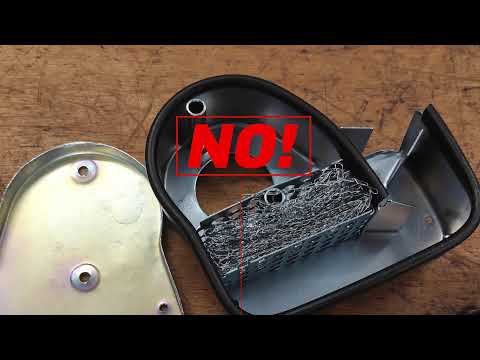
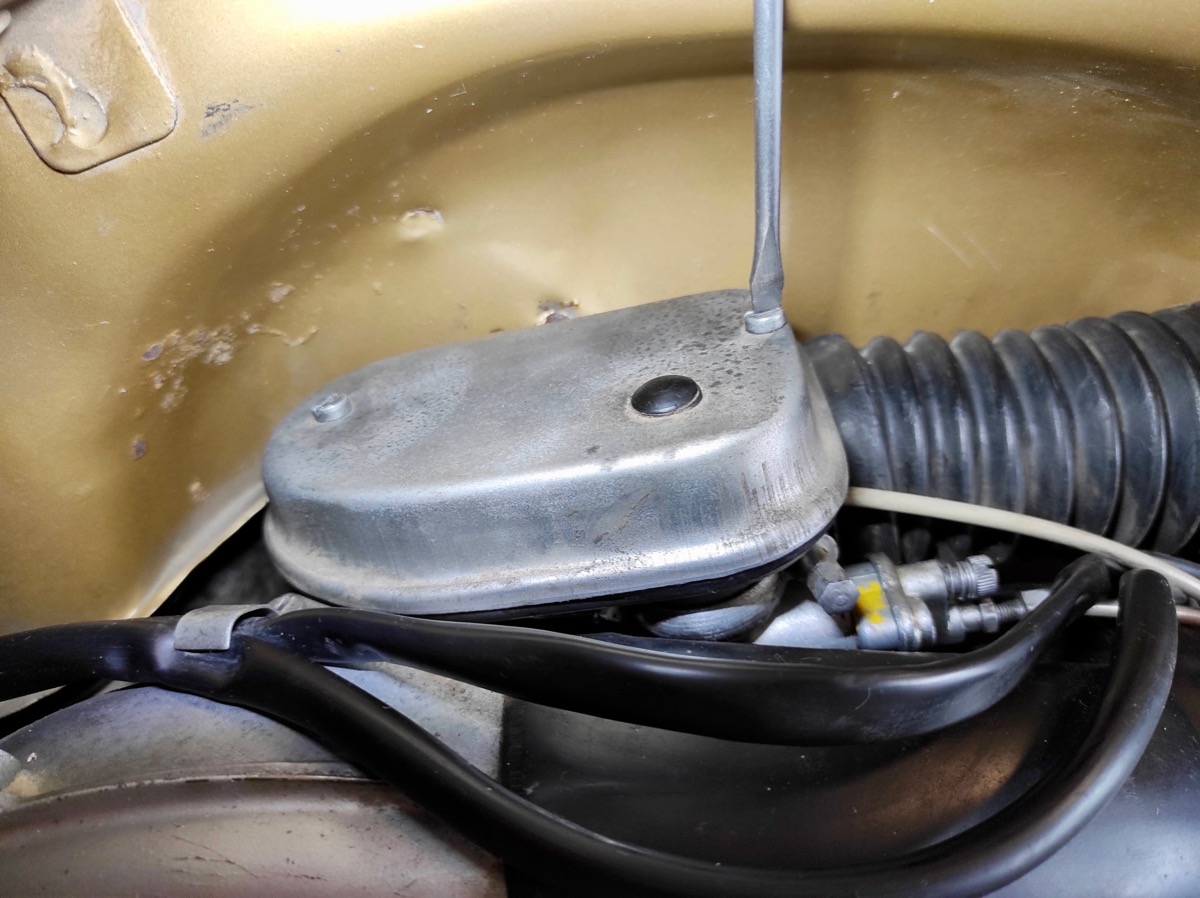
With many Motovespa Largeframe The identical air filter inserts are installed in the models.
Often the important component to protect the engine is missing or is no longer in a usable condition. That's why we have the Vespa for the Spanish license builds Largeframe Models one high quality air filter insert made.
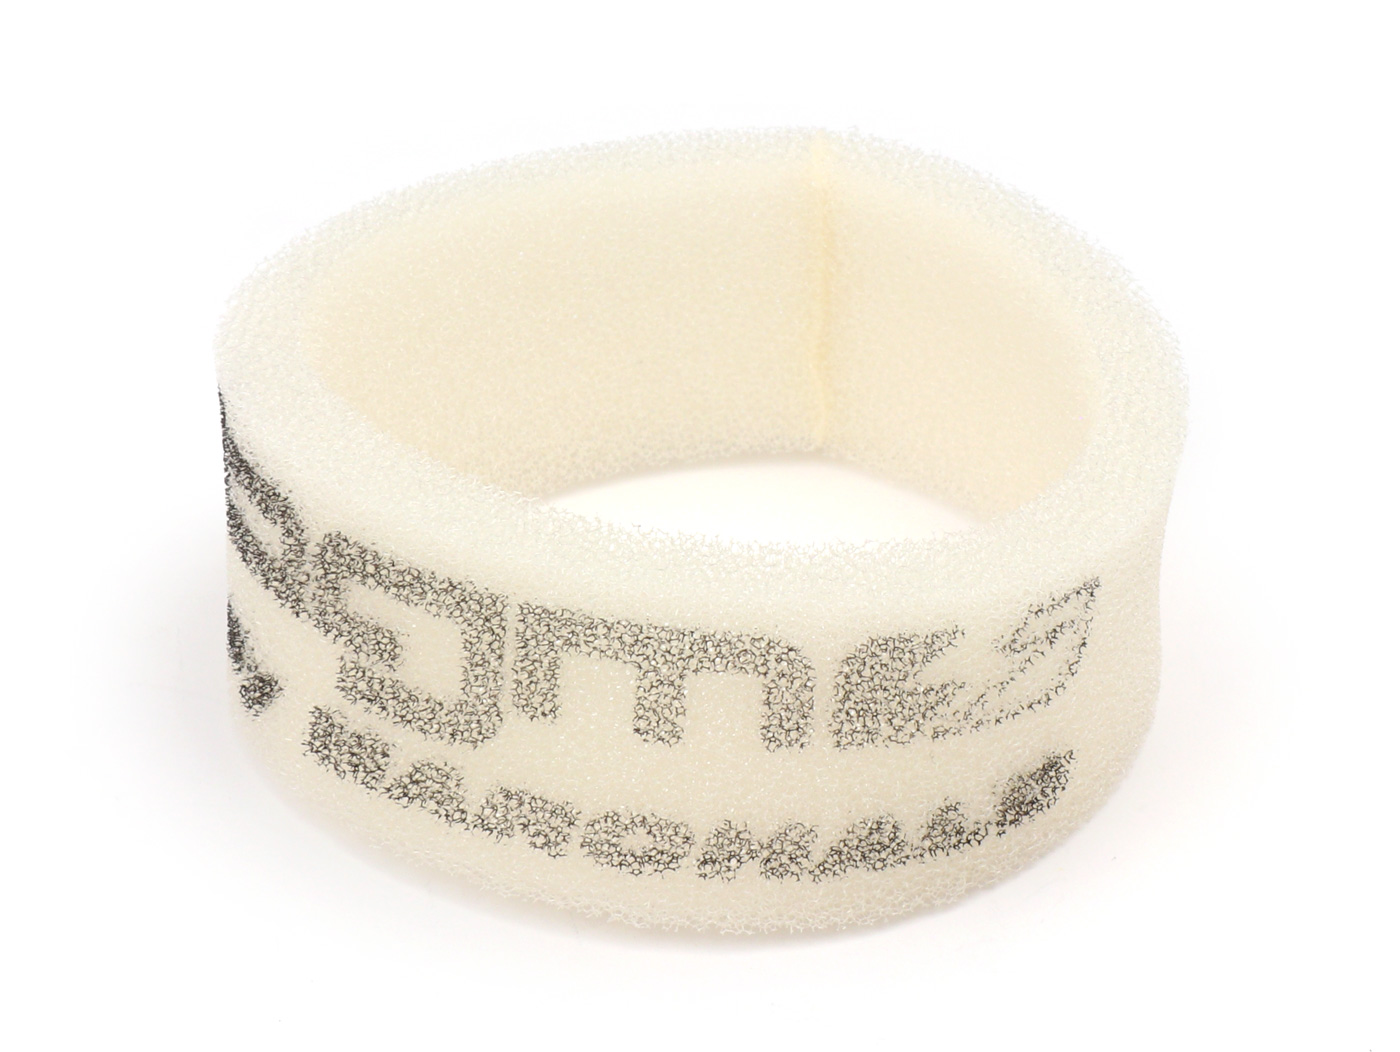
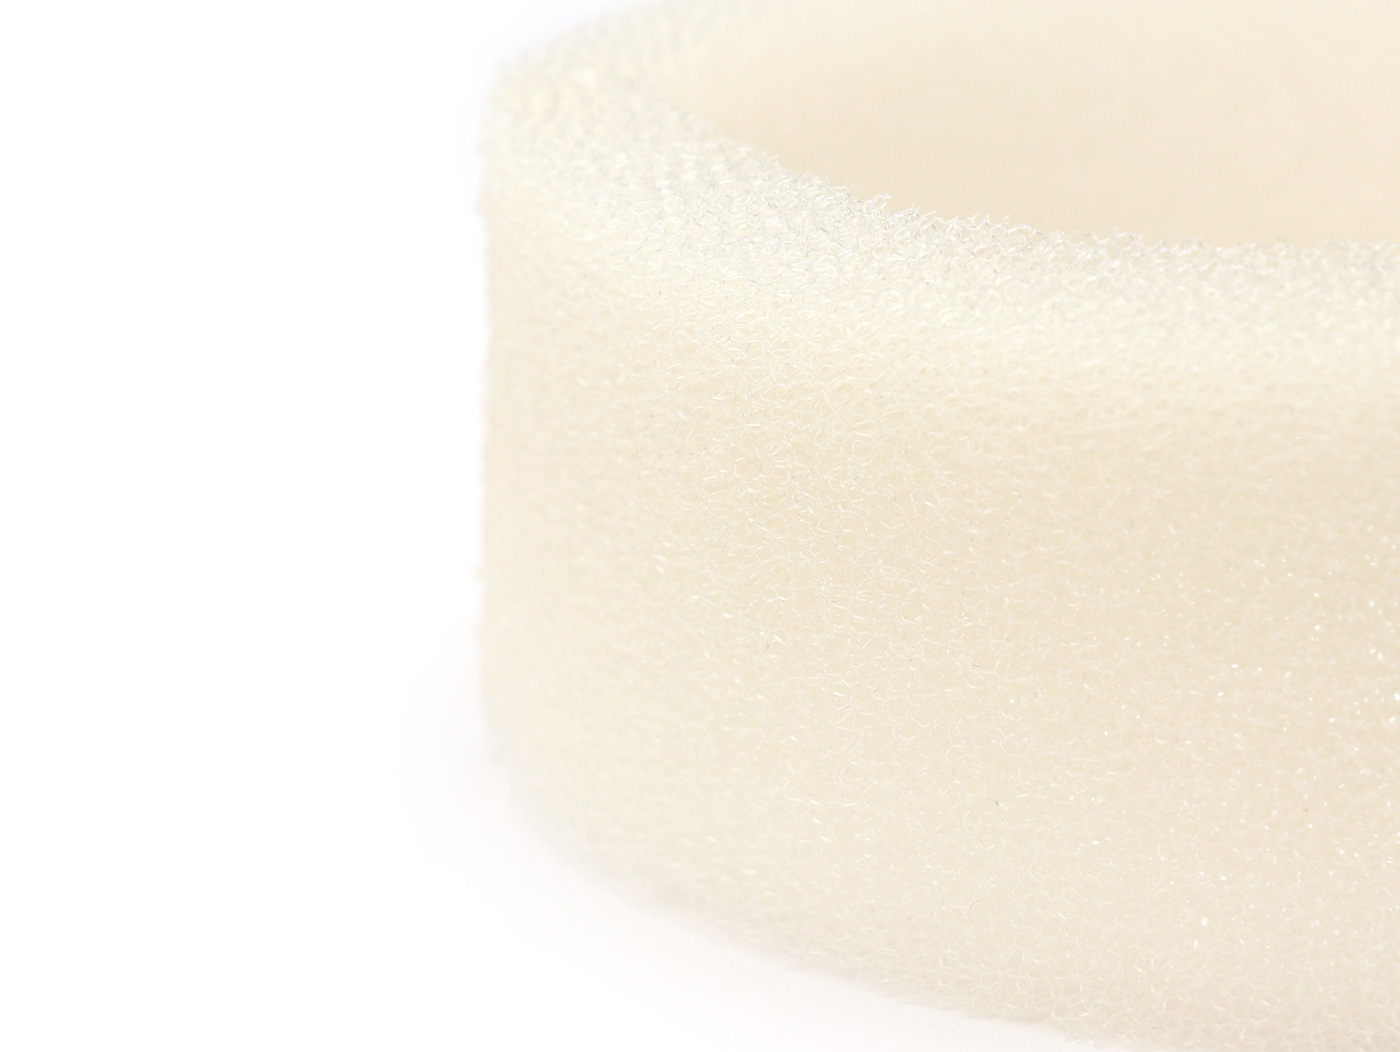
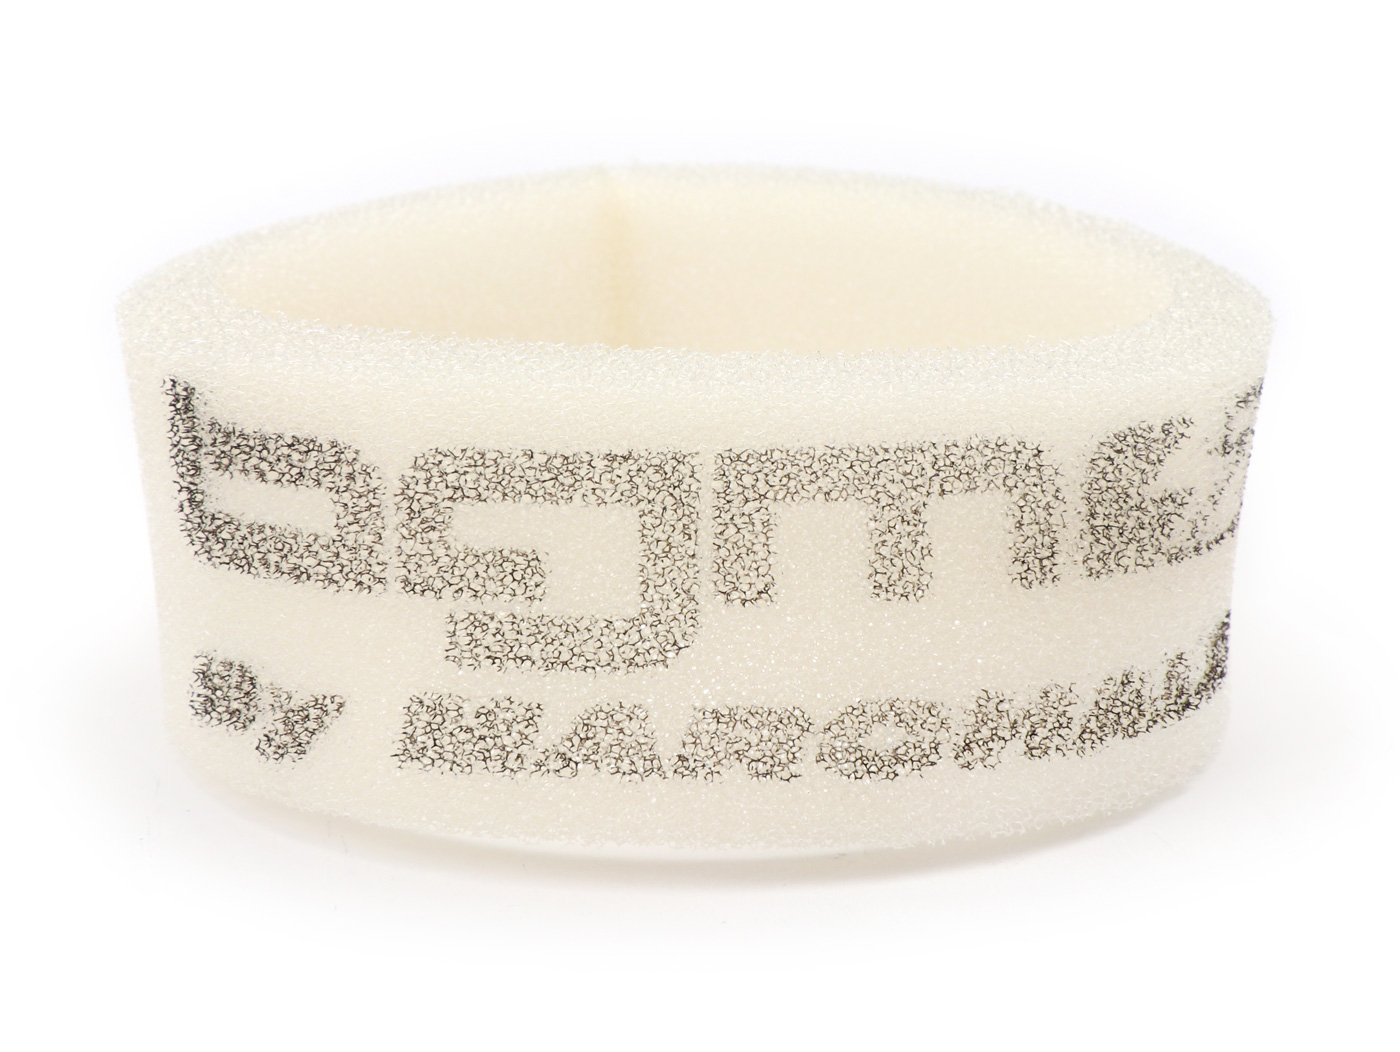
High quality filter fleece from Marchald (Italy), manufactured for bgm PRO.
Suitable for the direct intake engines (carburetor sits directly on the cylinder) of the Largeframe Motovespa engines.
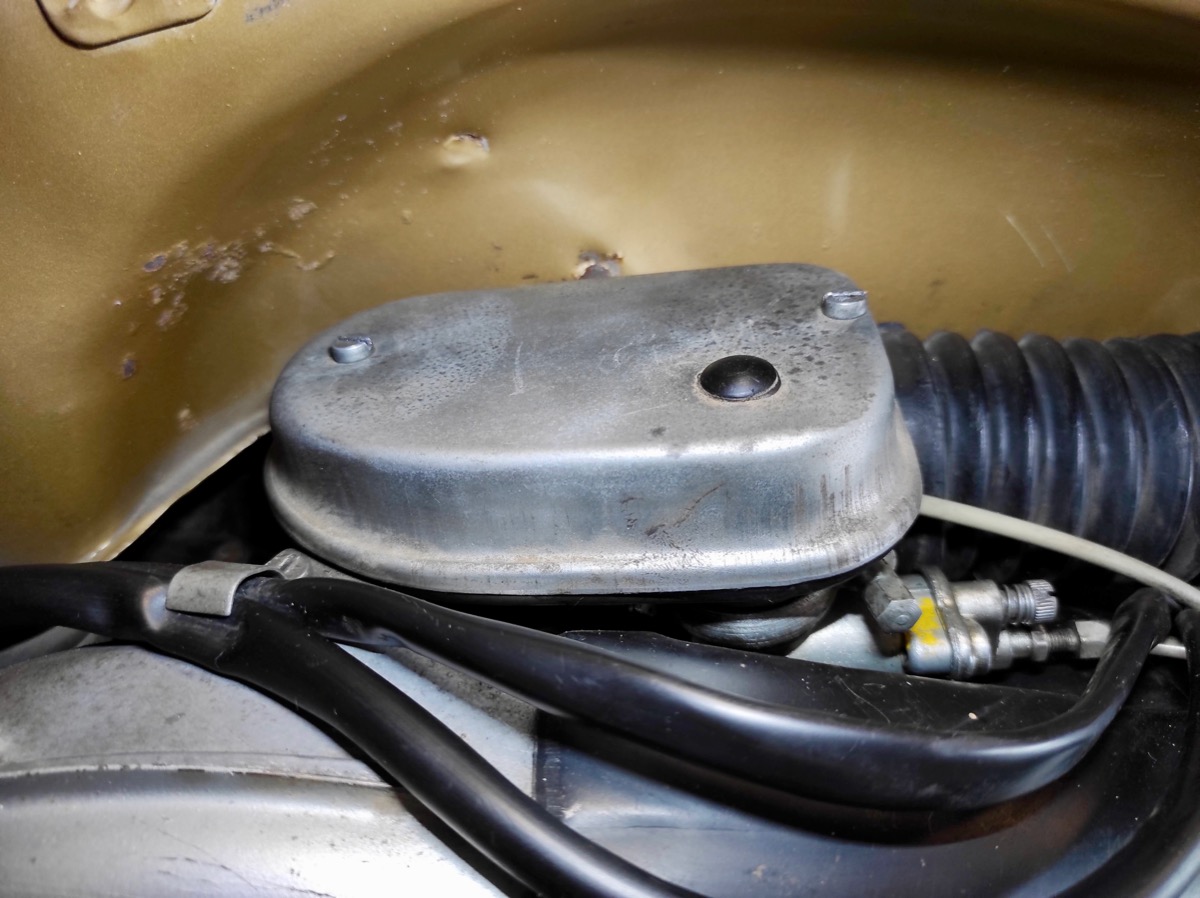
Replacing the air filter element is very easy. After removing the right side panel, the view of the air filter box is immediately clear.

The cover is attached with two M5 screws.
These can be loosened with a screwdriver size 5 to 6.
After removing the two screws, the cover can simply be lifted off.
Here, in our example, is the original one Motovespa air filter insert no longer available at first!
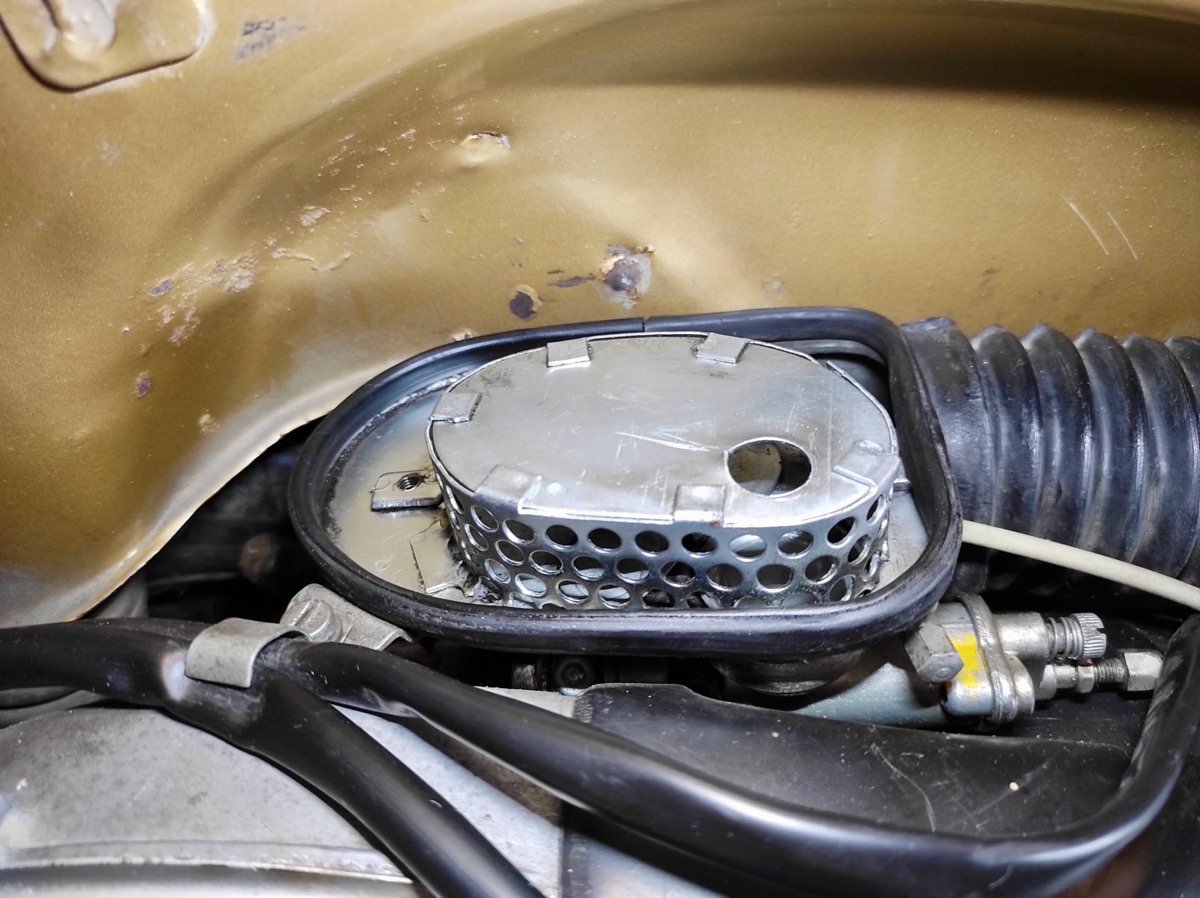
The air filter insert has no installation orientation and can simply be pushed onto the filter housing from above.
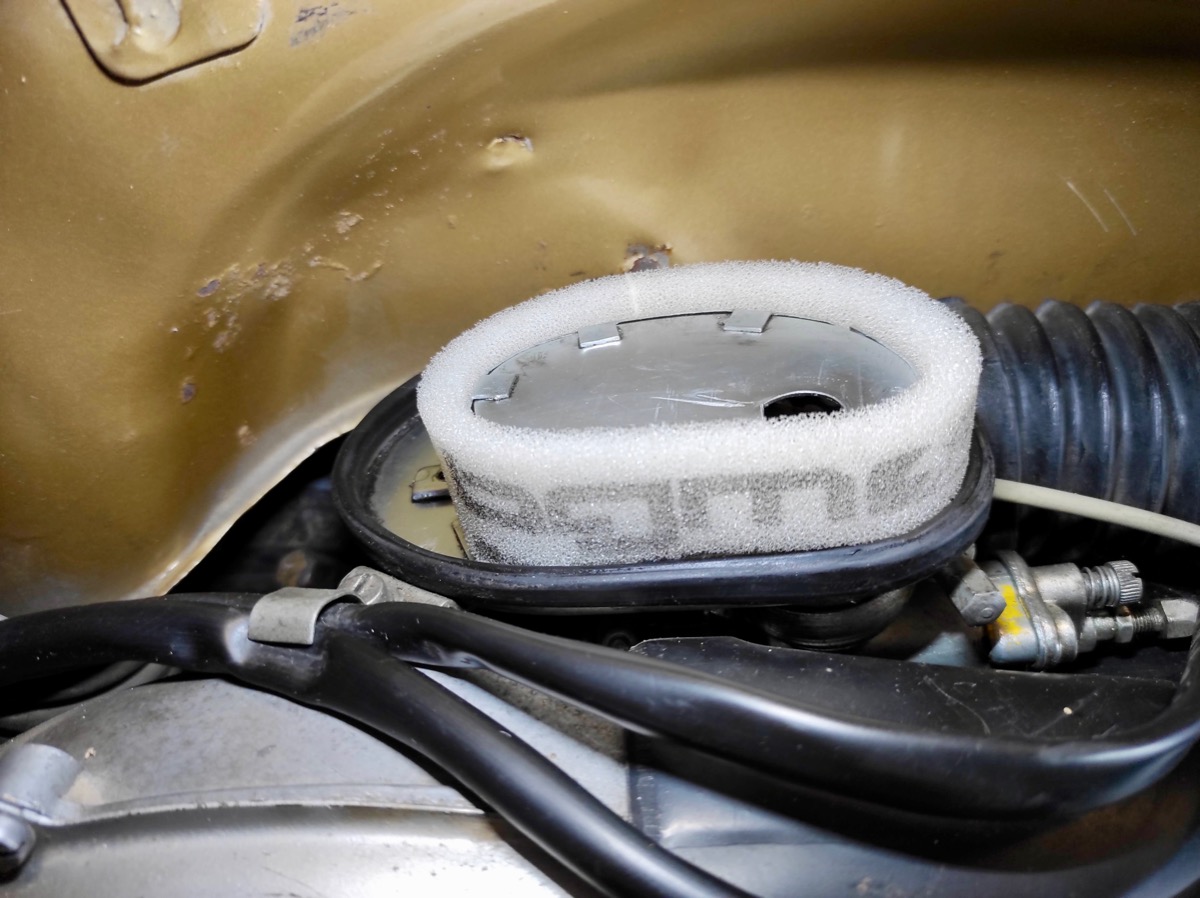
The remaining protrusion of the air filter insert seals against the air filter box cover when installed.
Fasten the cover of the air filter box again with the two screws, reassemble the side panel and the change is complete.
In order to achieve an even higher filter performance, the air filter insert with air filter oil can be used.
However, this is necessary due to the high quality filter material of the bgm PRO filter is not absolutely necessary.

You are sure to have a classic steel brush in your tool kit. Such a DIY all-round brush is practical and has many areas of application, but it can be much better with little effort:
I'll show you 4 small ones here Wire brushes from LESSMANN (Made in Germany) for special areas of application that make it easier for you to work on your scooter for repairs and maintenance!
![]()

Steel brush for cleaning files. You don't need to buy a new file right away if it no longer has the expected effect; cleaning the file is often enough!
This special brush from Lessmann is suitable for cleaning the cuts of metal files so that the cutting effect is fully available again.
The file cleaning brush is particularly suitable for removing chips and strongly adhering metals such as: copper, brass, bronze and aluminum.
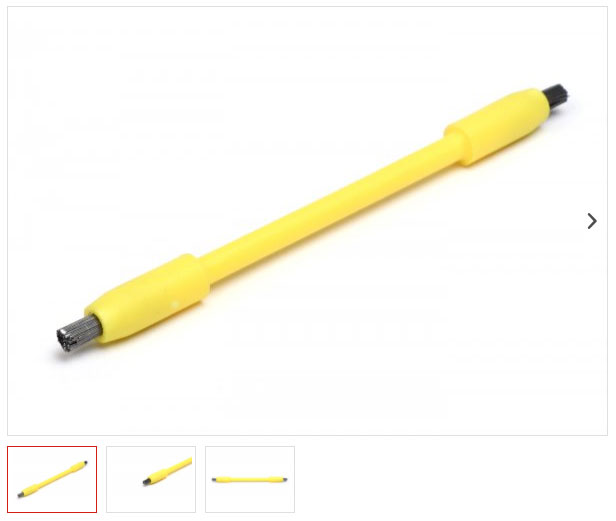
High quality rust eraser with steel bristles.
The brush is ideal for a careful repair of your vehicle with original paint on which sheet metal is partially rusted. which should not be ground flat. Keyword: O-paint rescue.
With the rust eraser, oxide particles can be removed effortlessly, even on surfaces that have already been scarred. The bristles on both sides have different thicknesses for precise work. Then the area can be passivated with a suitable agent (e.g. multifilm).
CONCLUSION: Great little tool with a big impact and fun factor

This quality steel brush is particularly suitable for removing coarse dirt such as rust.
It is not suitable for use on surfaces made of plastic, aluminum, copper, etc.
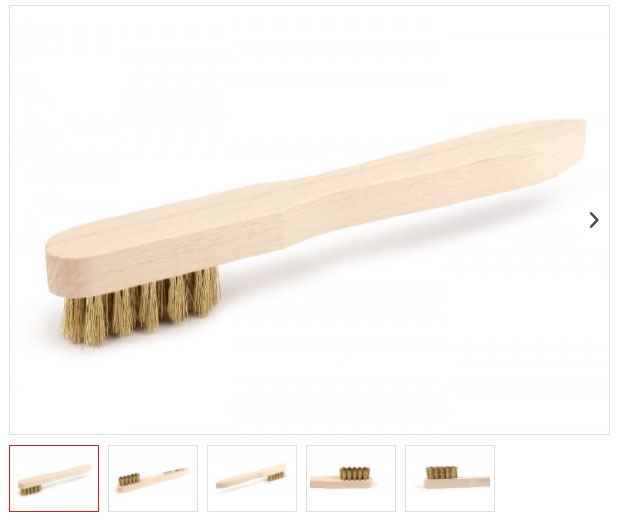
Brass brush for cleaning the ground and center electrodes of spark plugs.
Since brushes made of steel roughen the surface unnecessarily and new dirt adheres even better than before,
A brush made from a softer material than steel should always be used to clean spark plugs.
In the Scooter Center you get Lessmann brusheswhich have proven to be particularly suitable and proven in our everyday workshop and repairing / tuning scooters. Such a small brush can be very helpful and really make it easier for you to work cleanly on your scooter / Vespa / Lambretta etc.!
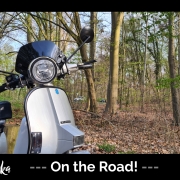
As we would say in Colombia: “I'm in my salsa * " (it means that I am fully in my element). I received Platónika with 18 km and exactly 15 days later, she had a thousand km more.
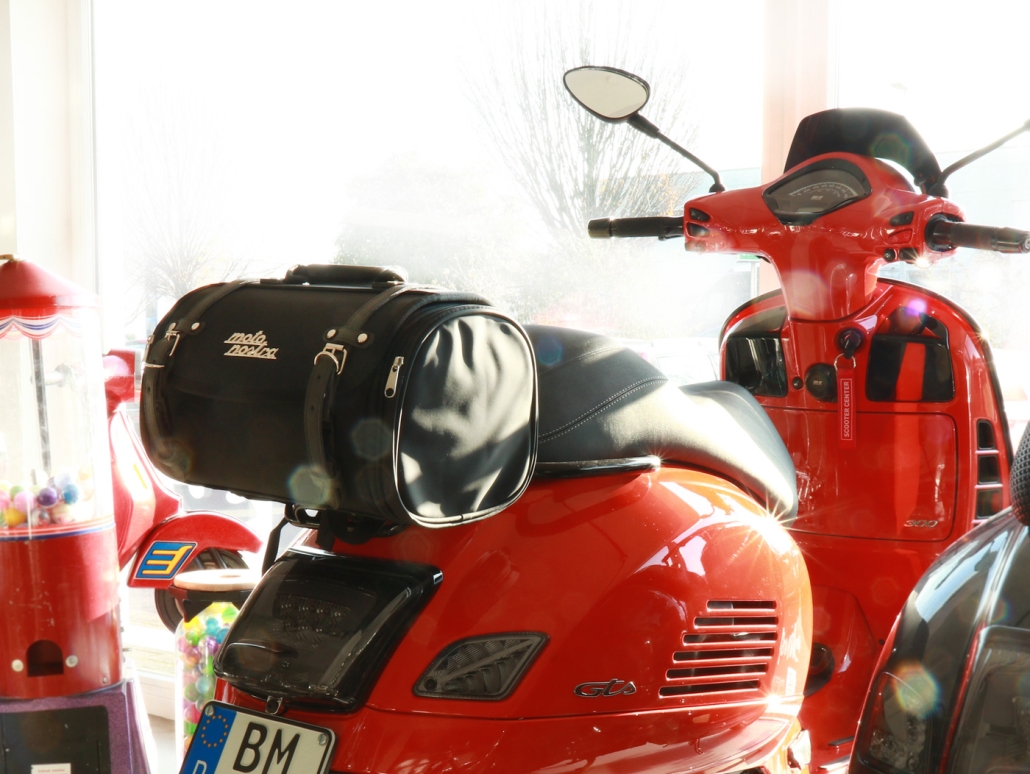
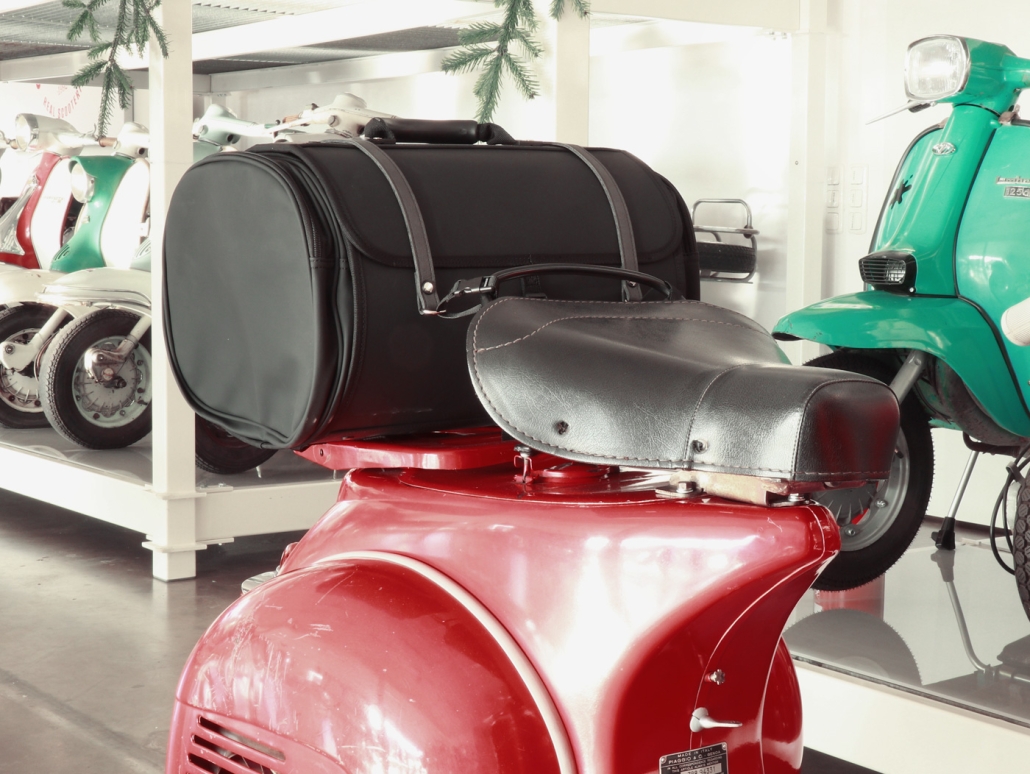
Completely excited because spring is already there colors I started to drive. And even put together a Motonostra accessory set for touring:
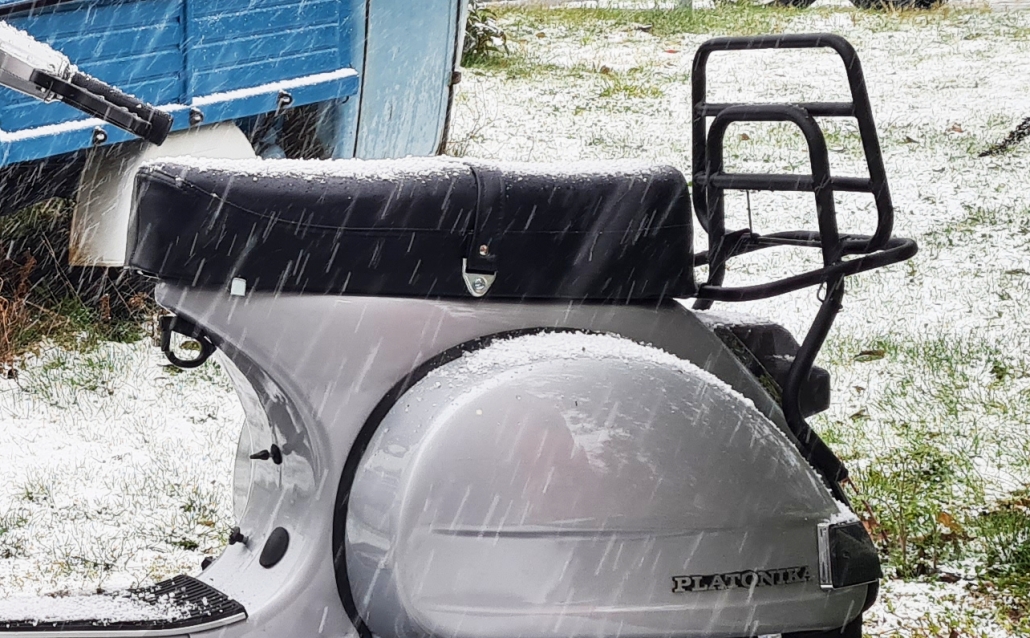
But with this German weather you never know! And sure enough, a week later it starts snowing ... that shouldn't stop me, so I'll protect myself from the harsh cold and keep going.
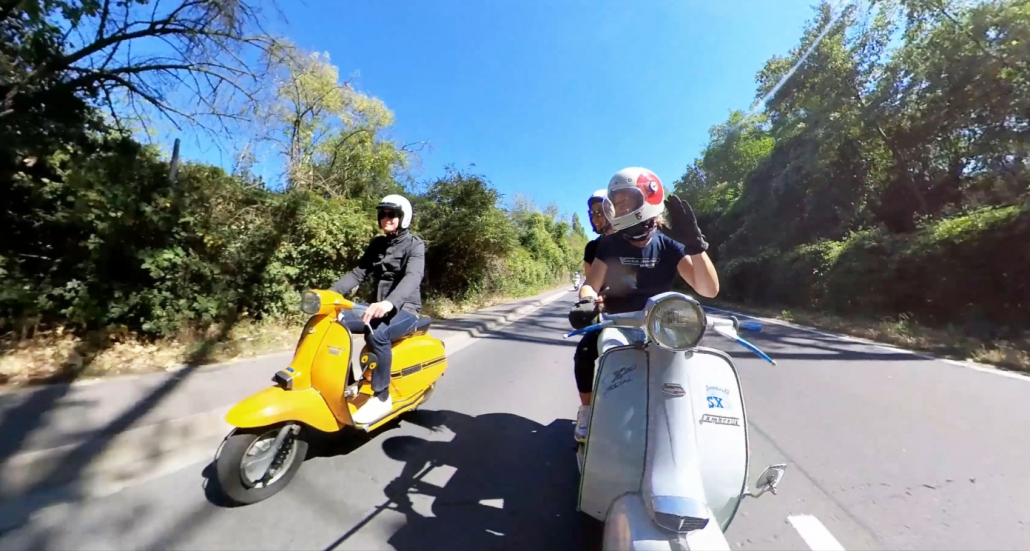
Pictures and videos come and go, but I still think I'm missing something. The reason I fell in love with this scene: Indeed, their Vespisti.
No meetings in sight, "then I'll go with my colleagues" I thought, but who could go with me? in the marketing office where i'm sitting i only have the two of them Lambretistas found…
And now ... why not?
Did you miss any details of Platónika's story? You can find the full story here.