

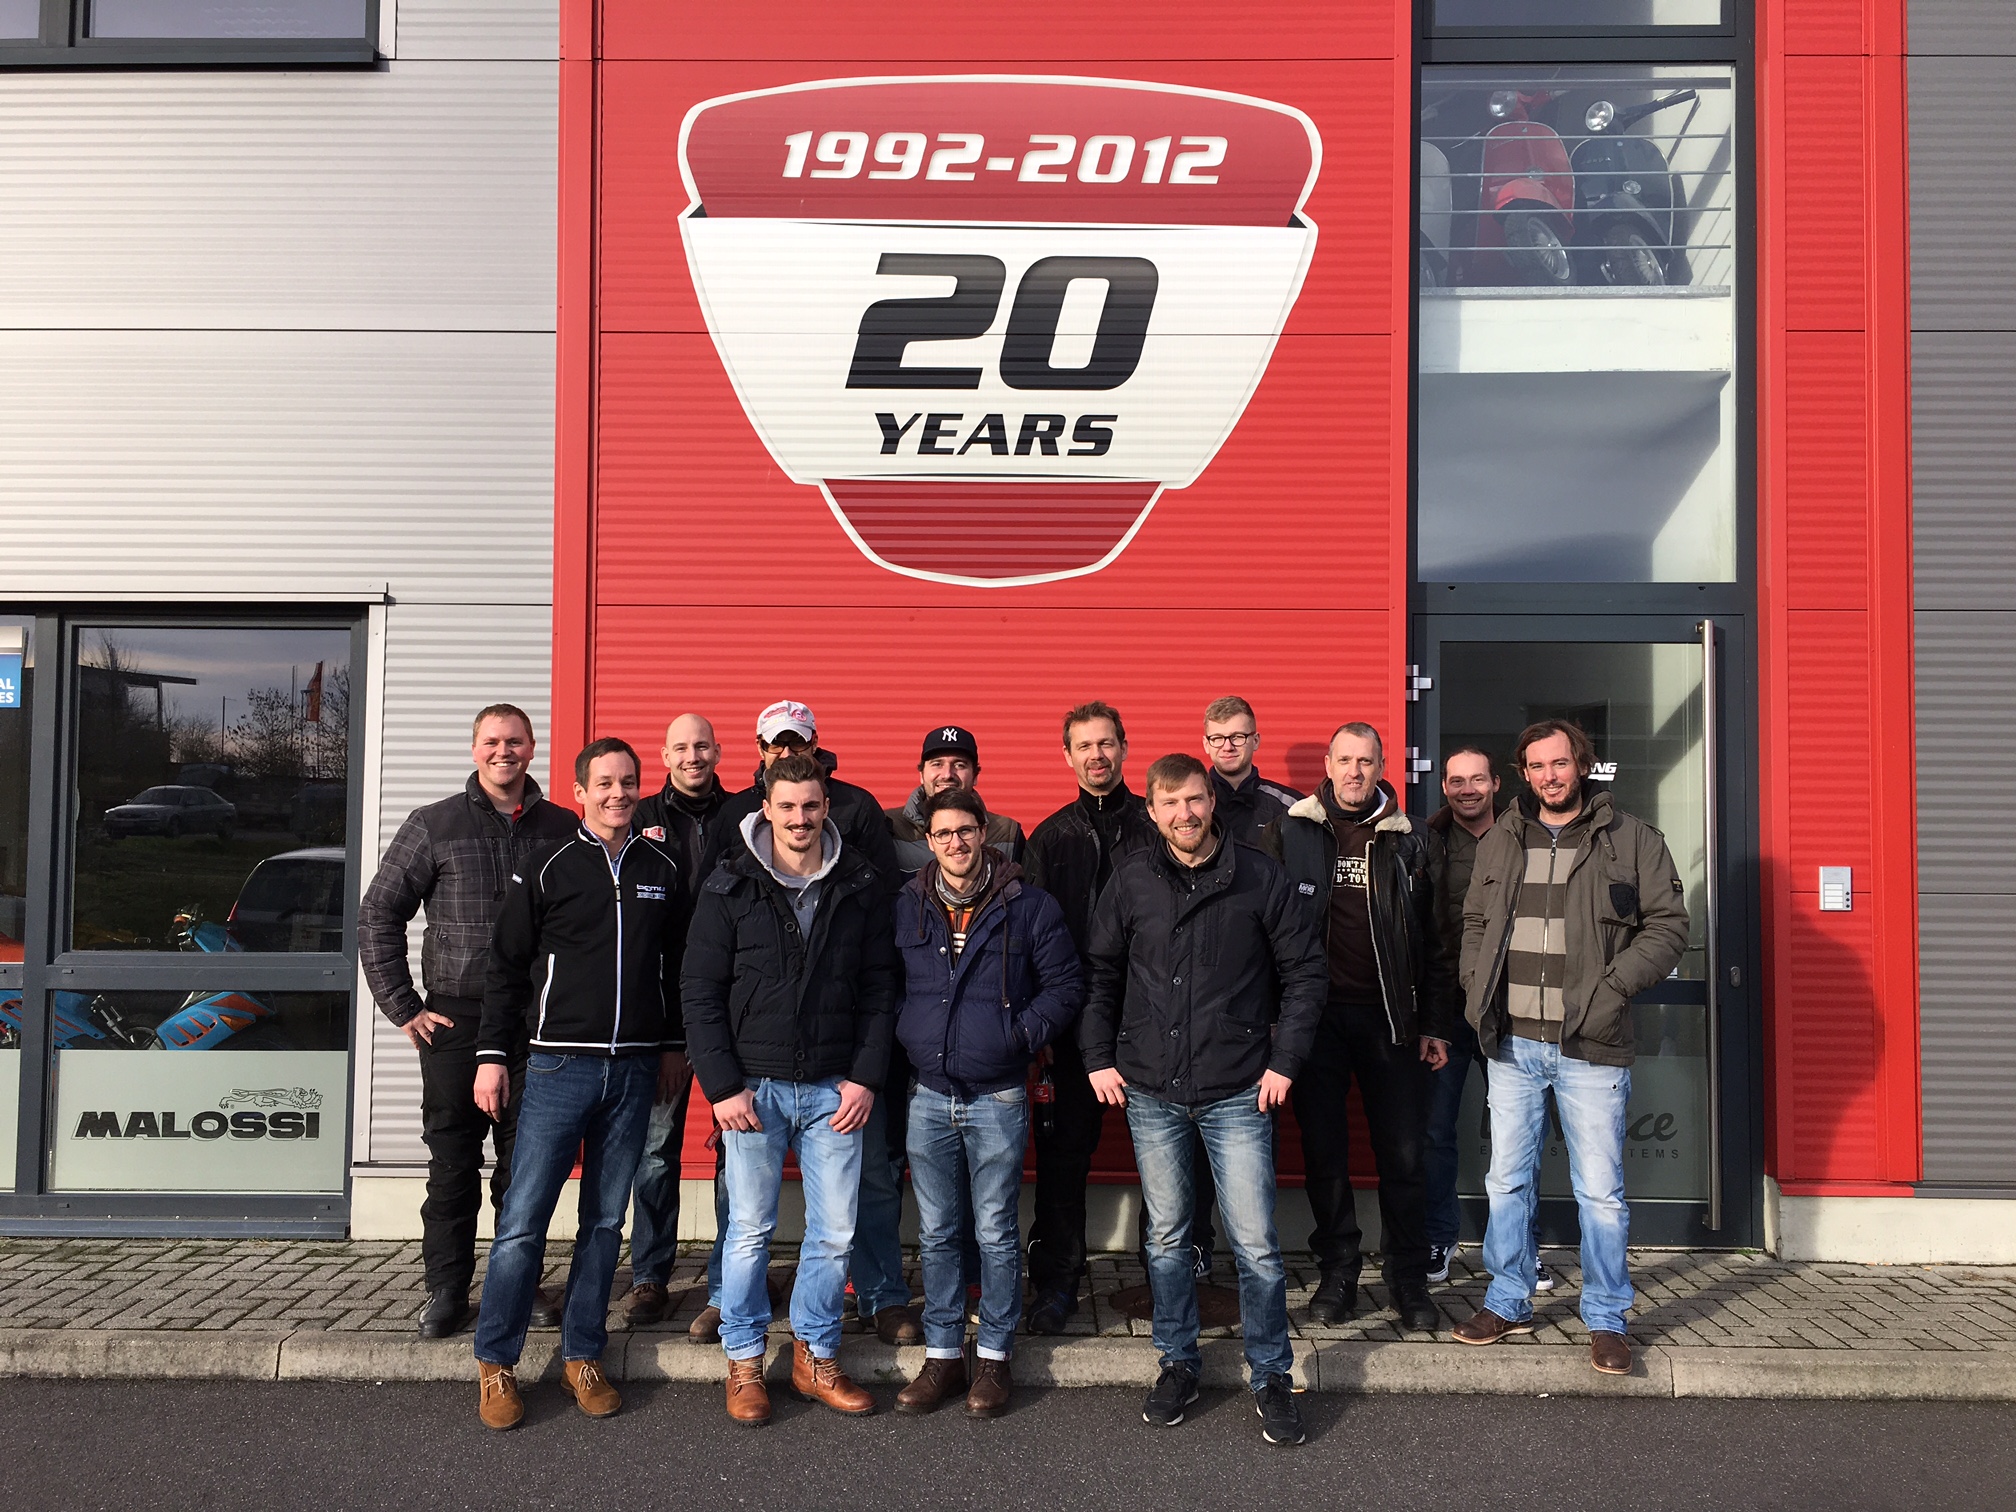
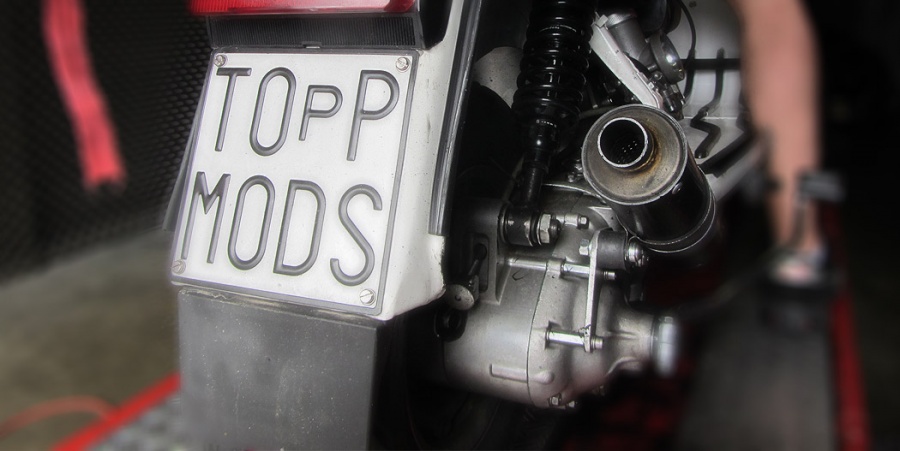
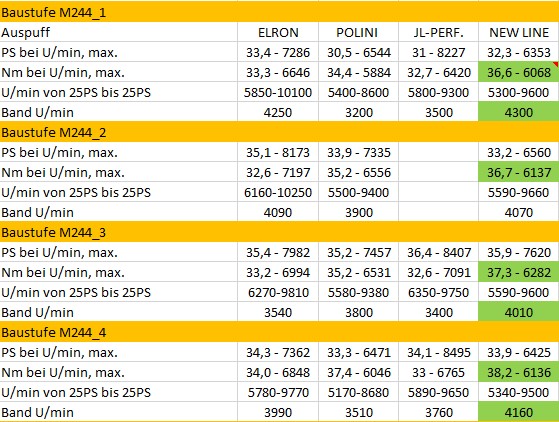
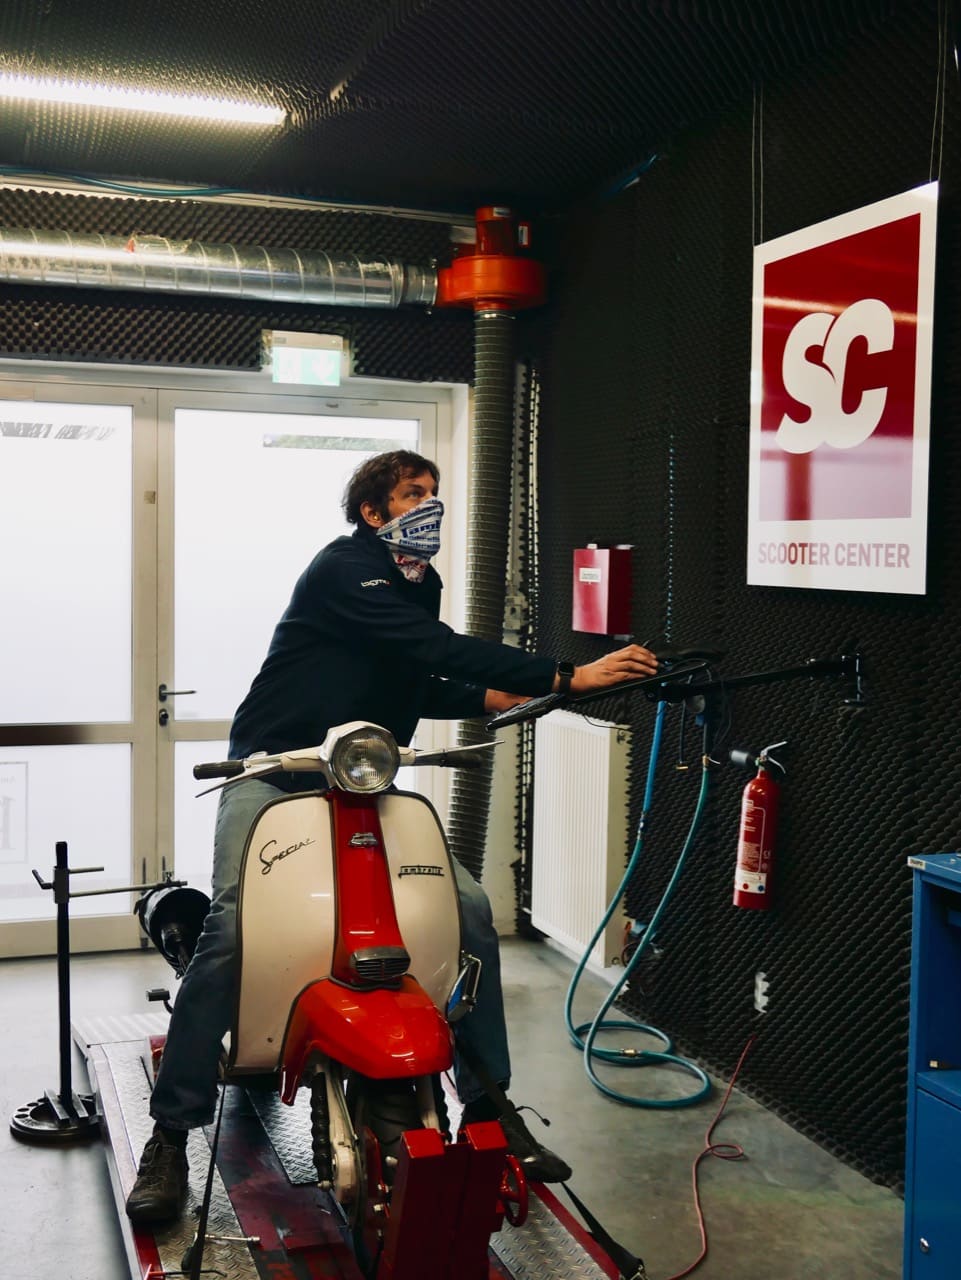
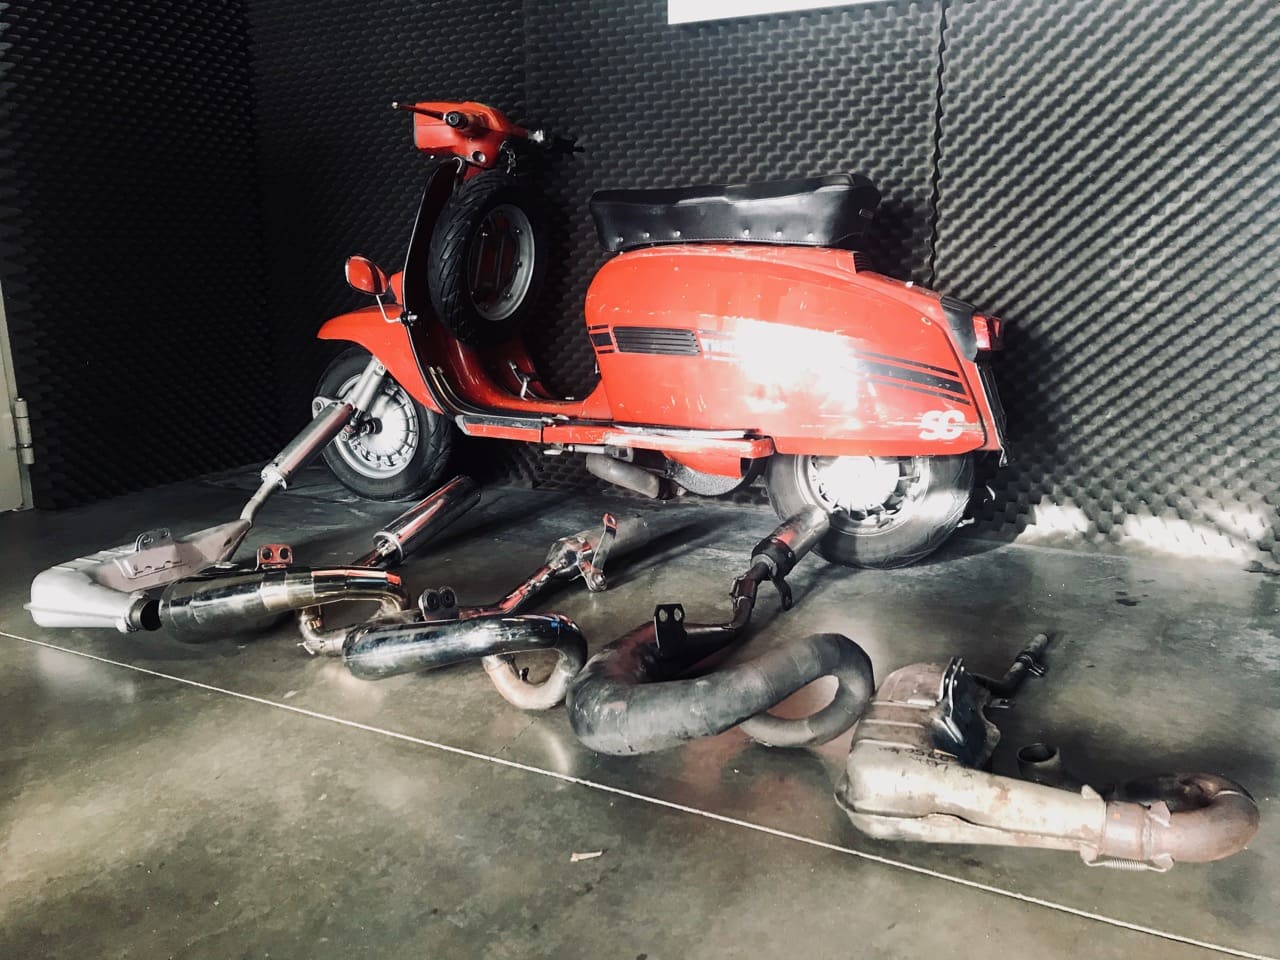
Test bench runs, diagrams, experiences and results

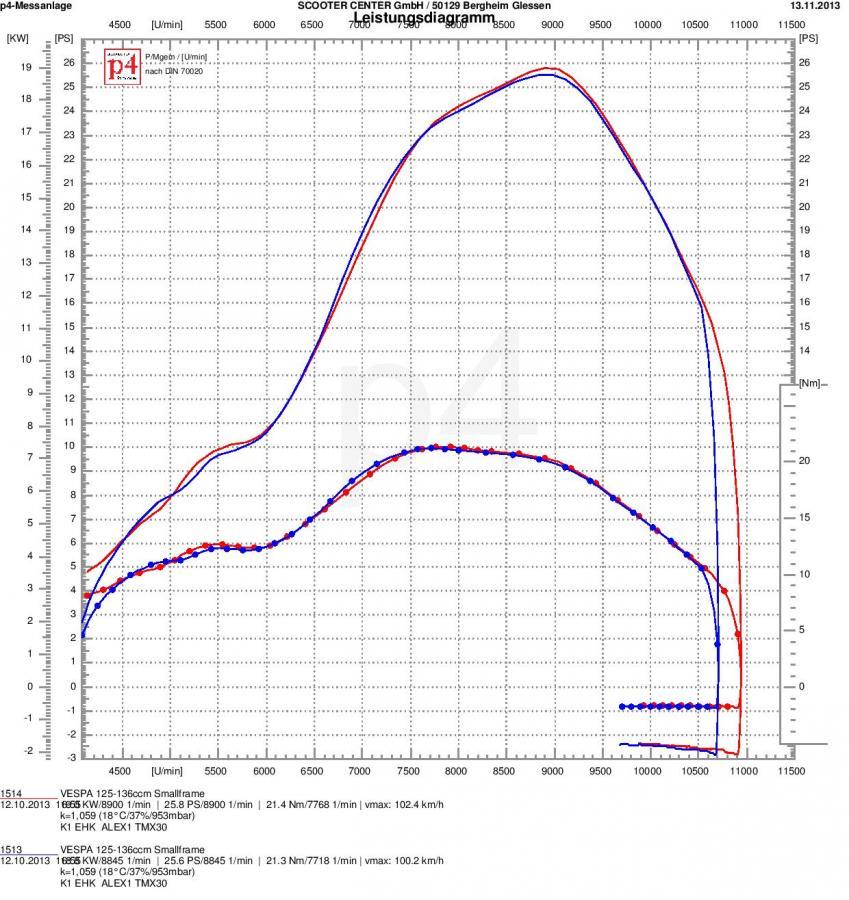
In the fourth part of our little blog series we make the following changes to our test engine:
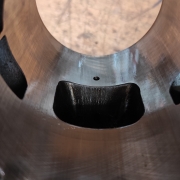
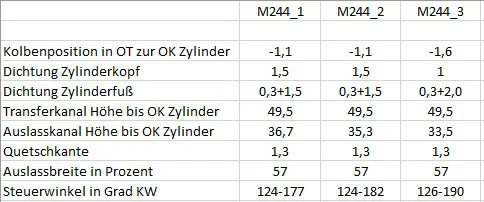
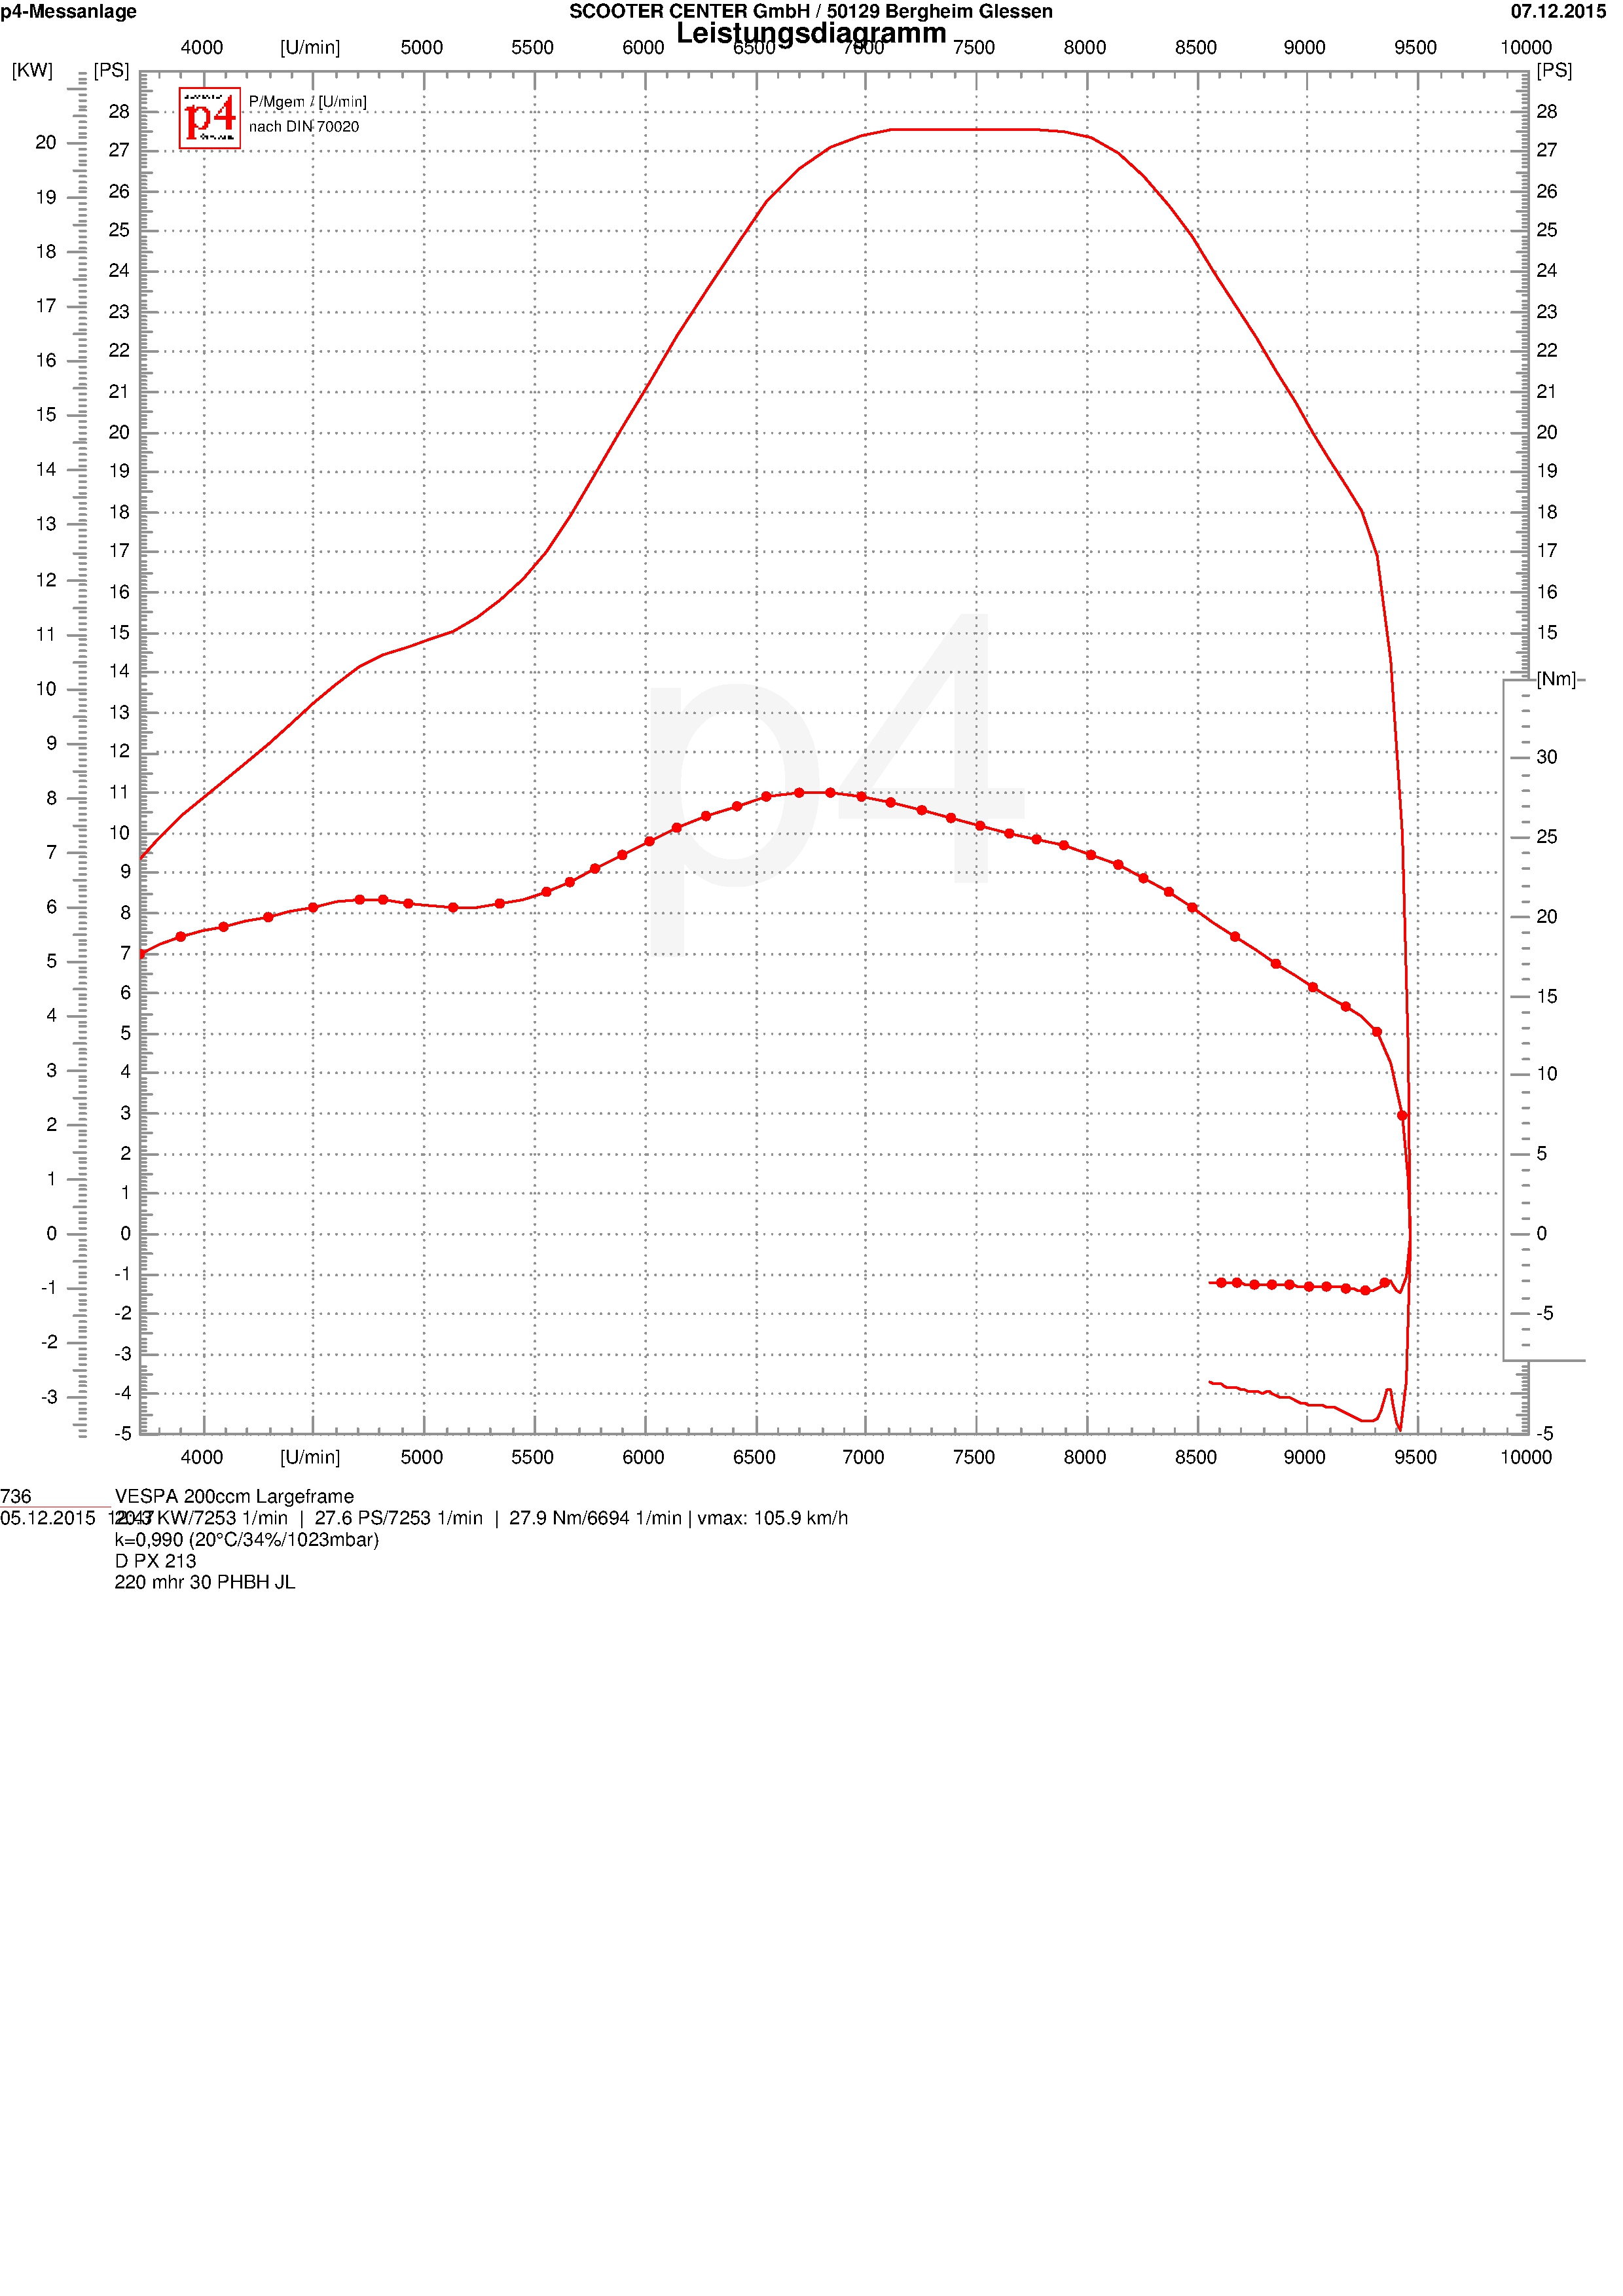
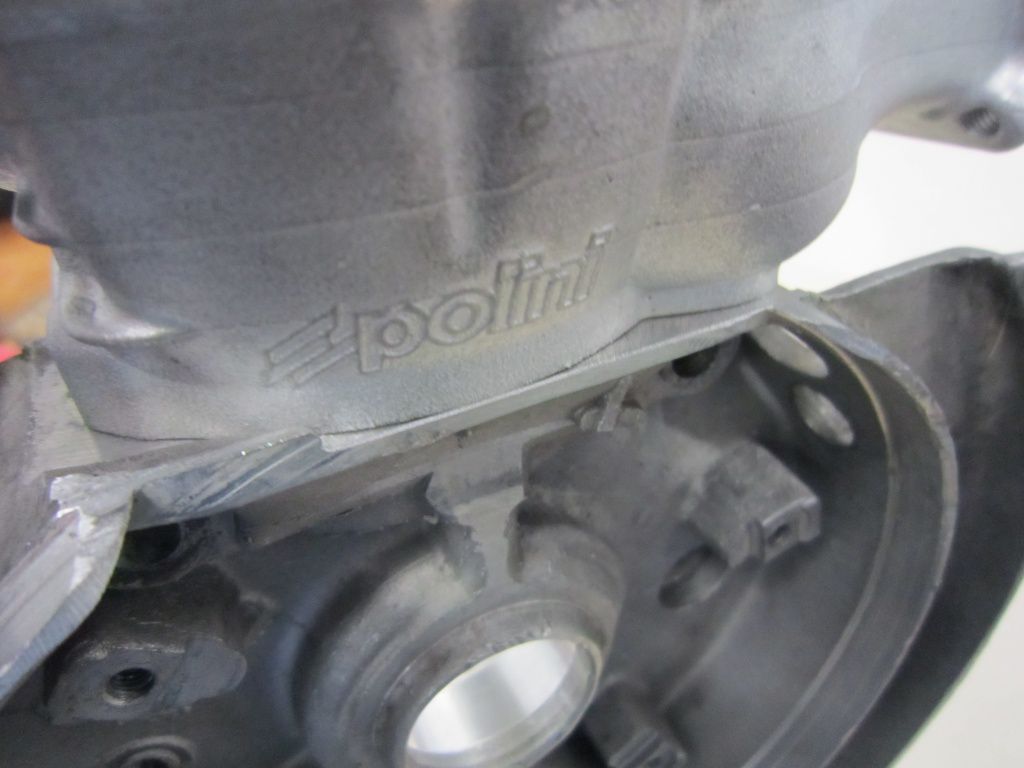
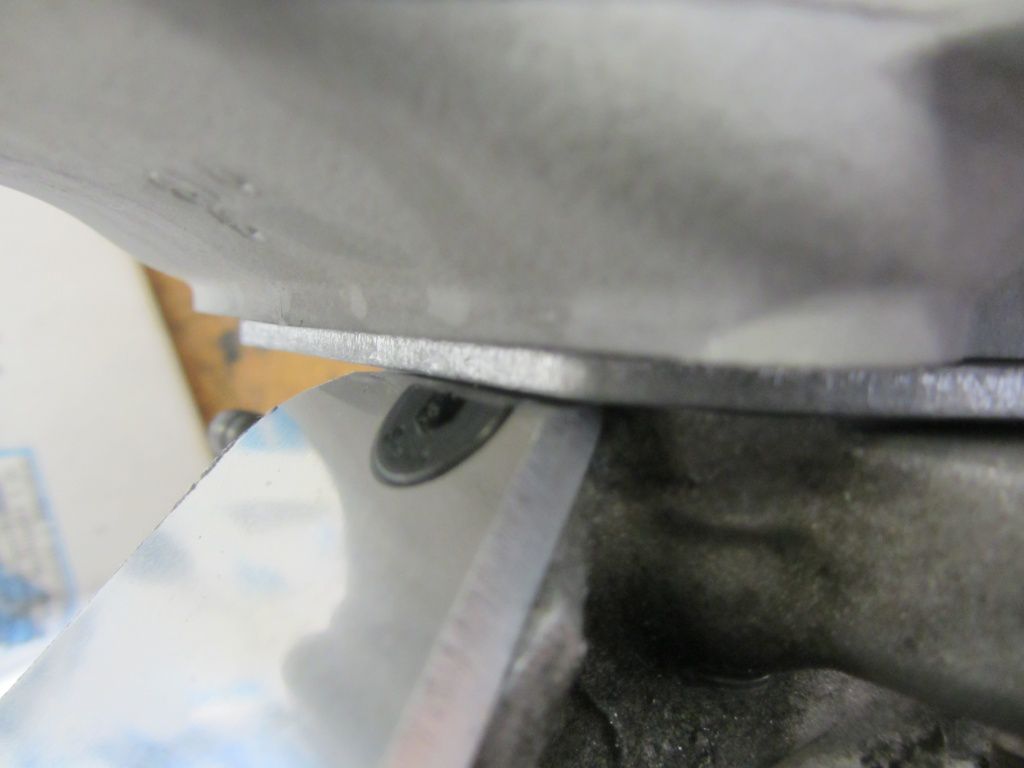
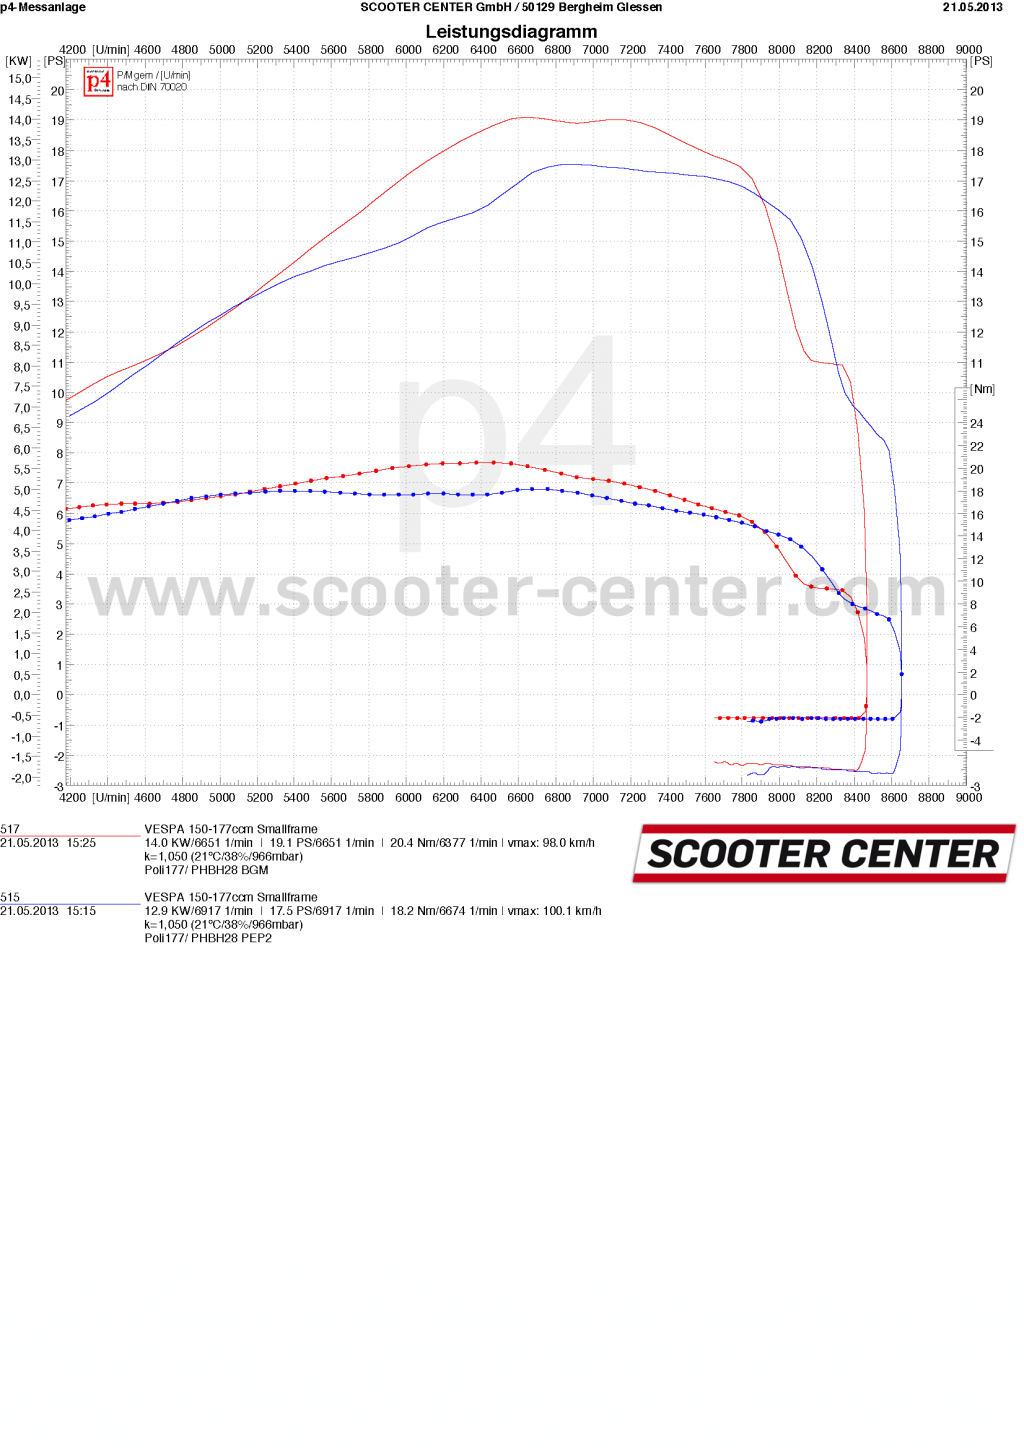
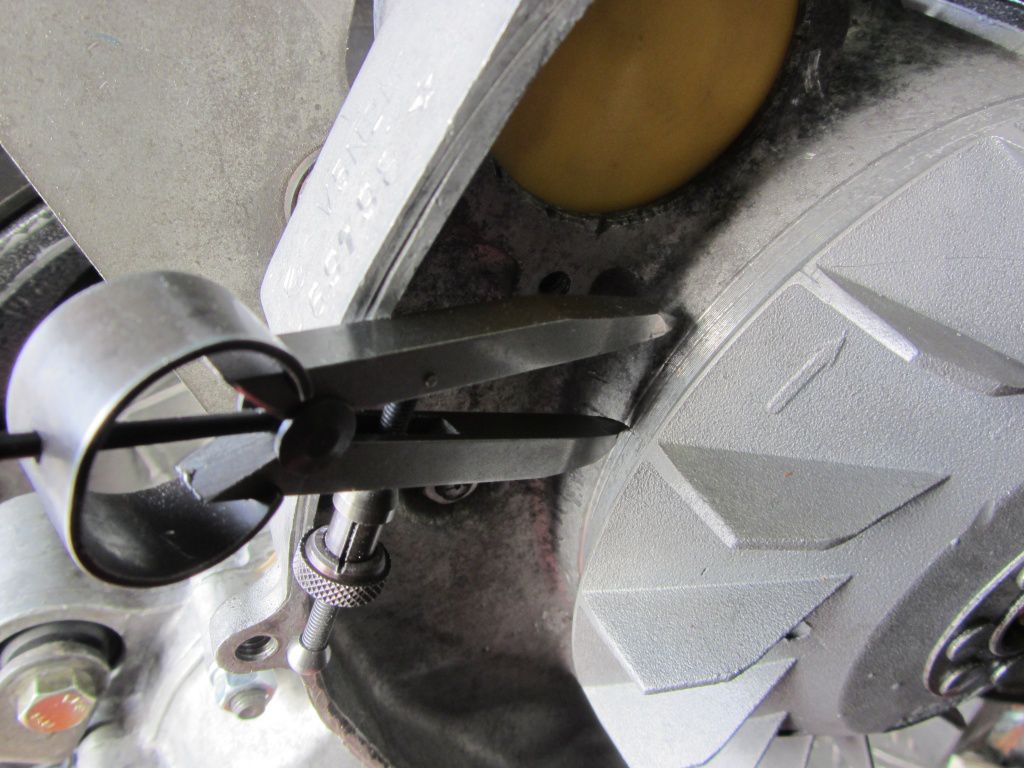
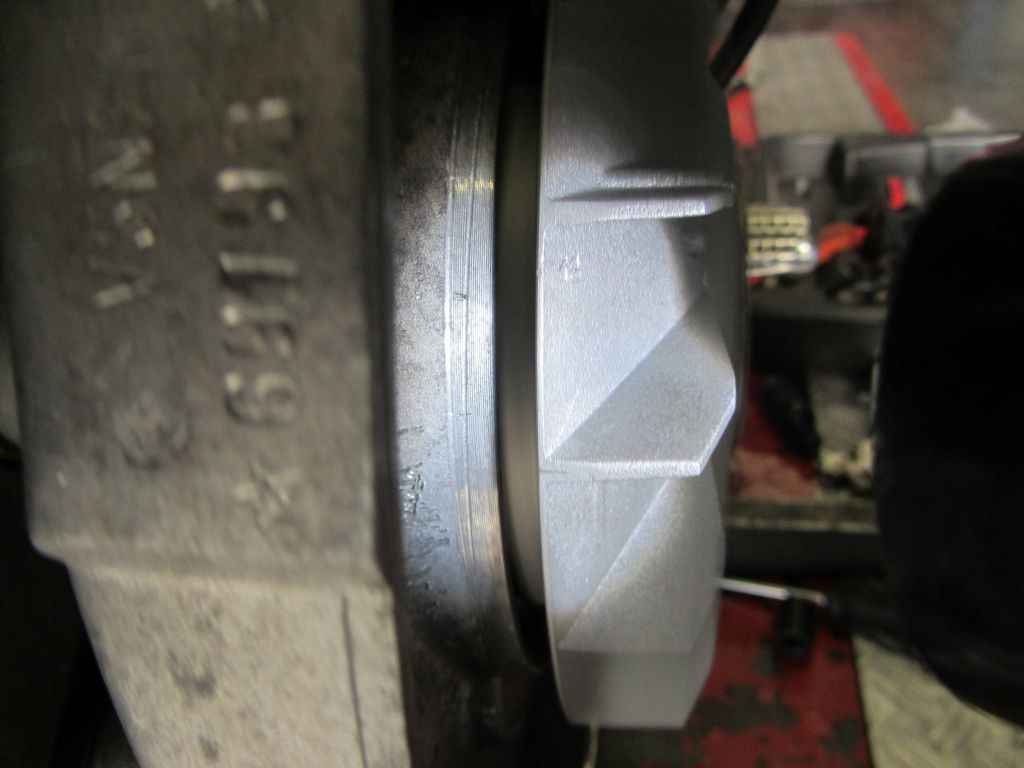
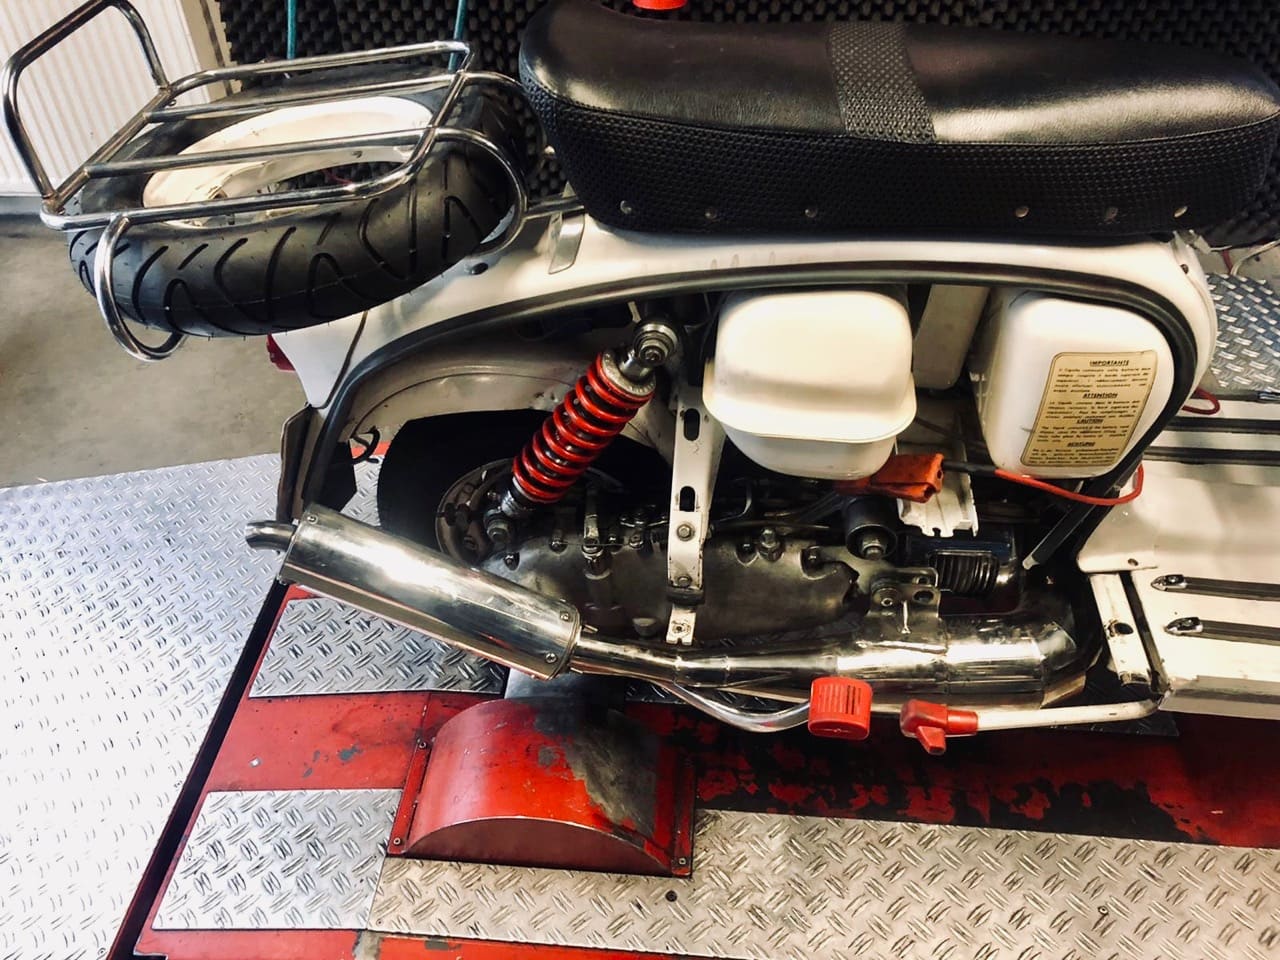
The cylinder is attached at the foot with two 1mm Spacers increased by a further 2mm compared to level 0.5. This changes the steering angle of the transfer channels from 124° to 126°. The outlet is adjusted to a control angle of 190° by milling. To do this, the outlet in the cylinder was raised by 1.8mm. The outlet width remains unchanged at 57%.
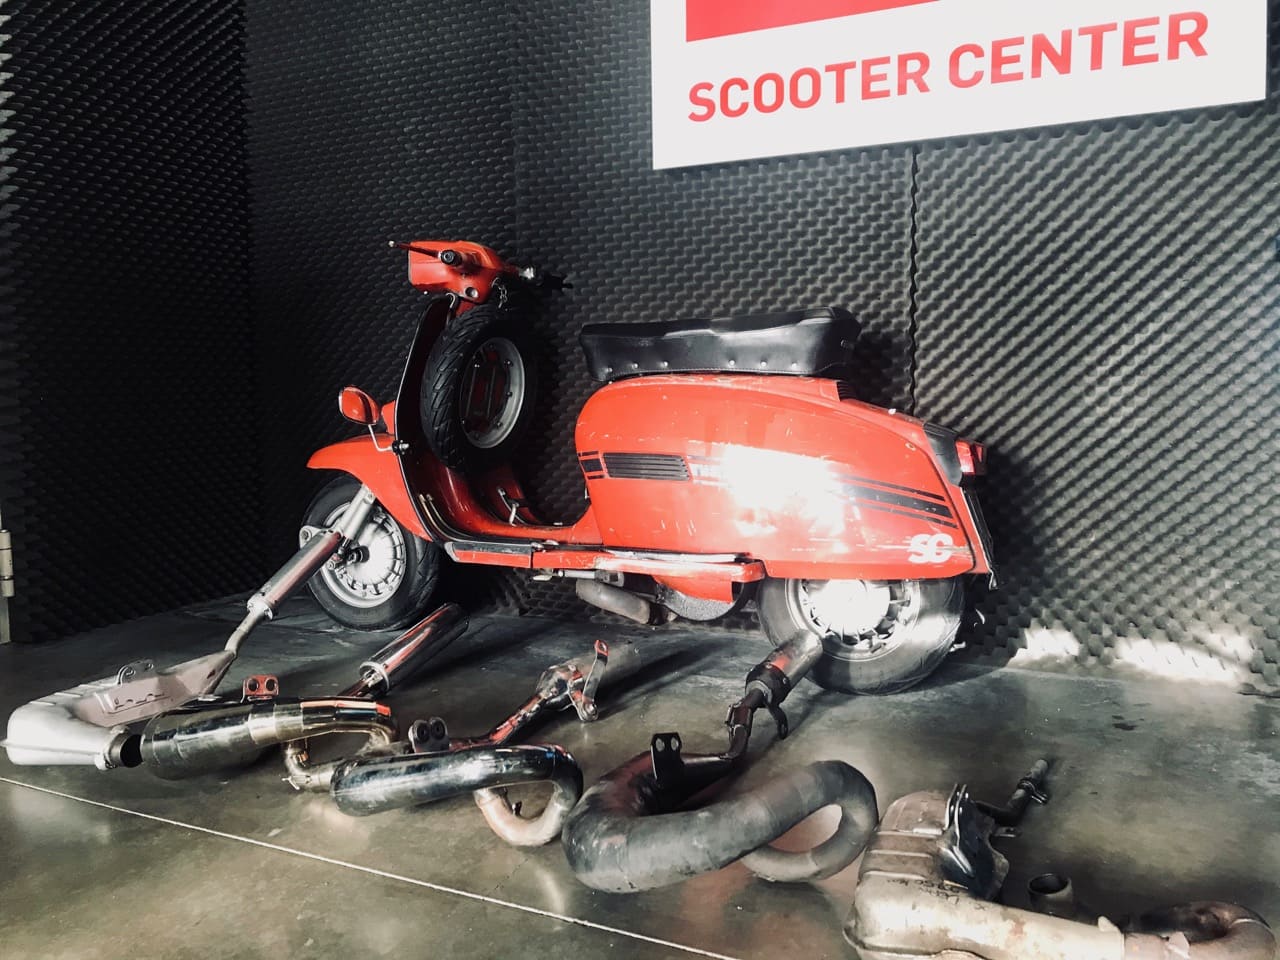
![]()
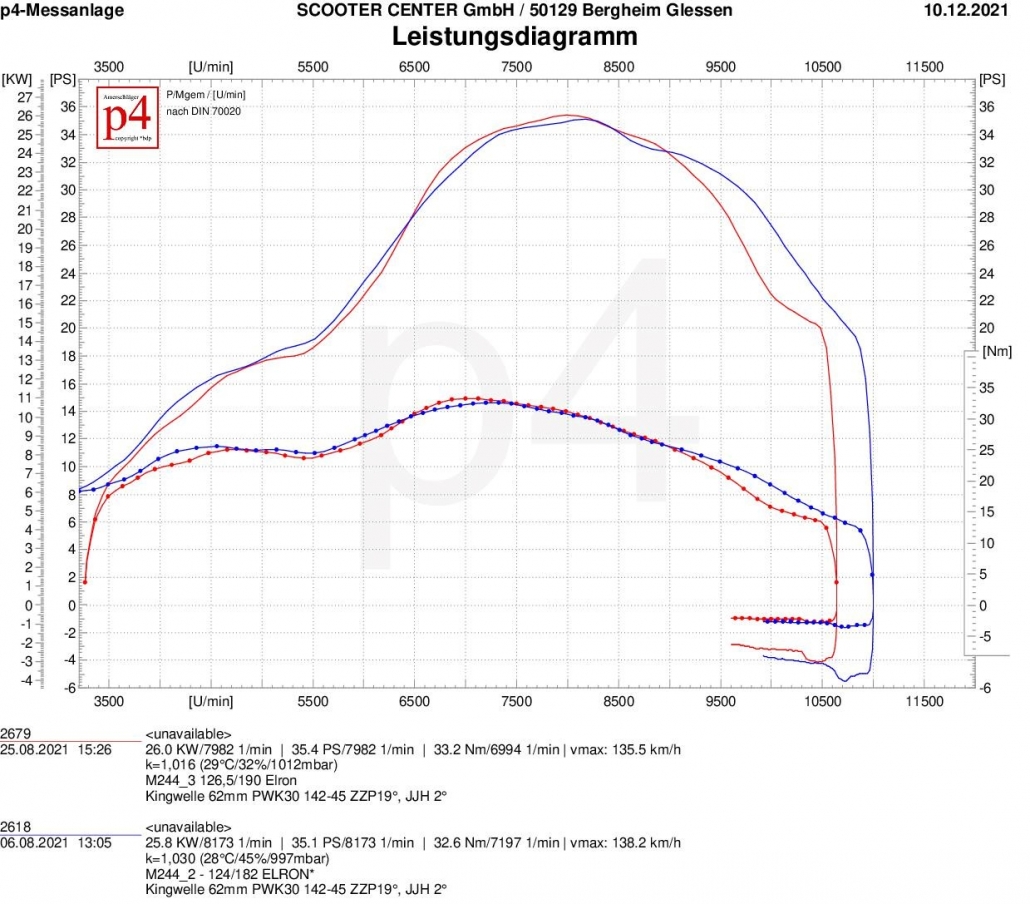
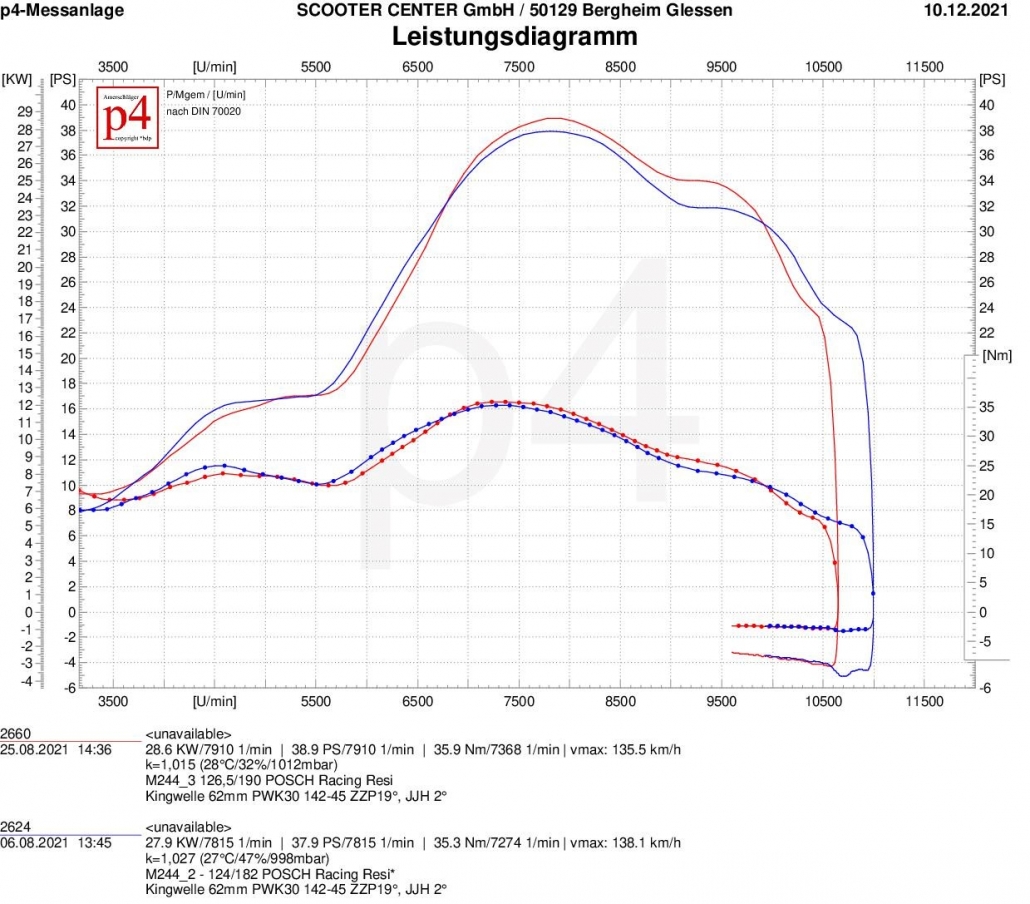
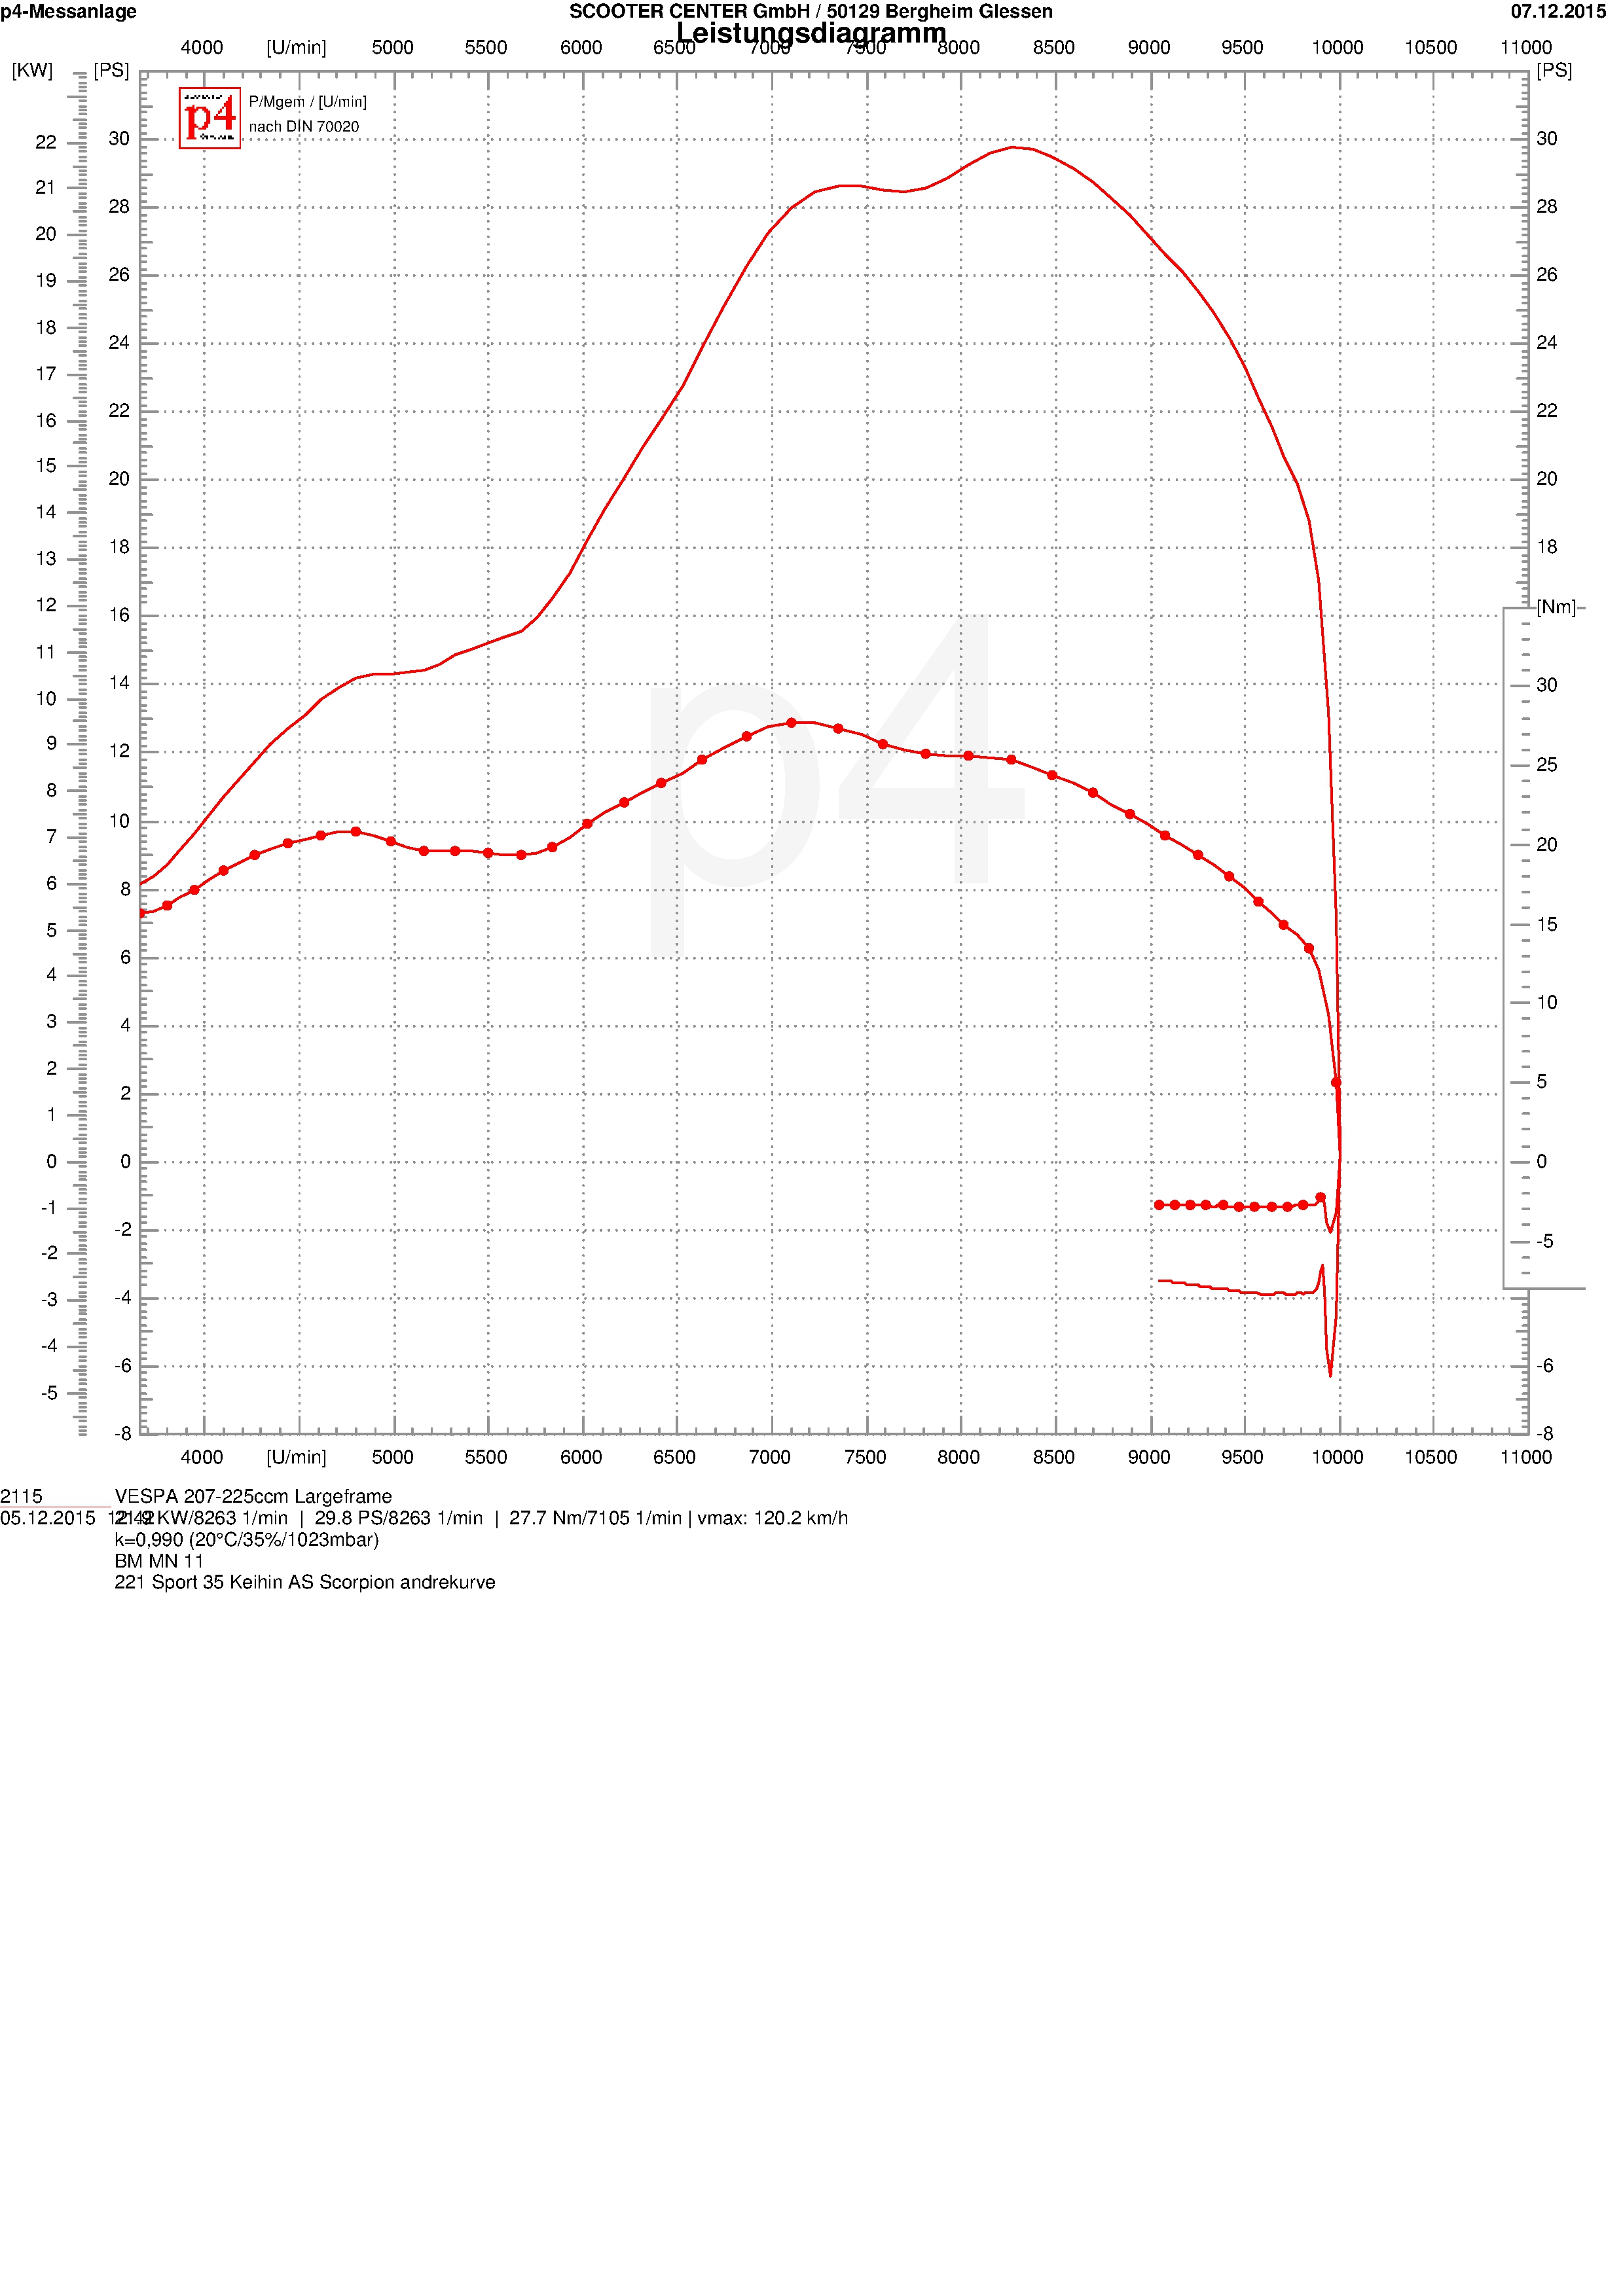
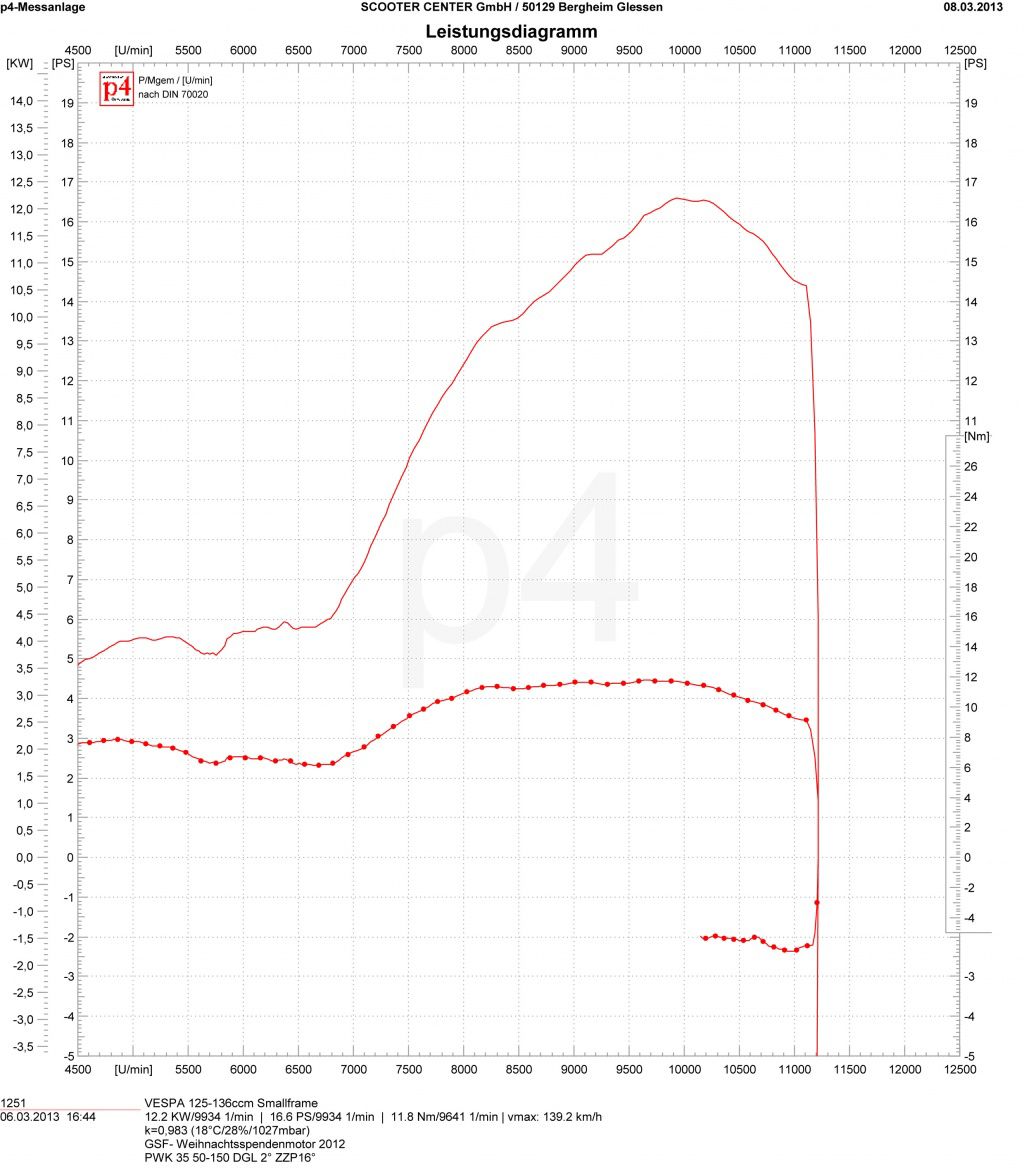
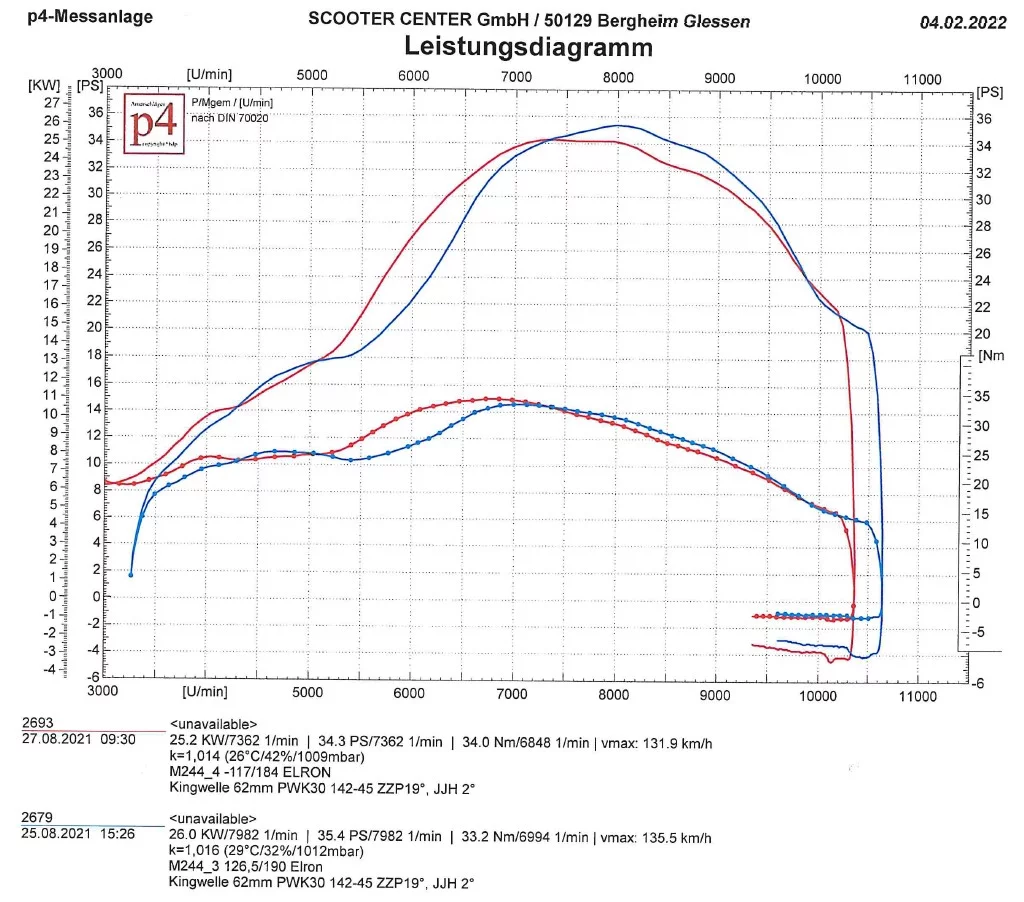
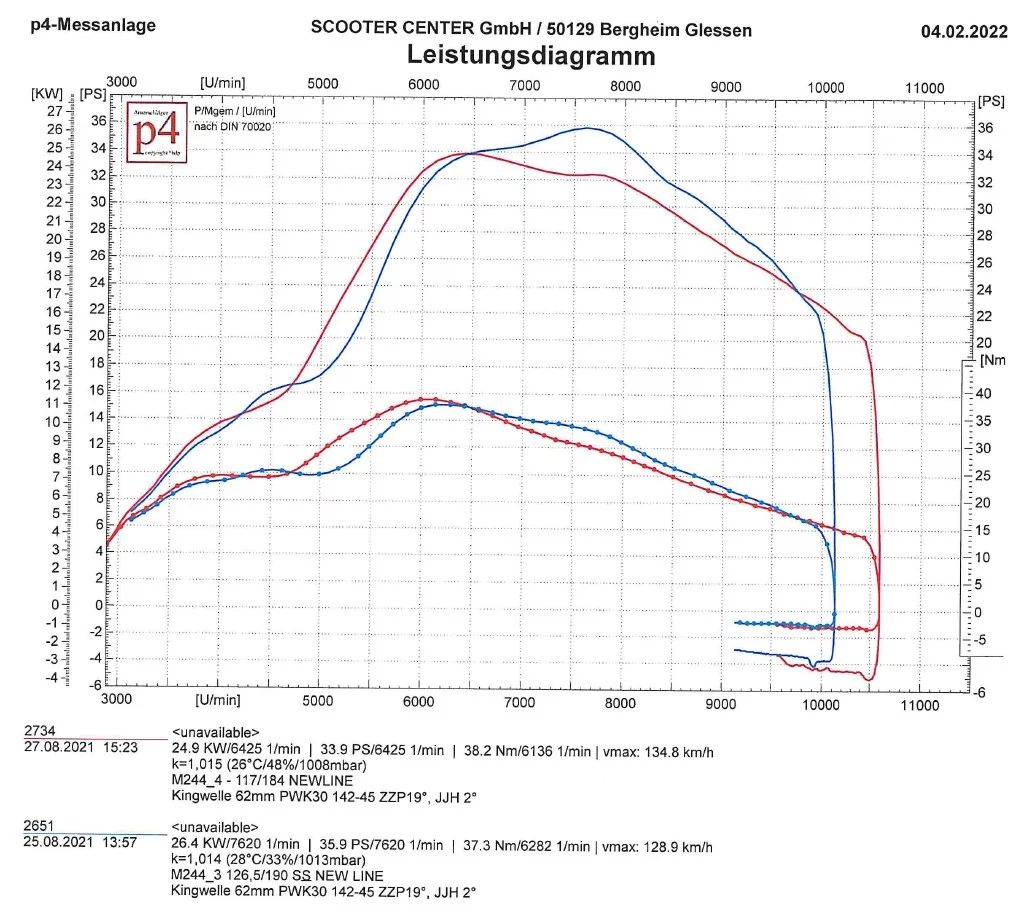
A little more nervous exhaust systems would show a clear shift in the direction of performance with the changes made, but the Elron is almost unimpressed by the specifications of the cylinder and retains control over the characteristics of the engine. A slight increase in the maximum values after the decimal point only indicates that the Elron has noticed that the cylinder is sending a clearer signal through the exhaust. However, the maximum torque remains at the same level as in the first construction stage.
The available speed range is reduced by 500 rpm to 3540 rpm.
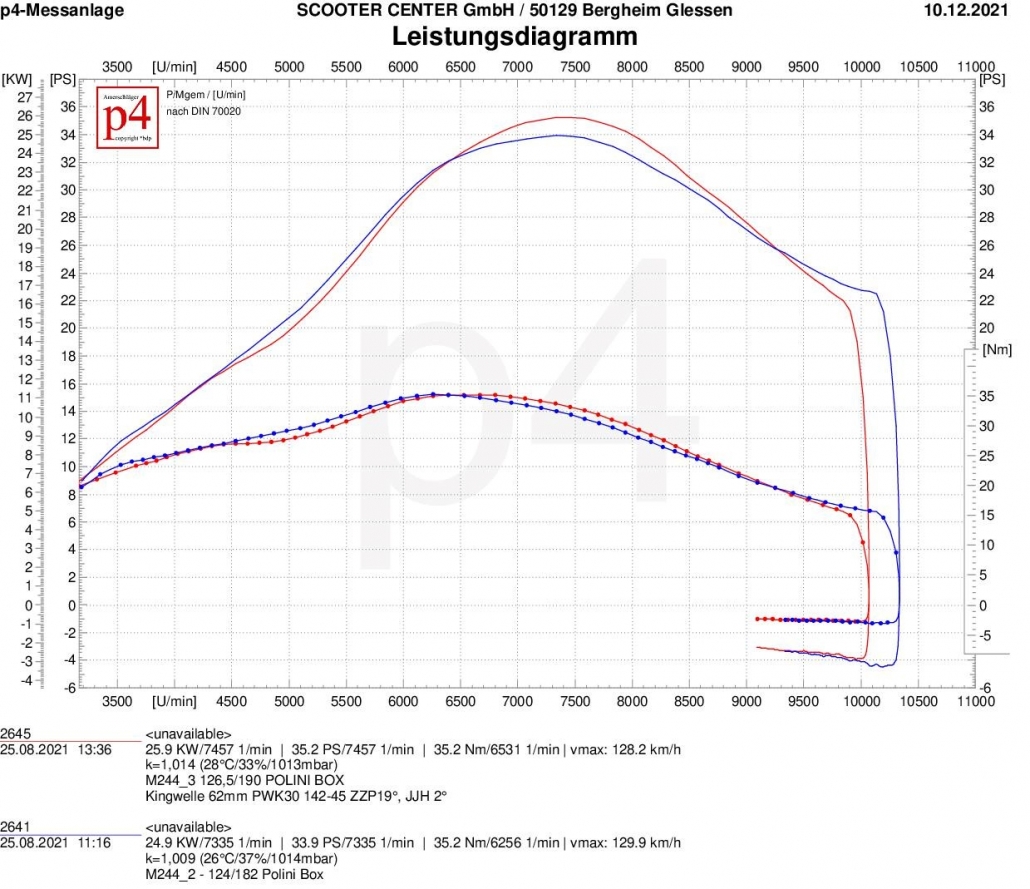
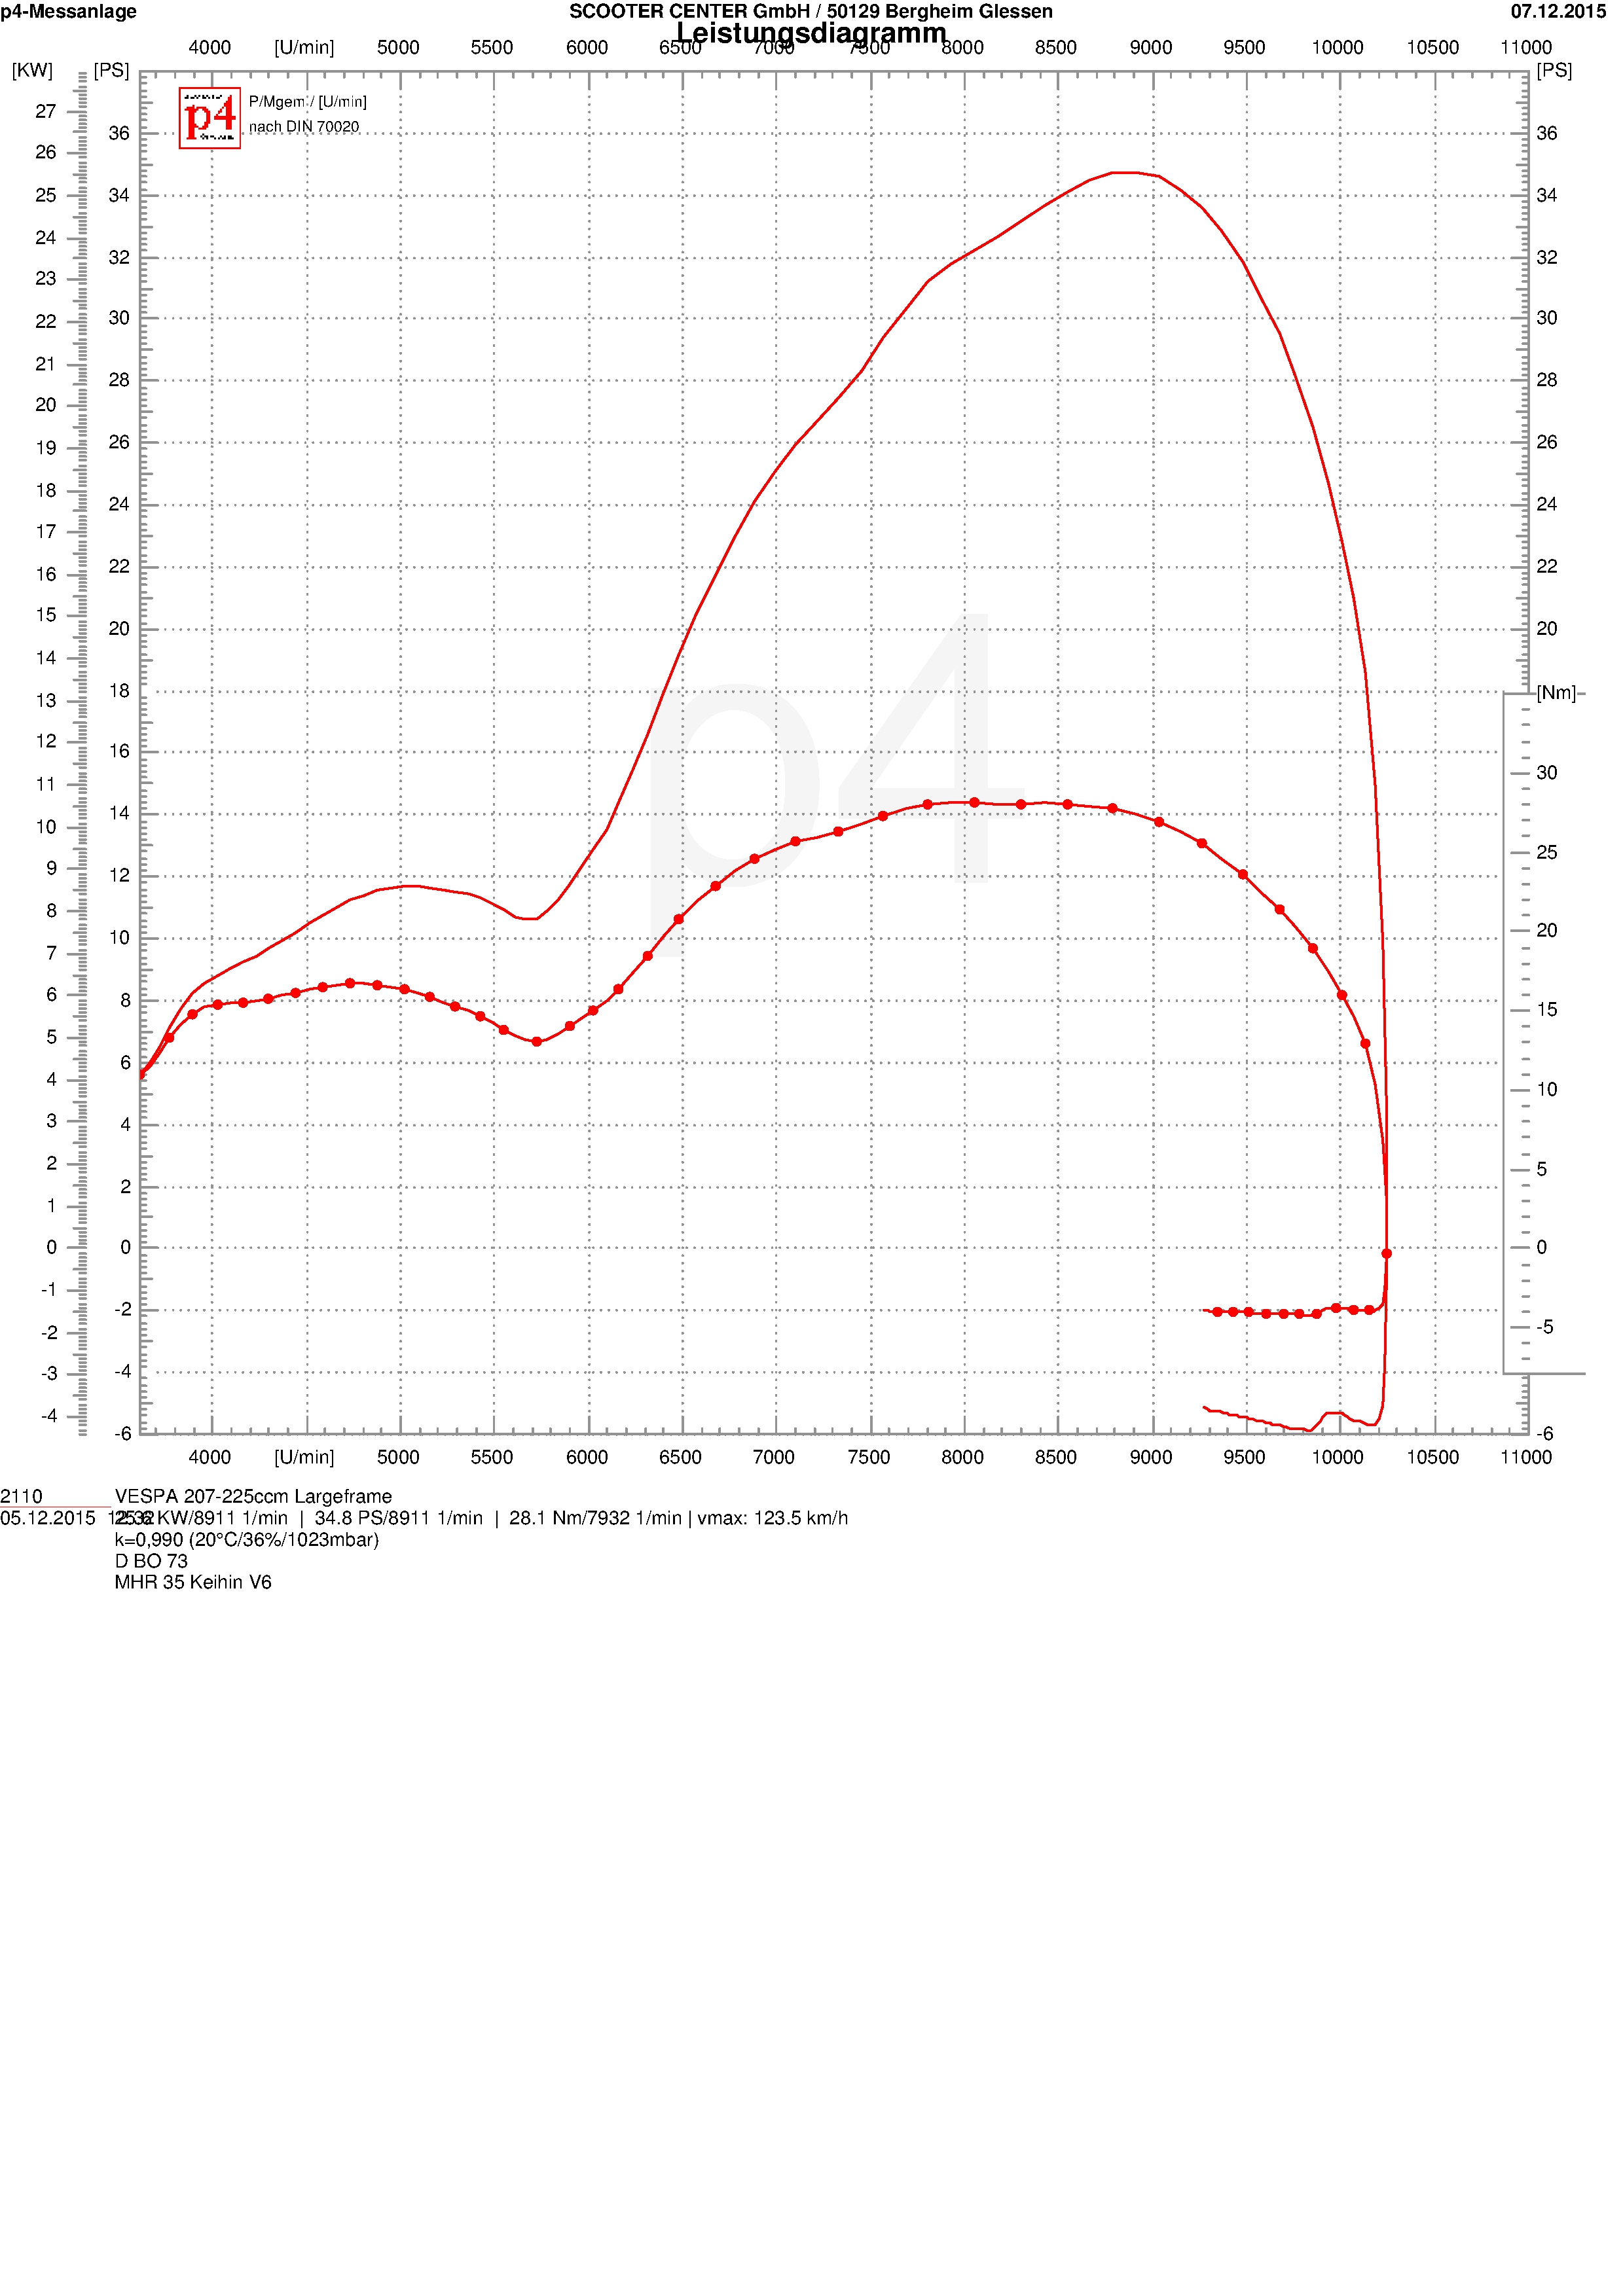
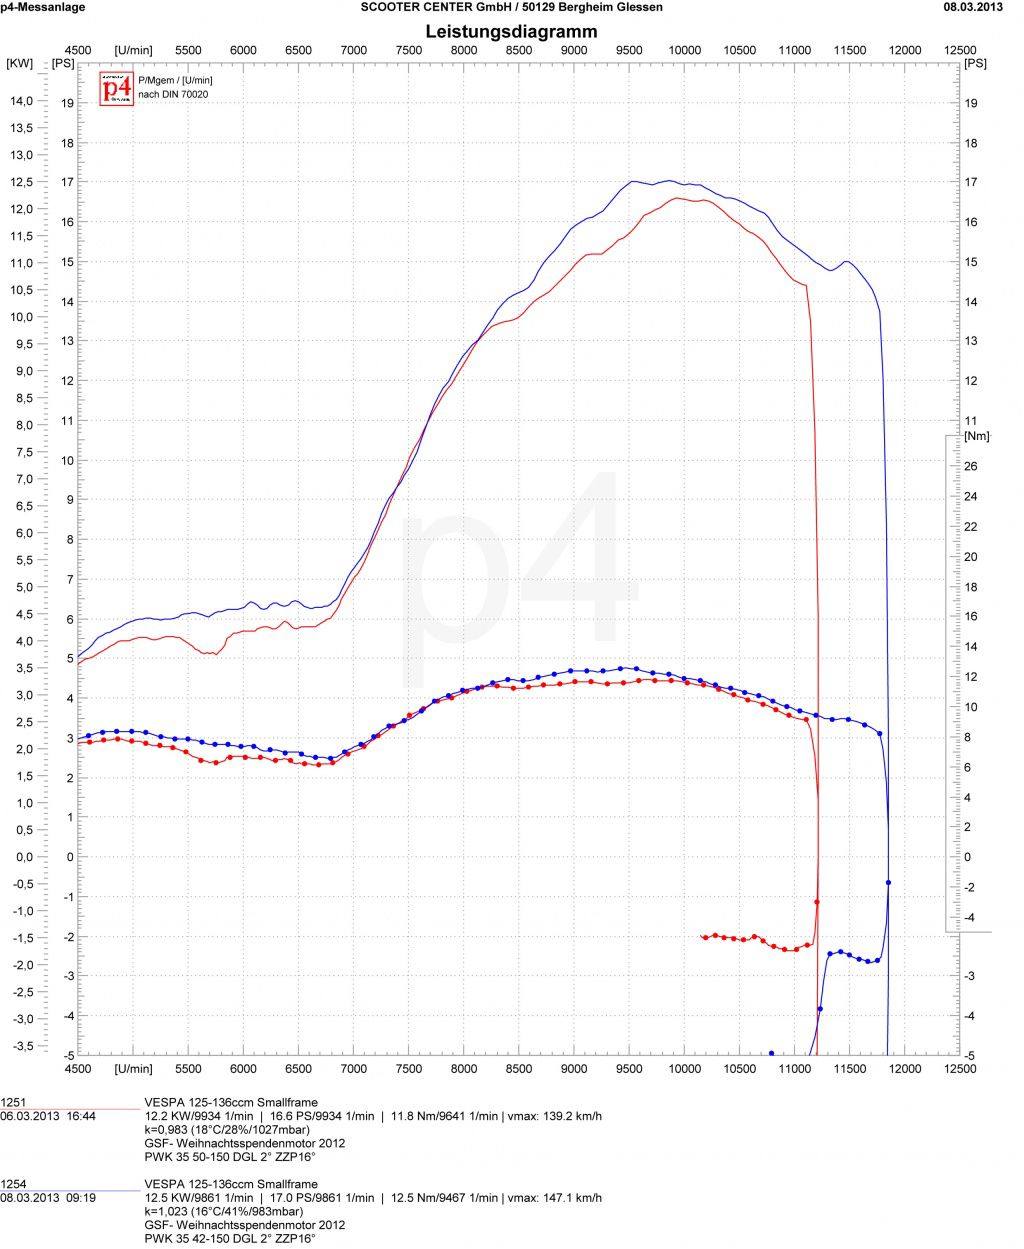
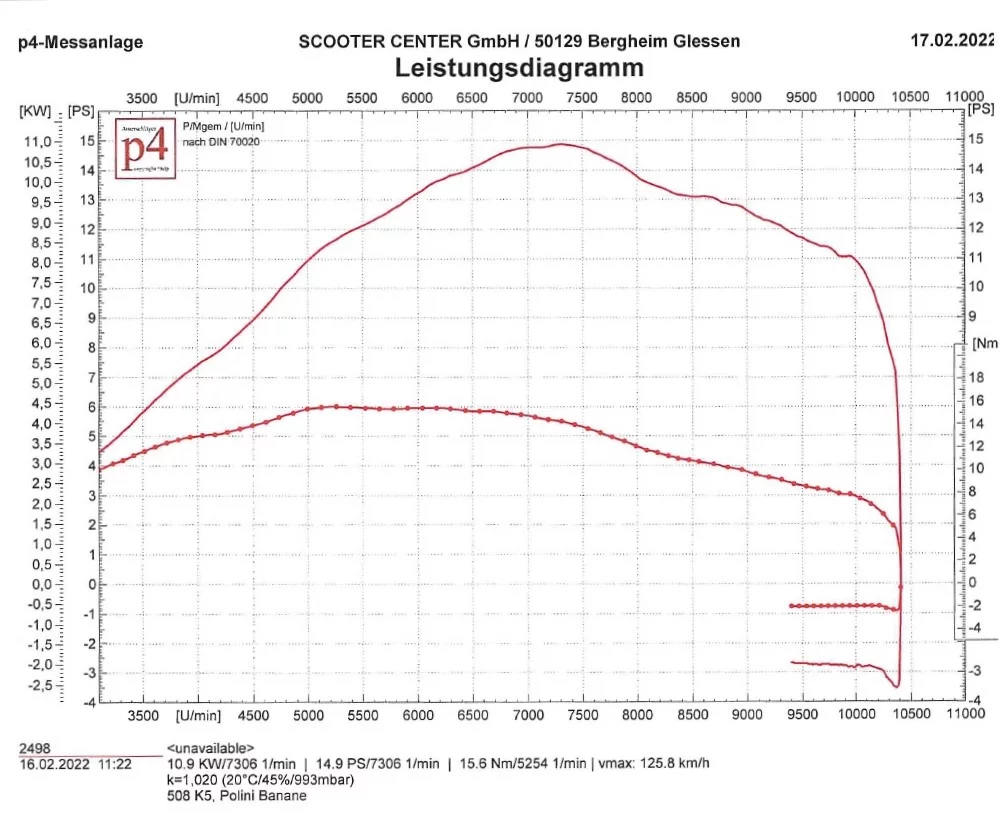
As a box exhaust, the Polini exhaust system reacts more as expected. Similar to the Elron, the can from Italy only shows small reactions. The lower effective compression makes the curve dip a bit in the rise between 4000 rpm and 6200 rpm. The system converts the slightly increased time cross-section at the outlet window with a gain of just over one horsepower at peak.
The maximum torque remains the same at 35.2Nm and is only shifted by a few hundred revolutions in the direction of higher speeds.
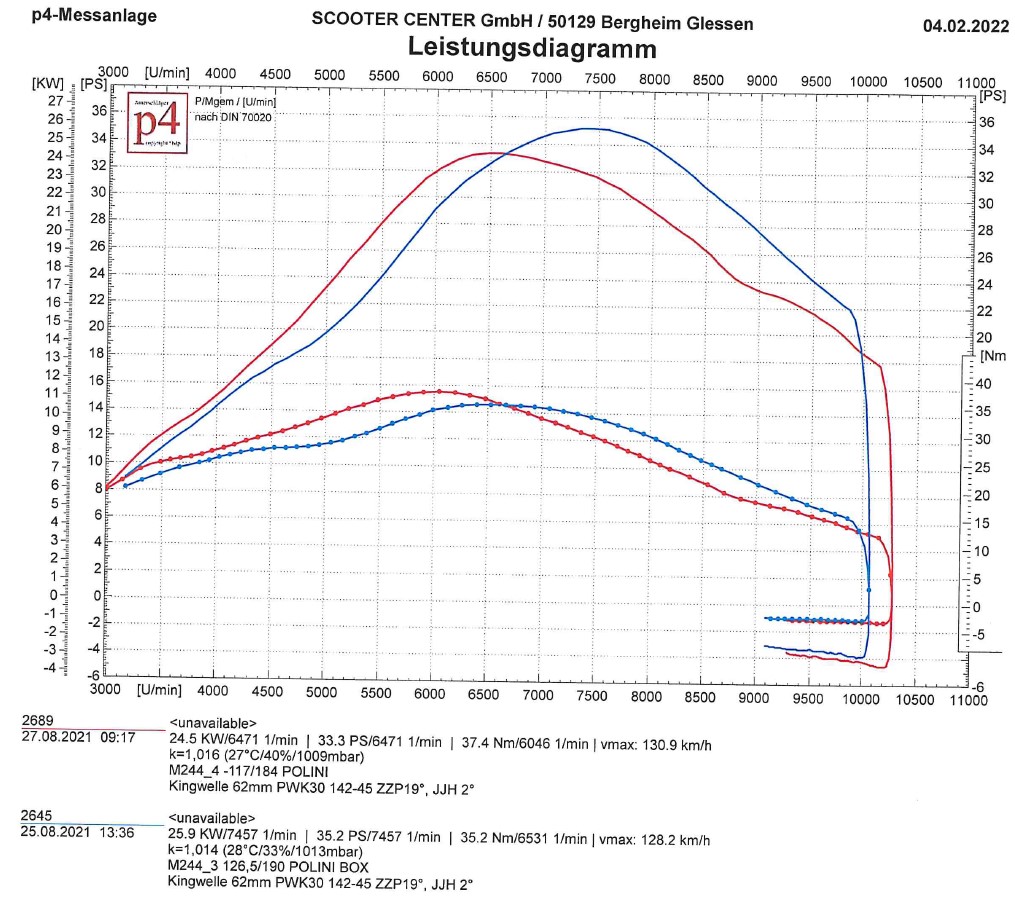
With a bandwidth of 3800 revolutions, the Polini system is slightly behind stage 2, but this test shows that the box does not necessarily prefer the very small steering angle. In a direct comparison to stage 1, the bandwidth and maximum values have increased significantly.
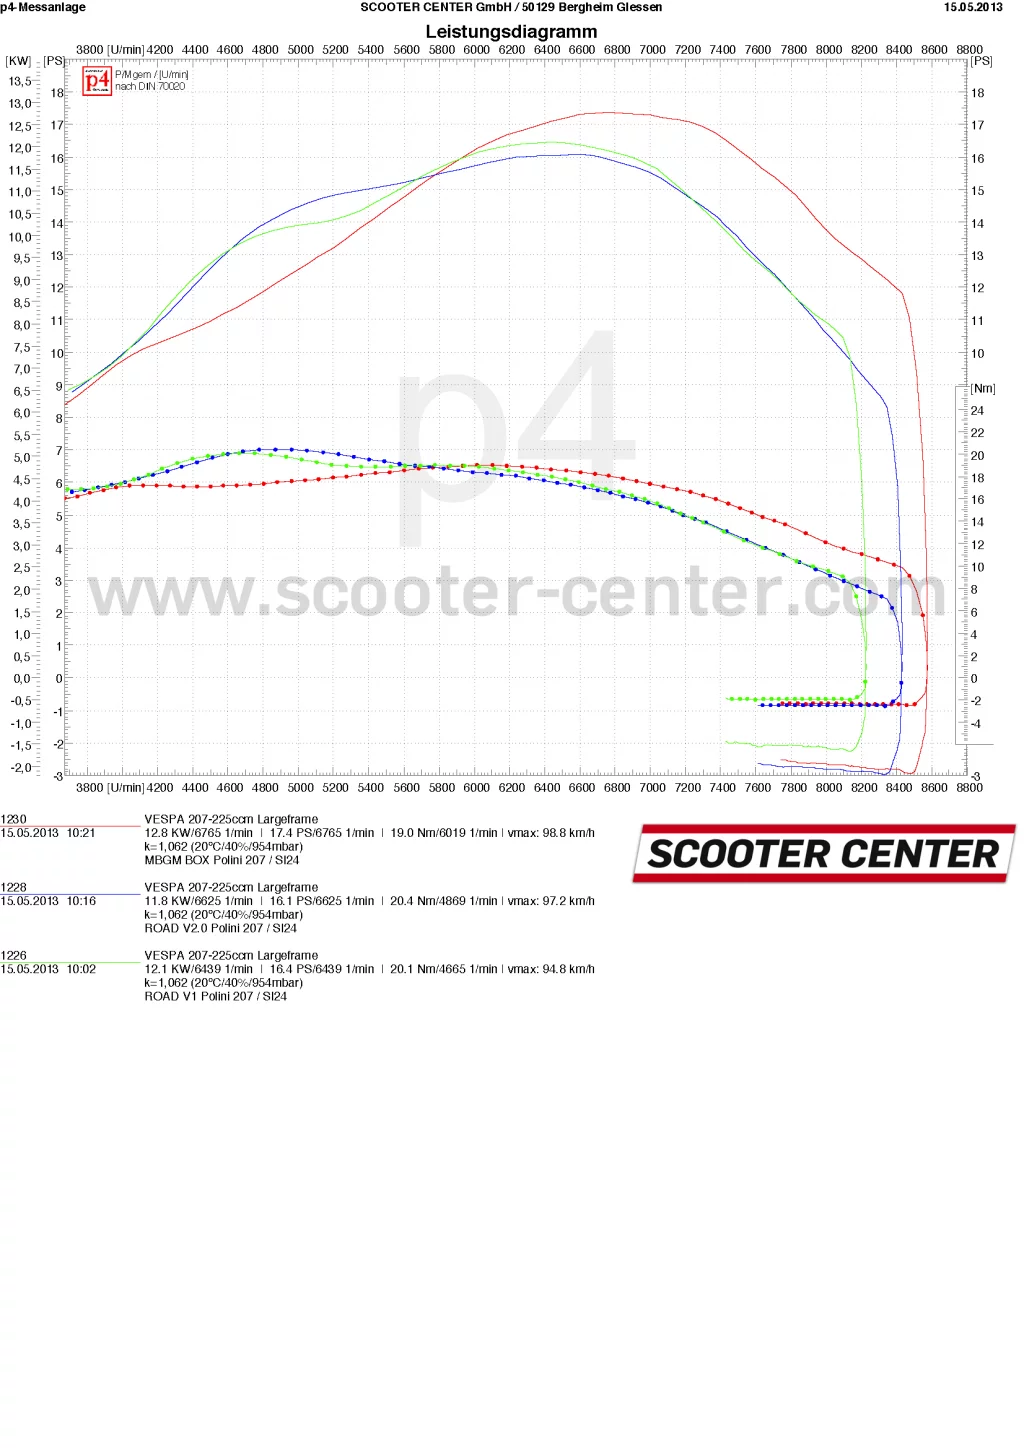
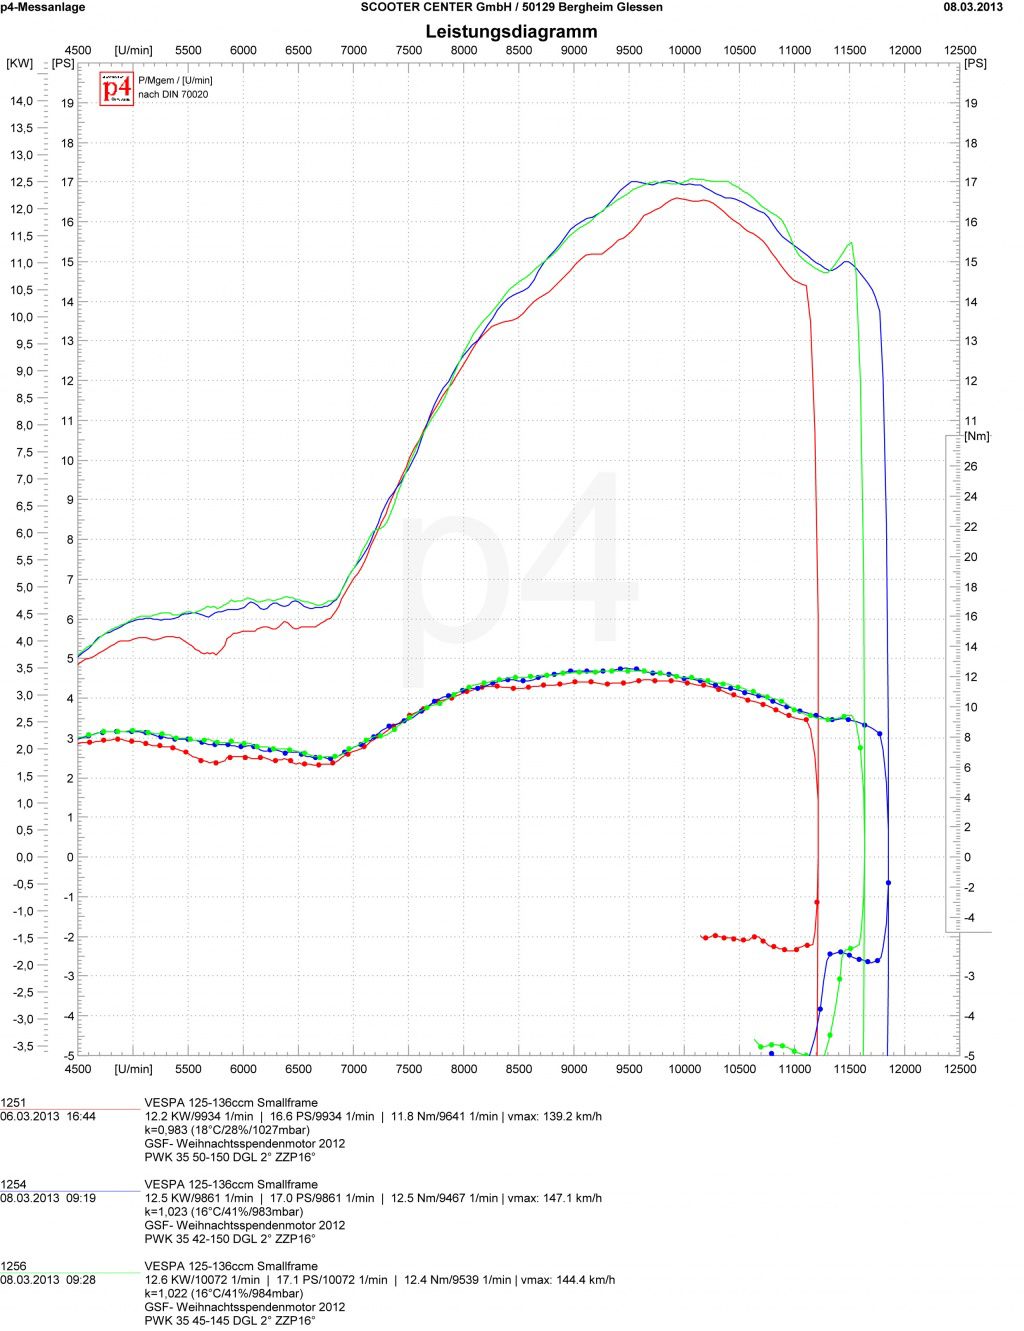
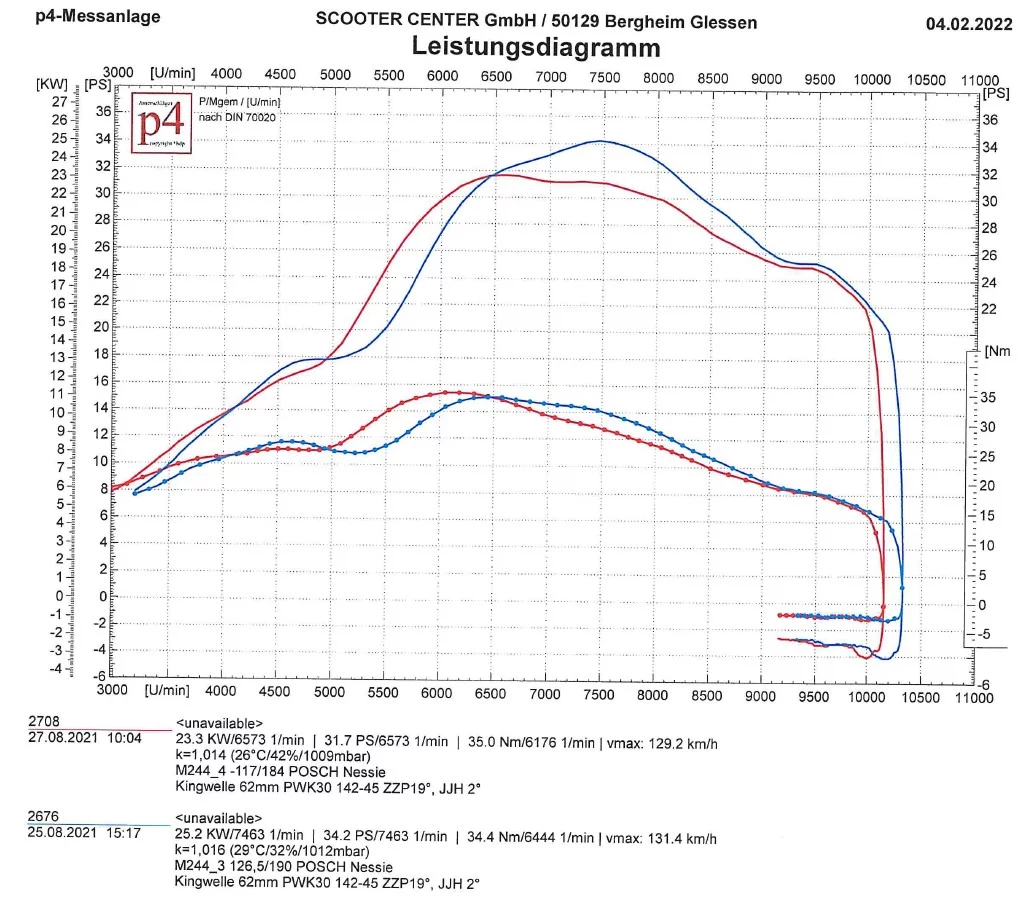
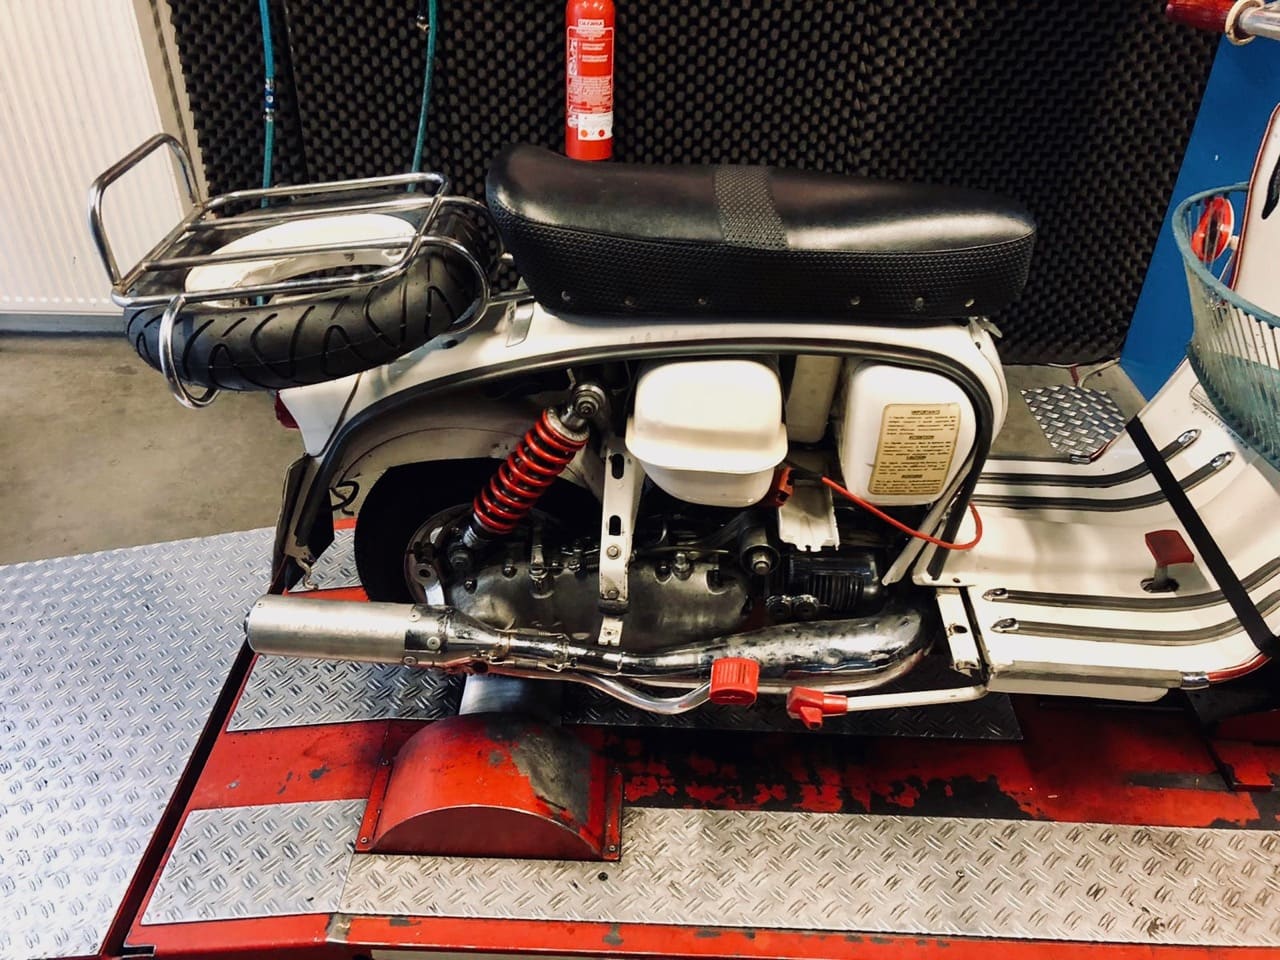
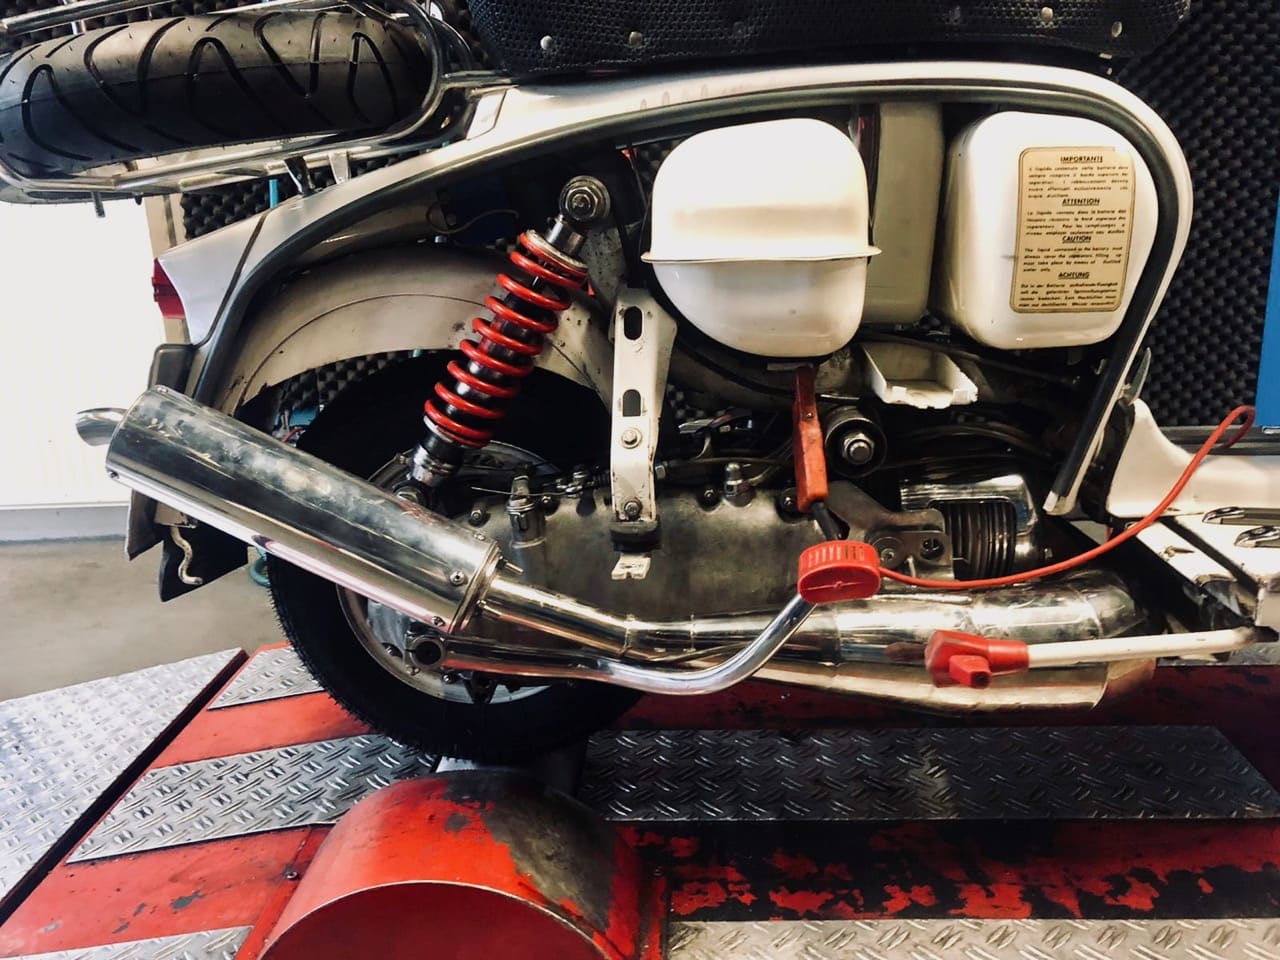
Our test subject had a short break in the previous construction stage due to appointments away from home; but now plays again in the third construction stage. So here is the comparison between levels 1 and 2.
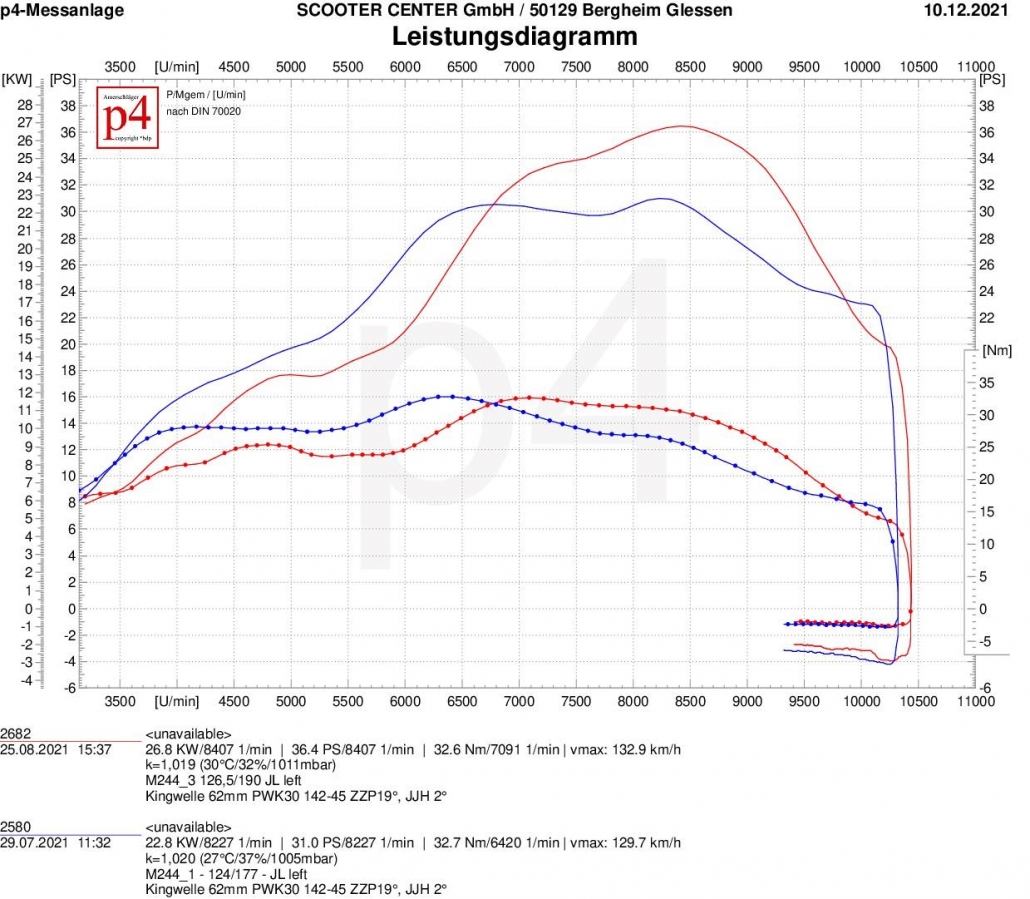
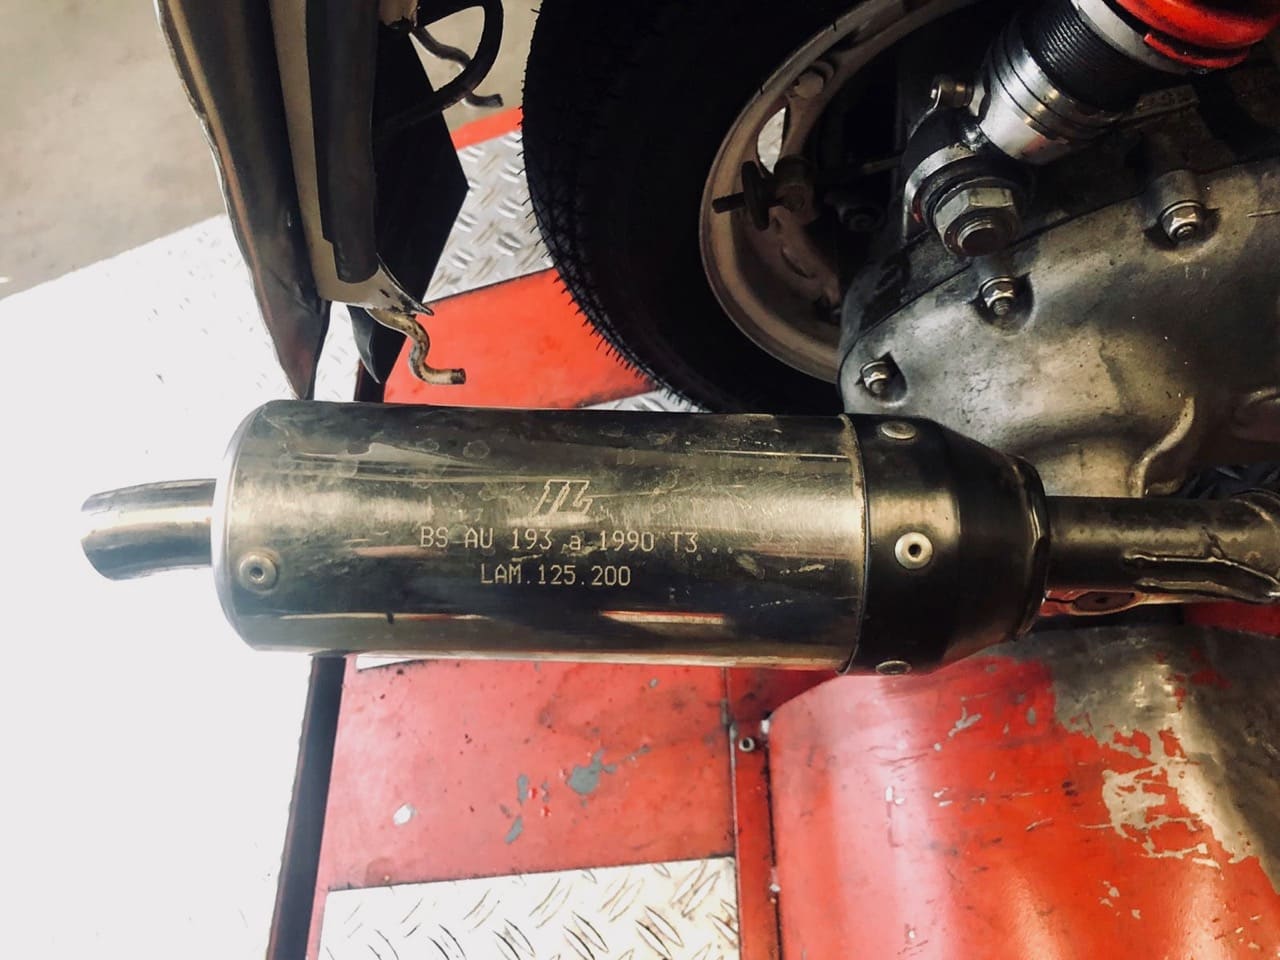
This also shows how clearly an exhaust can behave when it is operated from other steering angles. The JL, which is considered good-natured, turns out to be a very approachable partner in the search for performance.
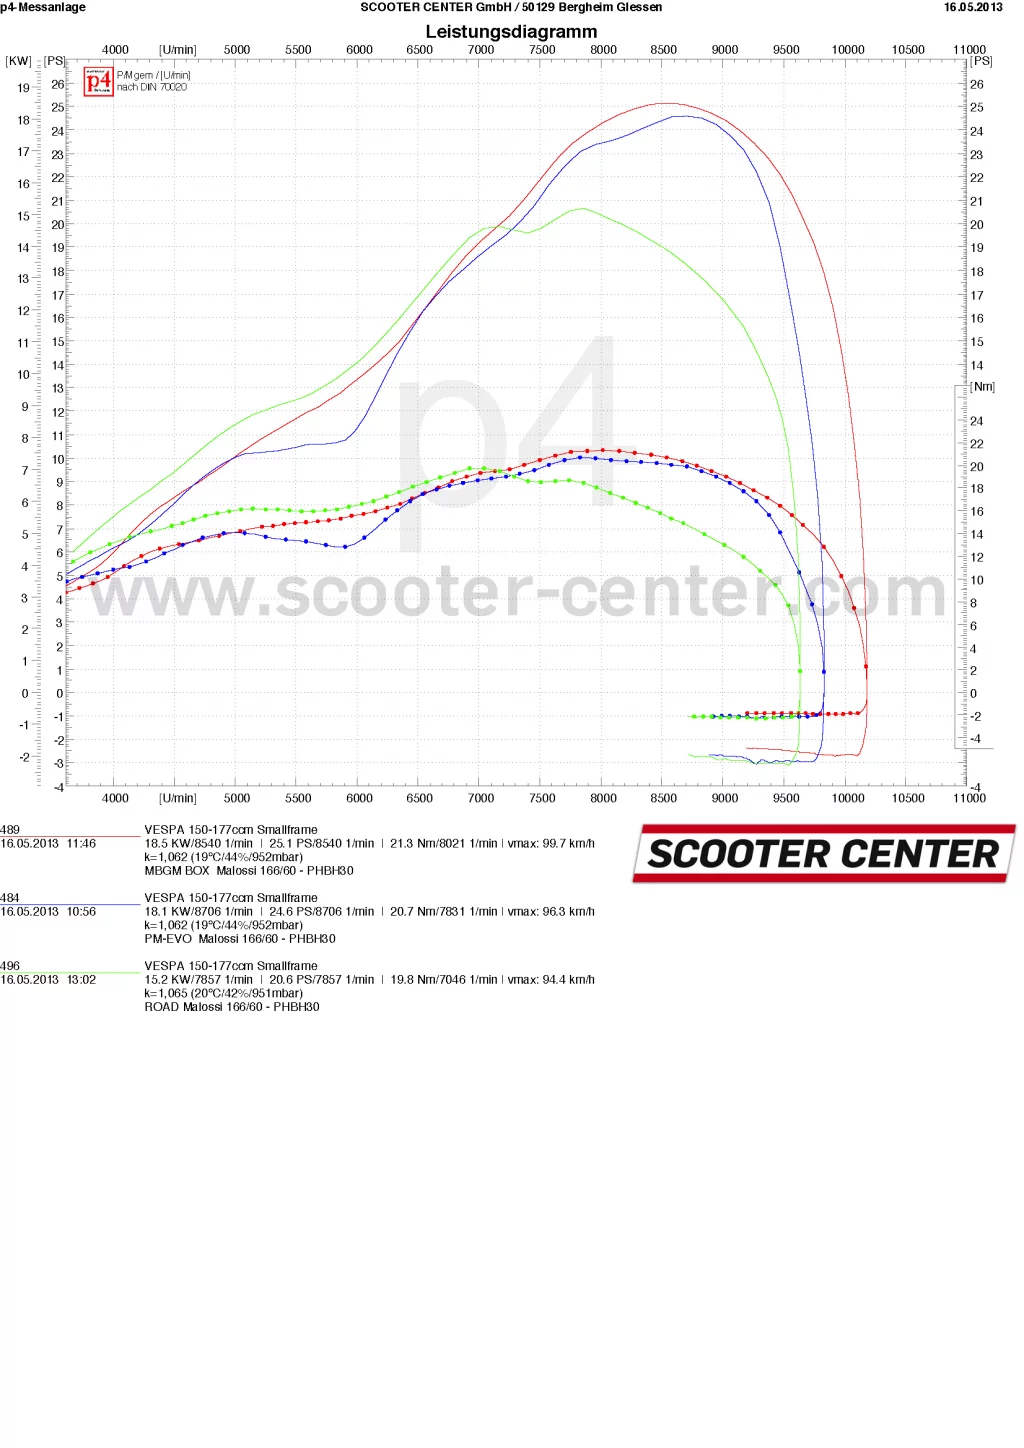
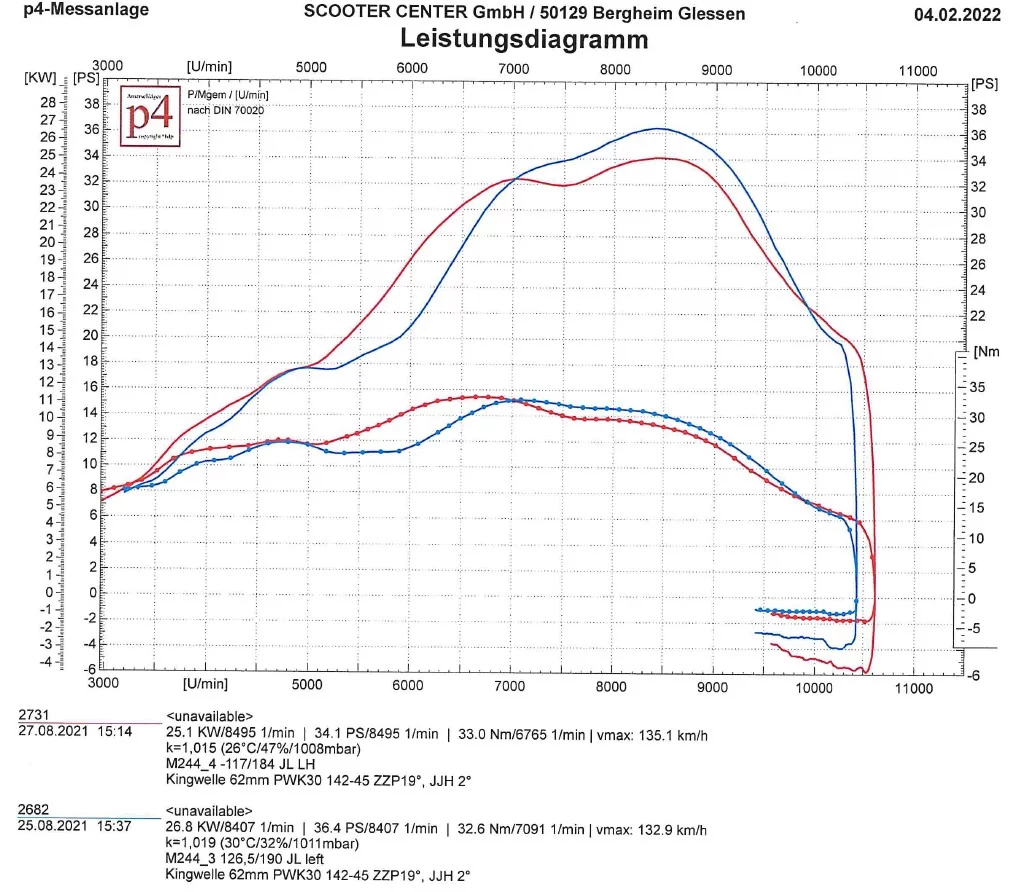
At the top, the JL provides almost five and a half more horses and climbs over the 36PS line in the graph. The torque remains at 32.6Nm at the same level as in the first attempt. However, the torque extends over a much wider range - beyond 7000rpm. The performance peak is reached with 36.4PS at 8400rpm. The JL falls below the 25 HP line considered in the bandwidth only beyond 9600 rpm and can therefore not be described as a lazy speed. In general, the graph shifts significantly in the direction of higher speeds. With a bandwidth of only 3400 revolutions, the JL even lags behind the Elron and brings up the rear in terms of bandwidth in this construction stage.
The edgy powerhouse from the north feels really comfortable in this expansion stage and takes two best values with it.
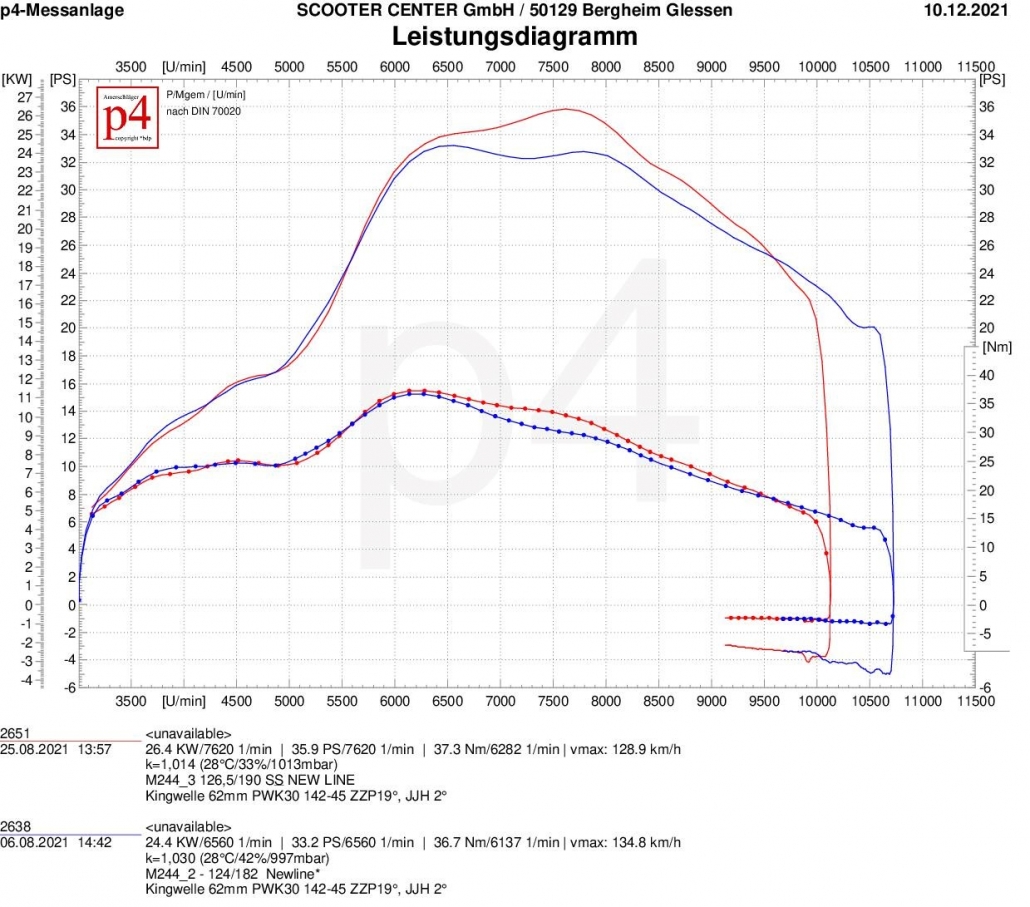
There are no notable changes in the rise in the newline, but it does quite a bit due to the larger advance angle in the engine speed range. With 37.3Nm, it takes the top position in terms of torque in the third construction stage. The available speed range is narrower compared to the previous tests, but here too the Newline achieves a range of 4000 revolutions. With these values, considerations germinate after a longer primary with 24-60 ...
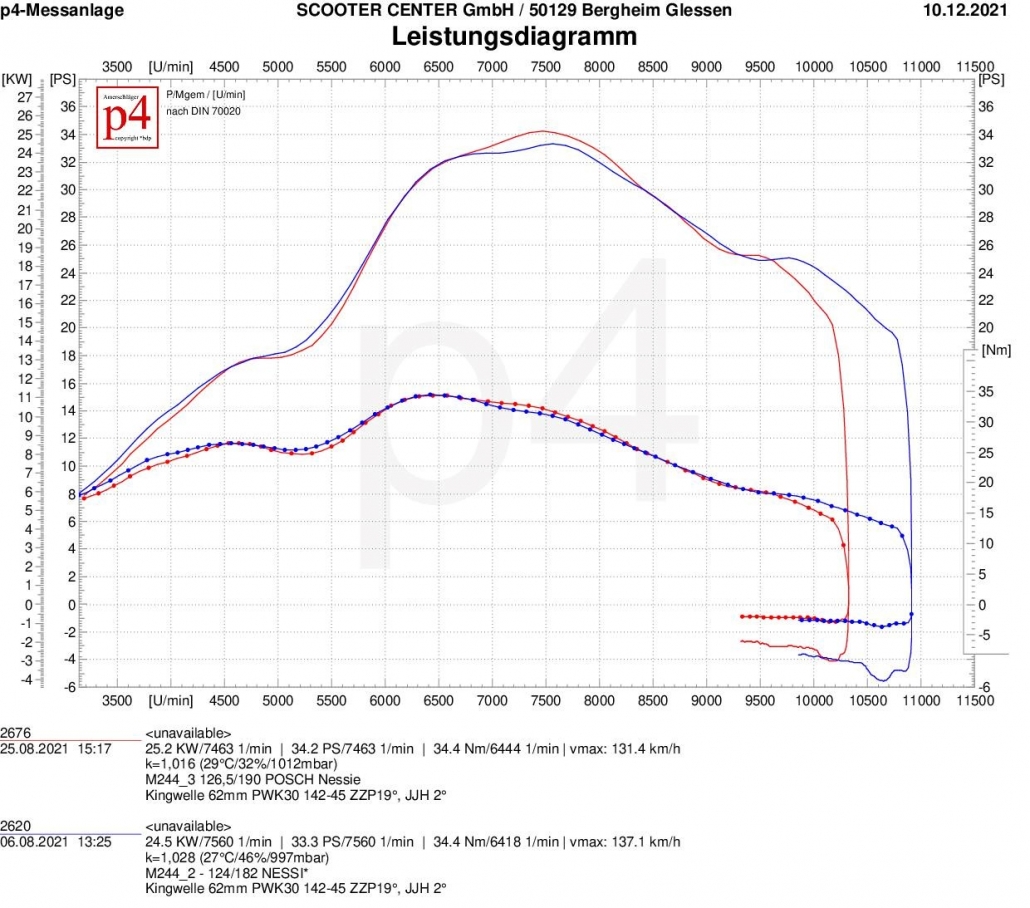
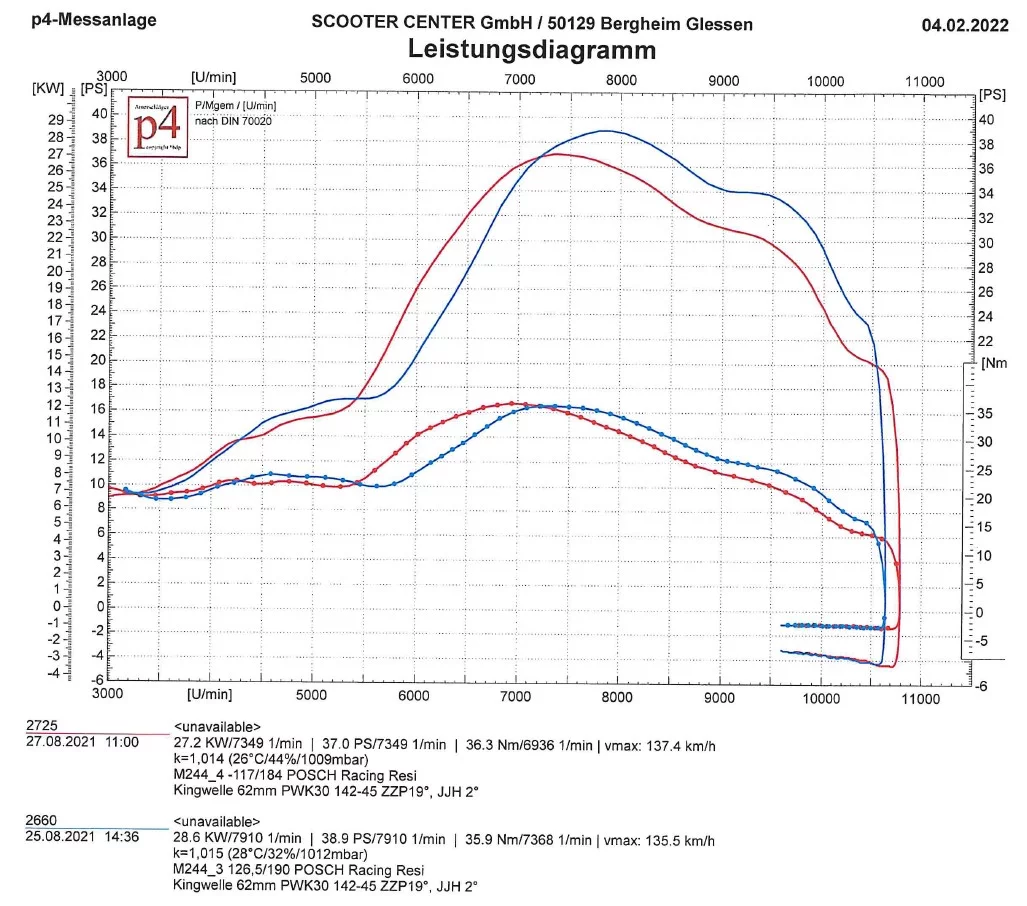
Like the Elron, the sea monster from Posch Performance is not quite sure what to do with the changed control angles. Maximum torque remains the same and peak power increases by one horsepower. While the Nessie was still way ahead in level 1 with 4300 rpm in terms of bandwidth, the available speed range in level three is a bit on the dip station and is in the upper midfield with 3700 rpm.
The Racing Resi taste the changes better. Rather devoted to the higher control angles, the Resi develops one more horsepower at the top and adds torque, which hardly affects the bandwidth on the 25hp line. In absolute terms, the Resi holds the position of the highest peak power with 38.9 hp in this level. We are slowly approaching the 40hp mark with the expansion stages.
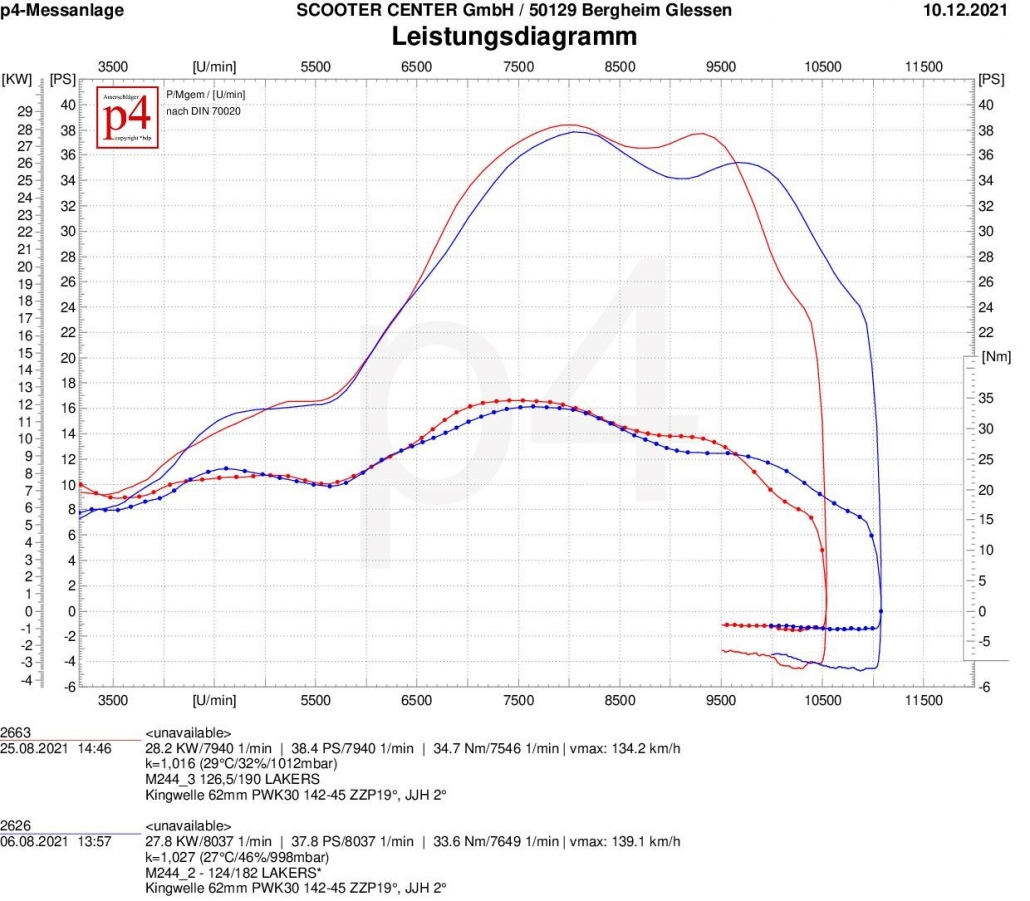
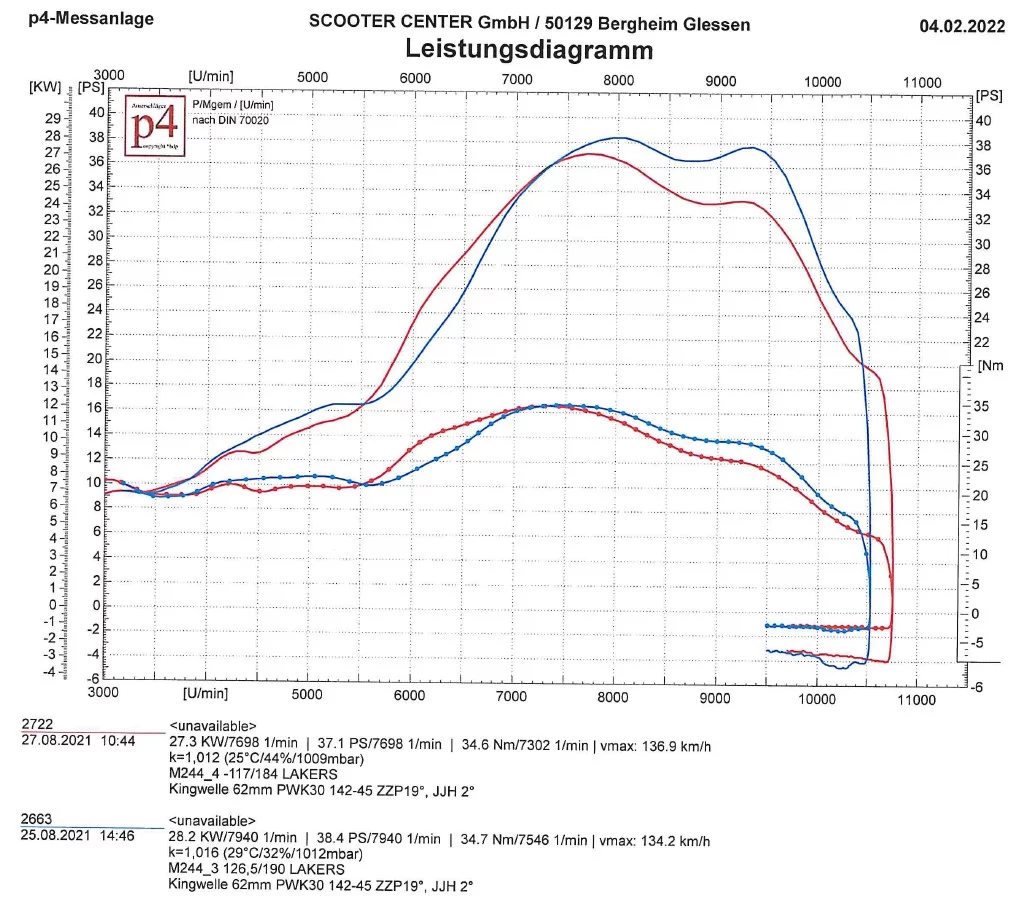
With 126° to 190°, the Lakers are not yet playing in their comfort zone. Although it also clearly converts the changed control angles into performance. With 38.4 hp at the top, it is only just behind the Resi. With a speed range of 3700 rpm, which already extends to 10.100 rpm, the Lakers shows where the journey can go with suitable peripherals.
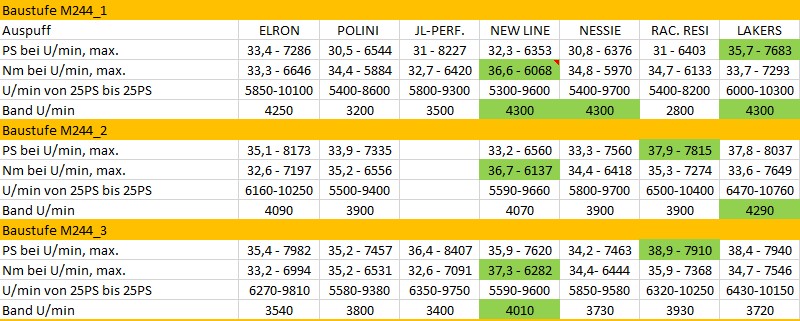
Here is an overview of the results. Best values are highlighted in green.
A Lambretta exhaust test: the new and upcoming Lambretta Big Box is currently in production. A delivery date is unfortunately still unknown.

Before we sent the final sample to Spain, the new box was put through its paces again. Lambretta exhaust test: Another prototype box from our friend Chalky from Replay Scooters and JPP came directly to the test bench:
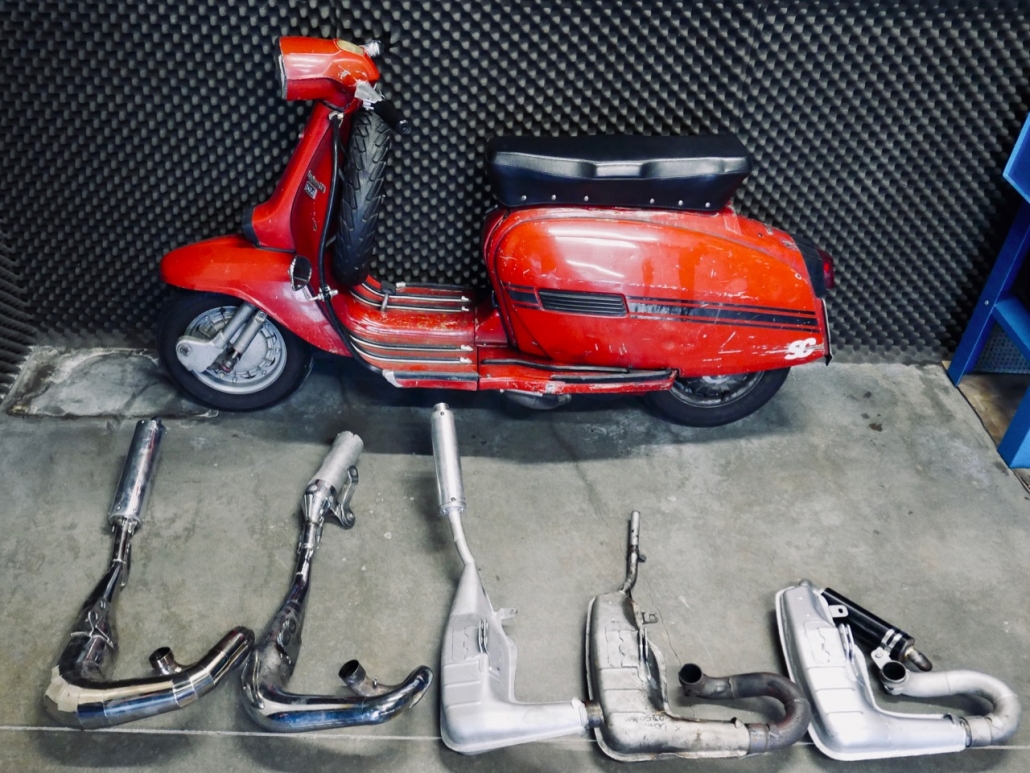
The following resonance racing exhaust systems competed against the pits:
And all three Reso systems did better against the speakers than we would have expected!
The test engine was constructed as follows:

Nice and clear to see how good the box is from the start Performancebut also with plenty of torque scores in comparison to the 'racing exhaust systems'.
This is exactly what makes the bgm PRO boxes so nice to drive. There is always enough power available without having to struggle with gear connection problems or having to turn the gas like crazy to get things going.
The moderate consumption values of the engine concepts with the bgm boxes are another advantage, apart from the original look and the pleasant background noise. Another outstanding feature is the protected fastening system with adjustment options in both horizontal and vertical directions. This allows tolerances and, above all, spacers used to be compensated for different strokes and connecting rod lengths.
Here you can find the performance diagrams as PDF:

Am 28 January 2017 it's that time again!
In beautiful Styria (Unterlungitz 109, 8230 Sankt Johann in der Heide) the popular and well-known PRÜFSTANDSGAUDI 2017 will be held again.
The strongest scooters from an international starting field such as Austria, Germany, South Tyrol, Italy and many others compete in various ccm classes. Screwdrivers of all categories and levels of expansion have the opportunity to put their skills and abilities to the test!
Like ours Scooter Custom Show not only Vespas meet. Automatic scooters and Lambrettas are also compared. In view of the different engines for one or the other enthusiast a certainly great fair.
up to 138ccm
139cc-190cc
191cc-230cc
231- high end
Automatic class up to 300ccm all brands
there will also be special cups, for example. for the strongest SF cast iron cylinder etc.
There is an unusual trophy for the most powerful scooter on the day.
Please send your registration with your name, roller cylinder and ccm to sinko10@gmx.at.
Rooms at the Kirchenwirt are reserved in advance, please reserve in person as soon as possible
http://
Schedule for the test fun on January 28.01.17th, XNUMX:
09:00 Registration and admission
10: 00-12: 00 races
12: 00-12: 30 lunch break
12.30-17: 00 races or other races
19:00 p.m. Lucky Haven raffle and trophy award
afterwards party party party with open end
Whether the passion for tuning and the love for Vespa and Co, there is one special feature in the center of this event. The Union "SFR - School Forest Racing “organizes this event not only to provide a stage for all fanatics, but also uses the opportunity to meet one financial support for families in need to enable. Therefore, in the course of this event, a Charity raffle organized, whereby all the money this raffle brings in through the sale of tickets will again be made available to a needy family this year.
The Scooter Center 2017 didn't miss the opportunity to support the test stand fun with great prizes in kind.
We look forward to seeing you there great charity event!
Until then!
SFR - School Forest Racing
The Vespa Wideframe-Models are enjoying increasing popularity.
In addition to more and more replacement parts, there is also vigorous development in the area of increasing performance.
So far, existing cast iron cylinders have been rebuilt in order to wrest a little more performance from them with a lot of effort.
Pinasco will soon be offering an aluminum cylinder 160ccm for the old Vespa engines with 3 stud bolts.
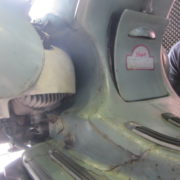
Our loyal customer Andreas Nagy, who has always been a great friend of these somewhat special Vespa models, deals very carefully with increasing the performance of the Wideframes and works closely with Pinasco in this area.
With a Prototype of the 160cc V2 cylinder he visited us on our dynamometer.


We would have liked to have taken an even closer look at the 160 Pinasco.
The prototype of this cylinder was unfortunately hidden under the cooling hood.
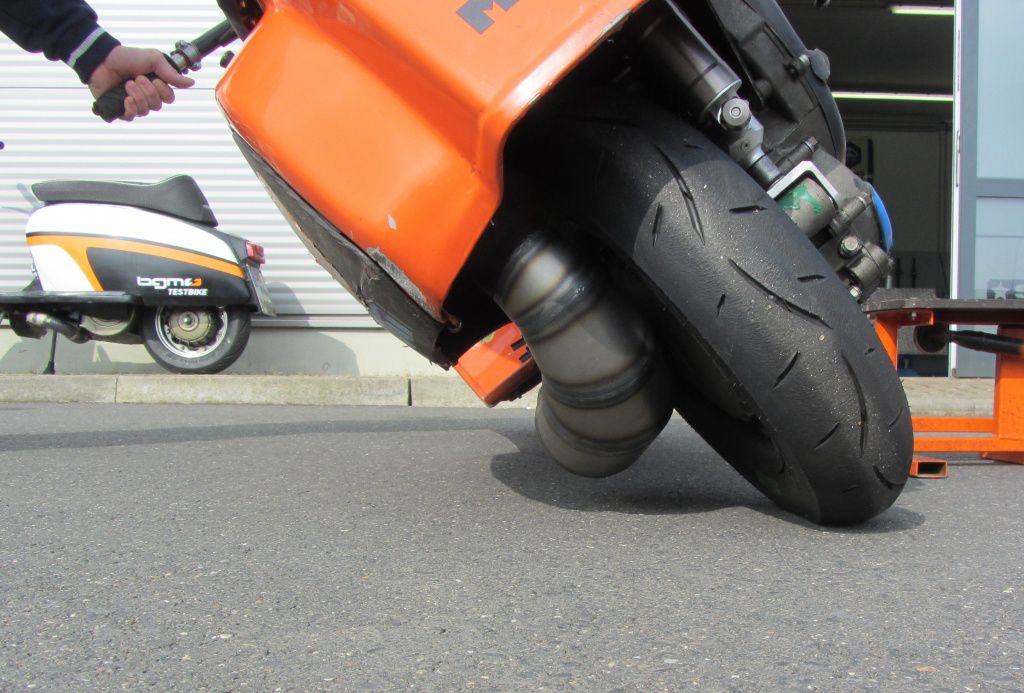
On our Scooter Center We tested some exhaust systems with Andreas on the P4 test bench. Of course, there is also a bgm PRO BigBox Touring exhaust for the PX models, where we have modified the suspension so that it fits onto the Wideframe fits.
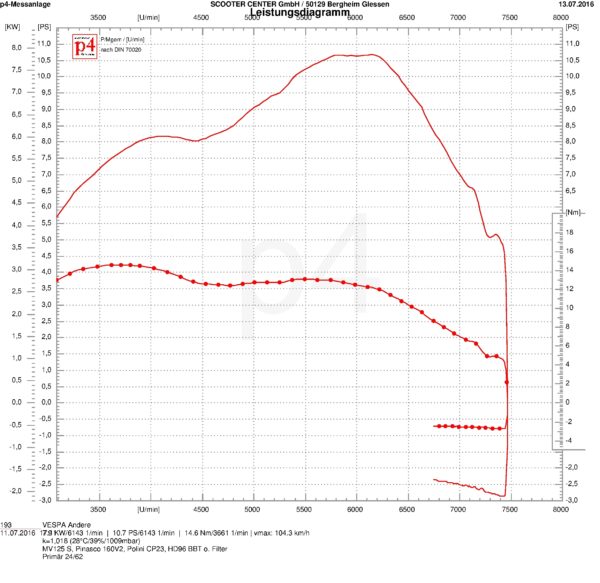
Pinasco Vespa test bench performance diagram Wideframe Cylinder prototype
Secure; In the age of a Malossi MHR, with which more than 35HP can be achieved almost playfully on a PX, the 10 horses of this Pinasco racing cylinder are not exactly breathtaking. However, you should also look at the original “performance” of the Wideframecall s to your memory! Originally with around 5HP, a maximum of 70km / h was possible on a flat stretch.
With now 10PSthat on Tugging 8 inch small rear wheel, and a suitable primary reduction, are mileage of over 100km / h possible, as can be found on an original PX200, for example.
We are curious to see the potential with which Pinasco will send the cylinder into the race.
Of course, you can find out about the latest news here, from us at Scooter Center Blogging!
as
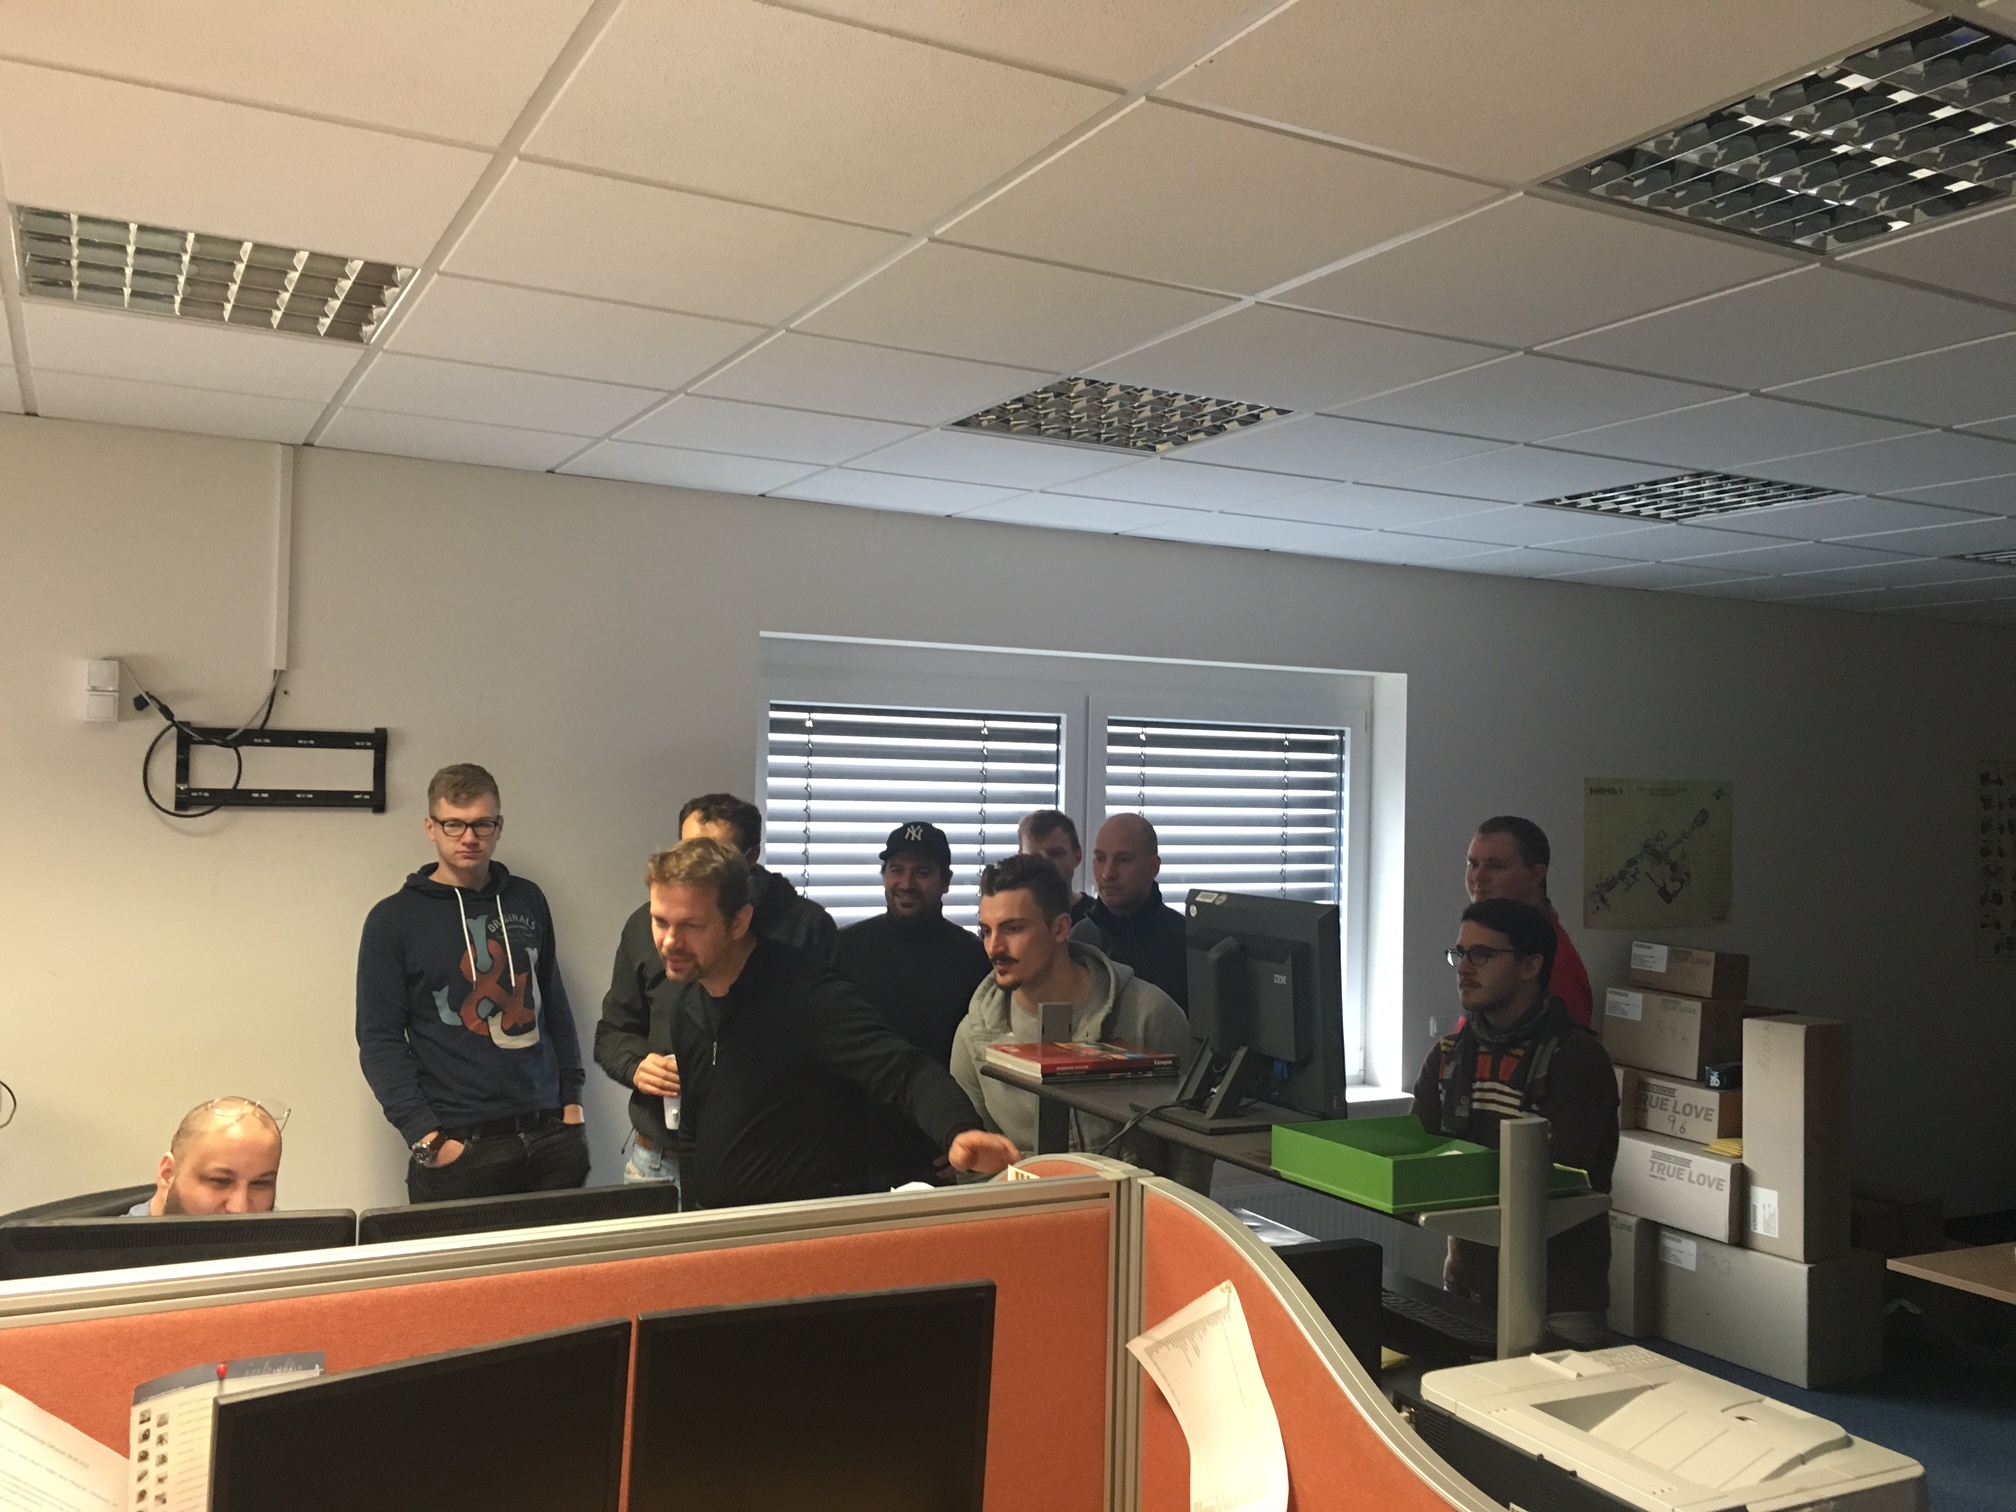
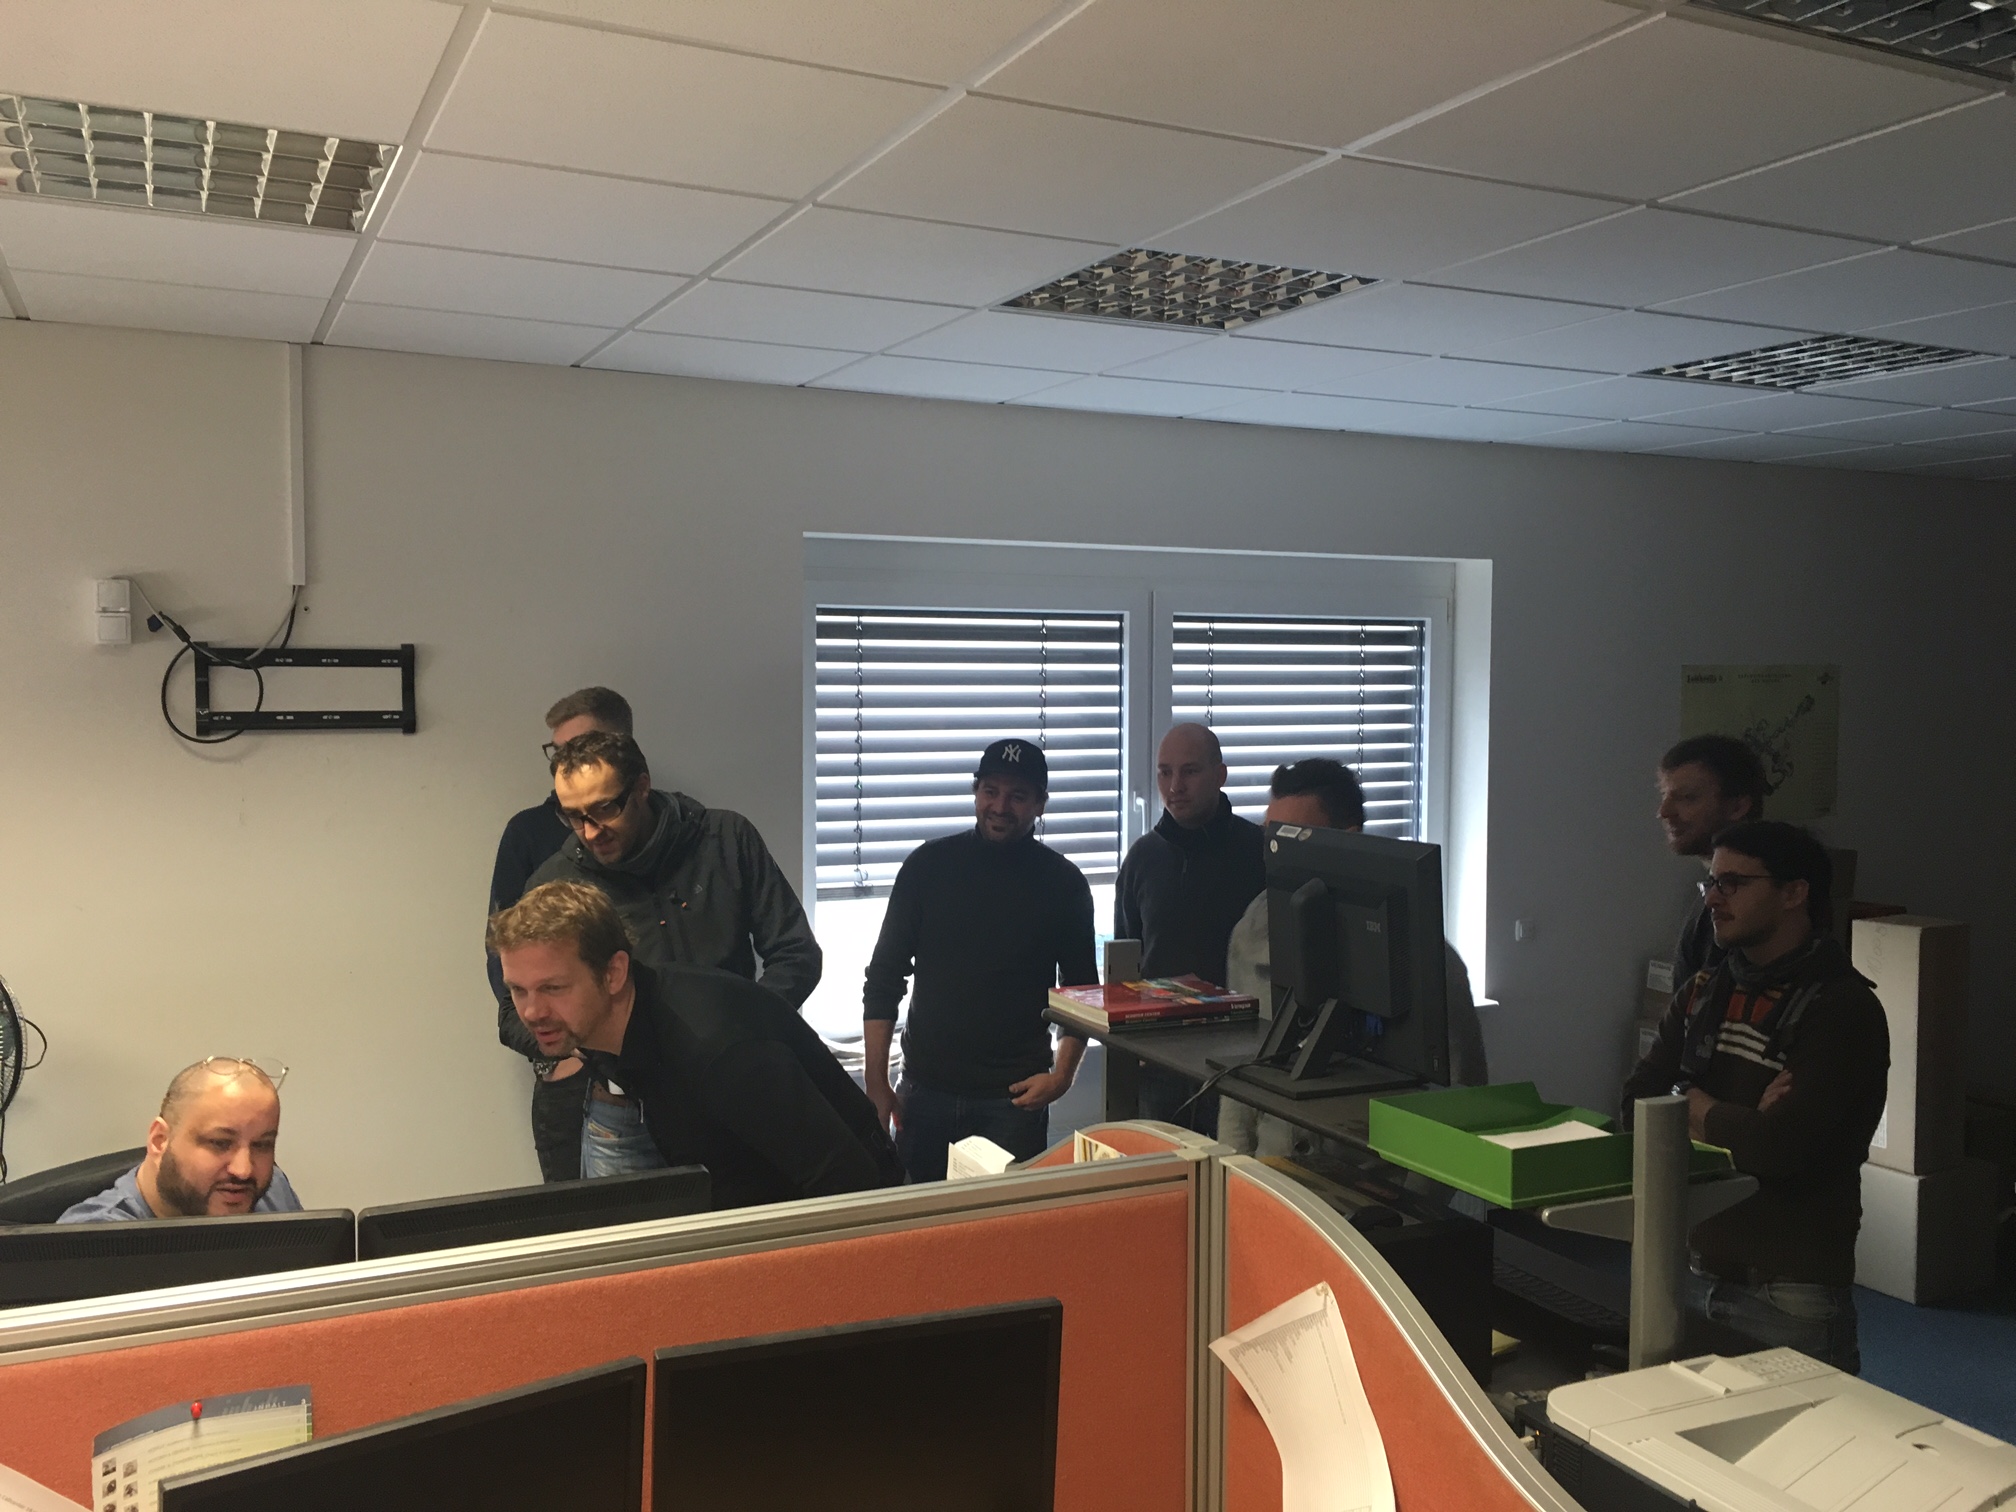
On Saturday, December 5th, the Scooter Center the Düsseldorfer created their own Open Day to roll off. With a slimmed-down program of the Open Days, things got down to business in a much more intimate setting. The weather god played along this time and the sun was already shining at 9 o'clock when it was time to leave Düsseldorf. The mild temperatures of around 10 ° could have been a bit higher.
Speaking of failure: the grill in the Scooter Center unfortunately smoked that morning and a completely new way of preparing Bavarian veal sausages in a hot water bath was used. Revolutionary! After a first refreshment, the gasoline talk was continued with a short tour of the camp. And an order process was run through theoretically.
So that this becomes a day that is not too theoretical, the test bench was then put into operation. In this way, it was possible to test the recent changes in engine concepts and put them on paper. And there were some nice engines there.
All in all, it was a super fun day, which unfortunately was over much too quickly!


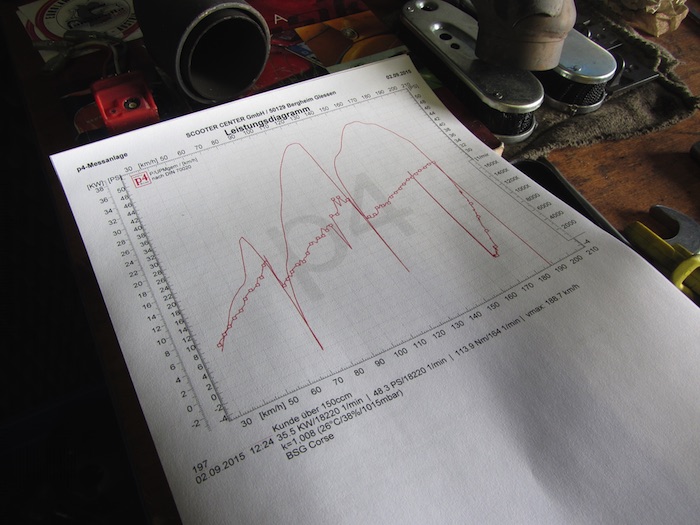
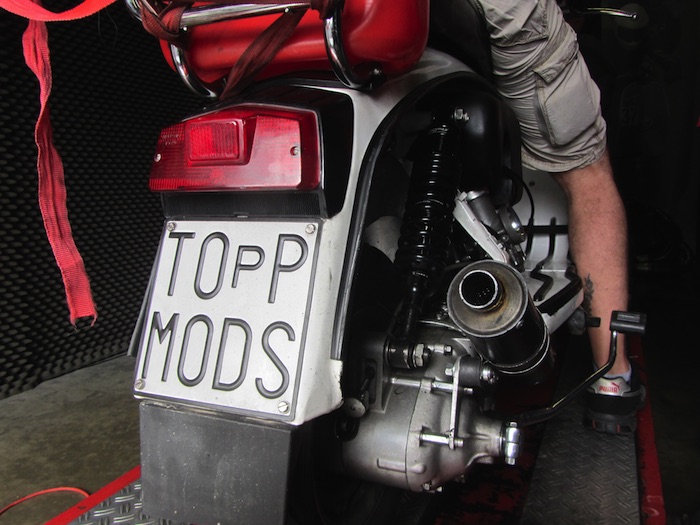
Dean Orton, the founder of Rimini Lambretta Center visited us in Scooter Center. On his way from Rimini via the Venlo Scooter Run to the ESC race at the Harz Ring, he stopped by for a few days. Dean use the trip to the BSG Corse engine to test its suitability for everyday use and travel. In doing so, it was anything but sparing the engine.
The test drive should be as real as possible, so Dean just packed his mod stuff and also:
Then he chased the Lambretta through the streets. From Rimini in Italy over the Alps to Austria and over Germany to Venlo in Holland. The way home then takes him back via Germany, past us and then on to the ESC race at the Harzring.
He reels this distance relatively relaxed at a constant cruising speed of 130km / h. And that with sufficient reserves to be able to overtake at 150km / h. Considerable when you consider the very short gear ratio of only 4,9. With this powerful motor, other speeds can also be achieved.
The CNC manufactured 305cc cylinder is throttled to approx. 50PS via the programmable ignition. Unthrottled, the engine already produced 63PS on the dynamometer at the Rimini Lambretta Center.
A European Scooter Challenge race will take place on the Harz-Ring this weekend. Dean meets the Casa Lambretta Racing Team here. The first tests and preparations for the race will take place on Friday. The Casa Lambretta racing scooters are equipped with the new parts of the Casa Lambretta Performance parts and some bgm PRO parts. We have the Casa team with the complete bgm PRO Lambretta chassis, the bgm PRO Lambretta silent blocks and the bgm PRO Superstrong Lambretta clutch equipped.
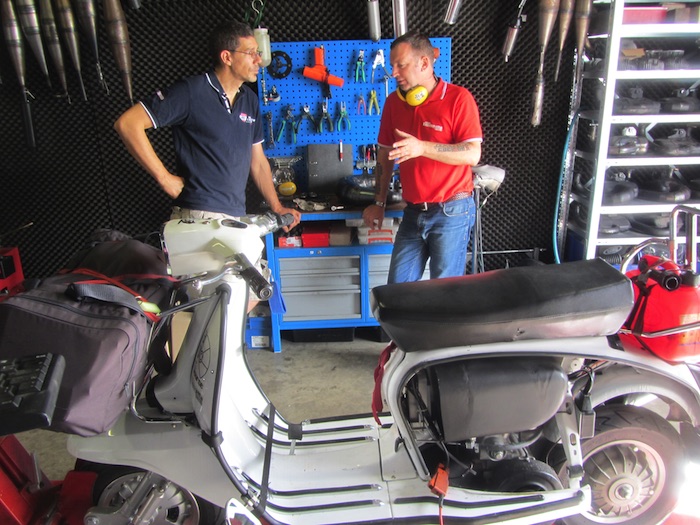
Even if we've known each other for ages and that Scooter Center Just as the Rimini Lambretta Center was founded around the same time, we already met at various events across Europe, but this year we managed to visit each other for the first time.
In April we went to the Open Day and had a great time there in this brilliant Lambretta shop with our Italian friends, great Italian food and of course many great and unique legendary Lambretta models such as the Lambretta two-cylinder prototype and the BSG 305 Lambretta.
Here is the video from the Corso, Philipp on the BSG Lambretta
On Monday So it was finally time, it was an honor for us Dean im Scooter Center to welcome. We loved every second and there were lots of stories old and new to share and it was very fun. After a few “business talks” we had dinner together and it got very late. Dean praises ours Scooter Center Generation XI Smallframe Vespa the most beautiful object in the universe - just one breath later our bgm demonstrator Lambretta than that ugliest Lambretta in the world to brand. Mhhhh…. Since we were already confronted with this opinion at the Riva del Garda Customshow 2013, there had to be some truth to it. So we had to do something about it. So we decided to make the Lambretta available to him and to adapt the optics to the perfect mechanics.
Tuesday Dean tests the Lambretta on the streets of the beautiful Rhineland and came right on time for the traditional afternoon tea to discuss some new Lambretta products.
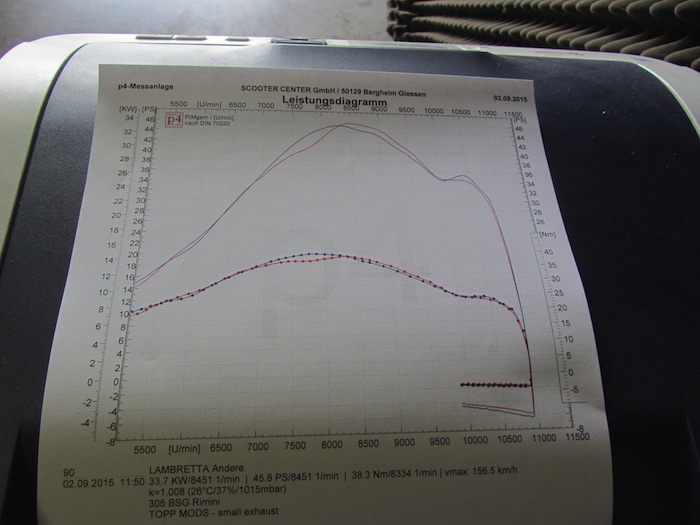
On Thursday Dean actually wanted to look at our order process. Unfortunately, we got the glorious idea to test his scooter and both exhaust systems on the test bench. The diagrams of our P4 dynamometer almost coincide with the diagrams driven in Rimini. Time flew by and after dinner Dean was already on the way to the Harz-Ring.


Many greetings to the entire Rimini Lambretta Center team and to Vittorio with his Casa Lambretta Racing Team - we keep our fingers crossed for the race
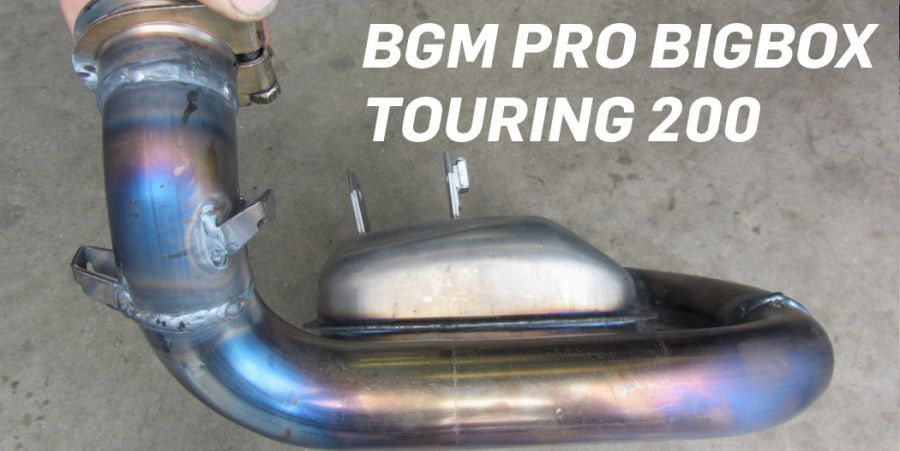
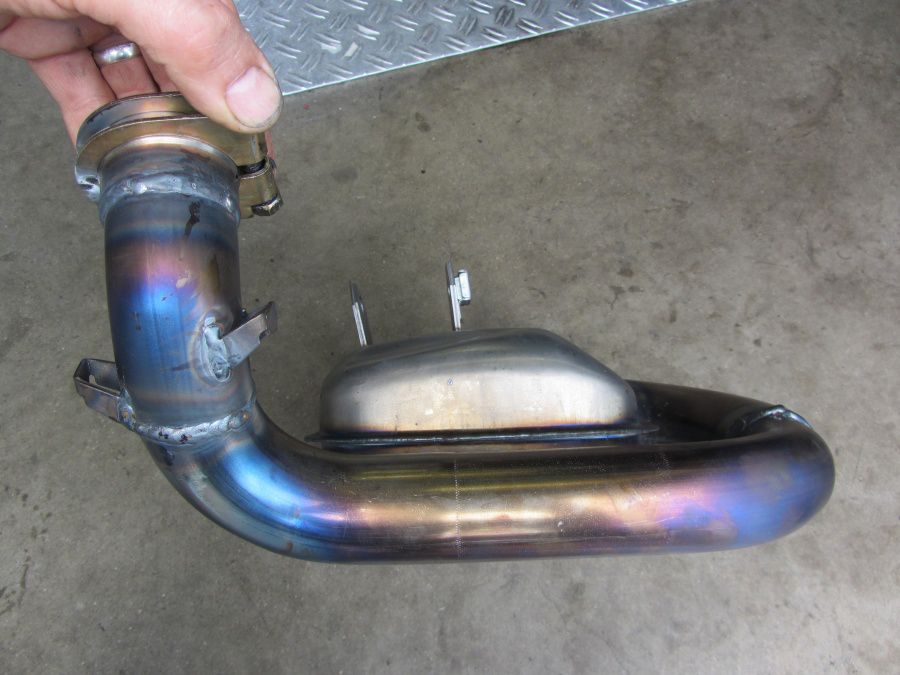
Today we have the first Manufacturing sample the BigBox Touring for the 200 Vespa PX engines.
The normal process of a sample test includes, in addition to evaluating the appearance and fit, runs on ours Scooter Center P4 dynamometer.
As we did in an earlier one Contributions to this Vespa exhaust have already noted, the BigBox Touring is significantly more delicate in the manifold area than its big sister, the Big Box Sports.

Without her black, heat-resistant garment the BigBox Touring looks a bit bare. But we also attach great importance to taking a close look at all the connection points without a “top layer” during a sample test.
One of the first tests was assembly on one Vespa VLB (Sprint). In combination with a 200 PX motor, such conversions often lead to space problems. Especially in the area of the main stand, especially the “U's” and the tabs for the stand springs. The stand feet may also collide with the manifold, depending on the routing of the exhaust system.
With the BigBox Touring, we made sure that these bottlenecks are sensibly defused. Even with vehicles with the only two-spring system on the main stand that has been introduced for the German market fits the BigBox and the stand feet are at a safe distance to the hot manifold.
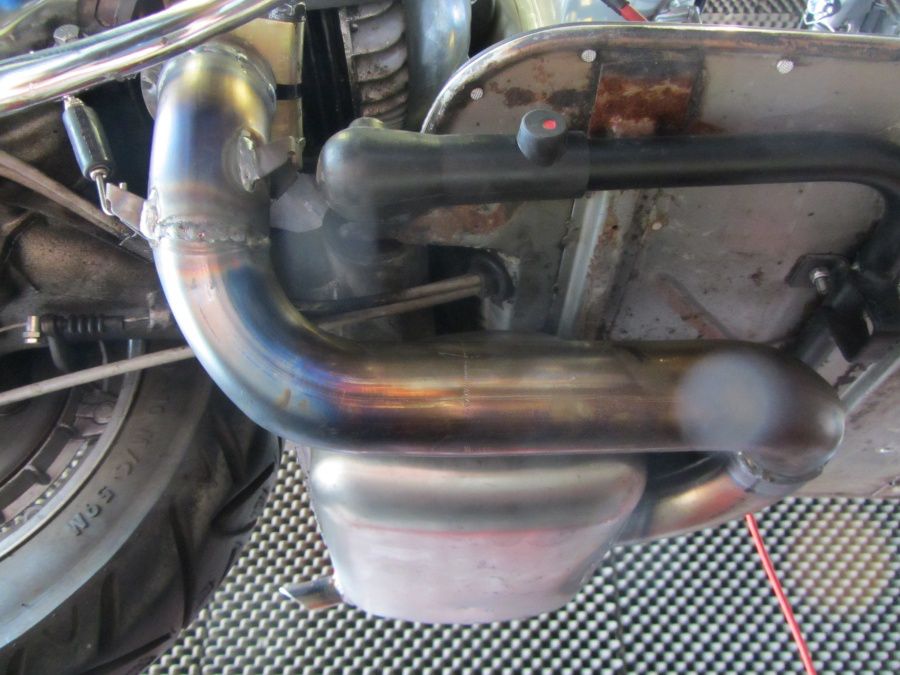
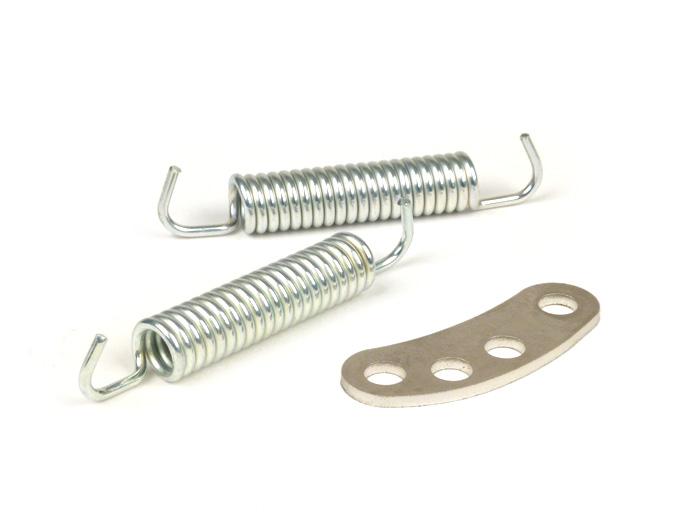
The Big Box Touring Just like its big sister, it is equipped with a solid clamp and additional holders for exhaust springs.
If you want to be on the safe side at this point, then this is ours Retaining plate with 2 exhaust springs exactly the right accessories for your BigBox.
If we like the look, workmanship and fit, then it goes to them Performance measurements.
Our first "test victim" is a Cast iron Polini with 207ccm, SI24 carburetor on a standard Vespa PX200 engine.
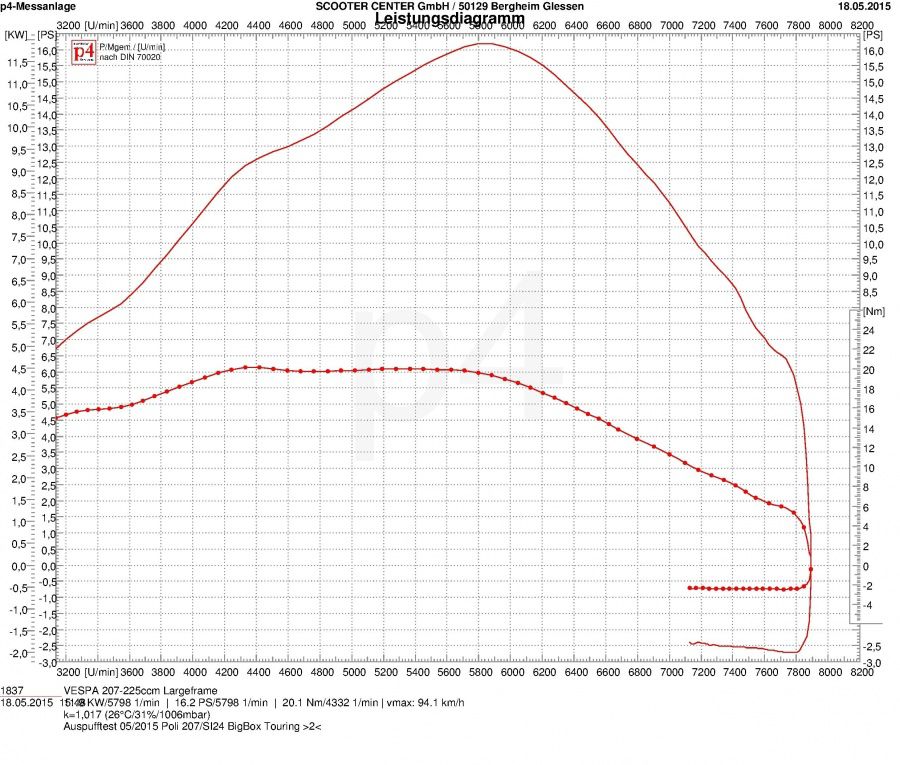
When developing the BigBox Touring, we made sure that the possible torque is available very early and that the exhaust has a lot of pressure from the low revs.
The earlier and more homogeneously a motor delivers its torque, the more pleasant it is Everyday driving. With the BigBox Touring, you can already step in on our test engine with the good, old gray cast iron Polini 3900rpm over 18Nm Forward. Converted to fourth gear, that means a pleasant one Cruising at 50km / h with a very good potential to accelerate through to the top speed.
Depending on which engine you are using the BigBox Touring on, a longer primary reduction may be required makes perfect sense can be used to drive a little more revs at the same cruising speed. The easiest way to extend the reduction is with a clutch pinion. That bgm clutch pinion for the Cosa type clutches or a durable solution like ours bgm Superstrong clutch are good and loyal companions here. Due to the longer reduction, up to to 5km / h more top speed at the same speed is possible.
If you would like to know what the Vespa touring exhaust bgm PRO BigBox Touring on your personal motor, then just send us an appointment request to pruefstand@scooter-center.com.
Appointments to: pruefstand@scooter-center.com
Our test sample of the bgm BigBox is on ours for you Test bench ready for testing.
Today our customer John was again with his Vespa Smallframe on our Scooter Center Test bench.
During his last visit, he asked us what changes he could still make to his engine in order to find a little more power.
After we had briefly discussed what its current setup looks like, we were actually able to give some pointers through which more top performance can be obtained.
Basically, the engine is equipped with a Polini Evo cylinder, a 54 bgm crankshaft. The 30th Mikuni TMX carburetor is attached to an MRP suction device. The very best prerequisites to become a clear Ü20 unit.
With an additional processing of the outlet and the conversion of the Polini membrane to 2 flaps, the following result comes out:

Due to the larger outlet area, the exhaust can work much better. The small loss at 6500rpm is unfortunately due to the missing Kytronic. In the current state (red curve), a standard PK ignition system provides a ZZP of 18 ° before TDC. their service. With the Kytronic it is certainly possible to shift the red curve back to the left at 200 rpm, in the direction of the performance that starts earlier.
But all in all a nice number - have fun with it on the street!
(AS)

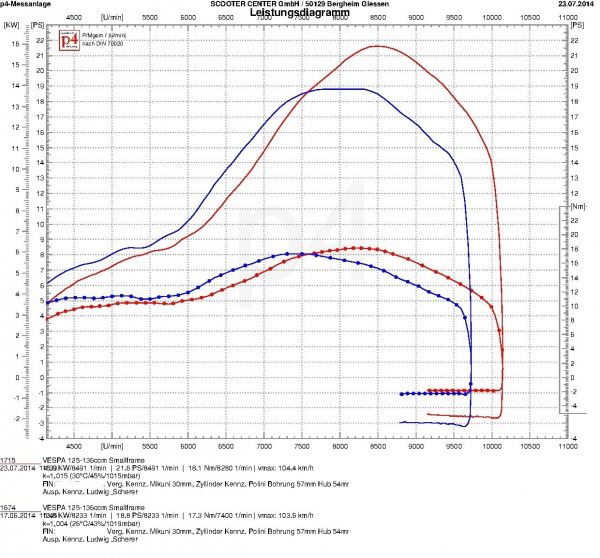
About 235ccm on one CNC motor housing are also more of an exception to the test for us.
Few enthusiasts dare to take on such a financial and mechanical challenge. The outwardly rather inconspicuous, silver Vespa PX, hides the technical eye-catcher under the right hood.

The engine, carved out of solid aluminum, is manufactured with a sufficiently large membrane intake manifold.
The crankcase is filled by a 38 Keihin Airstriker in a very short and direct way.

The valuable filling from the crankcase is then transported into a Simonini cylinder borrowed from aircraft engine construction during the flushing process. The 70mm bore results in 235ccm on this engine!
The gearbox of this Vespa PX200, actually 235, is of course not off the shelf either. The company KR-Automation has reached into buttons and developed a very elaborately manufactured Vespa gearbox that can withstand a power of over 50HP over the long term.

At the moment “only” 35HP and 34Nm are pulling on the main shaft.
However, as the owner credibly assured us, this will be further optimized and we will soon meet again on the test bench to look for more horses.
We are very curious!
In many cases, the TüV requires a performance report to enter changes to the engine.
Next to the 135cc DR cylinder is the Malossi cylinder with 139ccm one of the most popular cylinders to help the little PX on the jumps. So also in this case, our customer Timur needs such a diagram for the demonstration and entries with the TüV.

When measuring according to DIN on the Amerschläger P4 test bench, we have to enter the key data of your engine in the diagram so that the tester can correctly assign the diagram to the vehicle. All scooters with gear shift and four gears are usually measured in third gear. This information is also noted in the diagram.
 So that the changed maximum speed can also be entered during the test, we carry out a performance versus speed run. Here all available aisles are simply extended.
From 2014, a standardized package is permitted in class 1 of the ESC. The direct suction serves as the basis for this package Polini Evolution cylinder modified to the ESC version.
The one-size-fits-all solution with the Polini 133cc Evolution membrane In class 1 the ESC may only be operated unchanged and with the intended exhaust. After consulting Polini and Ludwig & Scherer, we were able to achieve a package price of currently € 625 for ESC drivers. Approval for the purchase of the kit must be obtained through the ESC respectively. You can find the current set of rules at www.eurochallenge.de
The basic idea of the standard solution is that as a driver, as in class 5, in class 1 you can concentrate more on actually driving on the track than on the sometimes quite complex engine concepts.
With the “big one-size-fits-all” and the Polini 133ccm Evo, an output of approx. 25PS is possible. In close cooperation with the ESC, we have created this kit for you and run some tests on our P4 test bench.

That up 51mm stroke reworked cylinder kit You can of course also move normally on the street after the TüV blessing. Even if you do not take part in racing events in the ESC, we can prepare this kit for you. But then at the regular price, as the cylinders for ESC use are specially discounted by Polini.
So that you can install the cylinder, you should pay attention to a few things in detail.
Crankshaft / crankcase
The cylinder kit has been revised for the use of a crankshaft with 51mm and 105mm connecting rods and supplemented with a matching spacer.
The following crankshafts fit this:
bgm Pro 51/105 ETS 24mm and bgm Pro 51/105, 20mm and of course all other crankshafts, which have a stroke of 51mm and a connecting rod length of 105mm.
A crankshaft with a standard connecting rod length of 97mm cannot be used.
To install the bgm crankshaft you have to prepare your crankcase.
In the “small engine half”, ie on the generator side, the diameter of the crankcase must be enlarged to 88mm.
In the large half of the housing, the drive side, it is usually sufficient to remove the rotary valve sealing surface.
You must also pay attention to the clearance of the crank webs and the connecting rod above the rotary valve sealing surface.
When building the engine, we recommend that you store the crankshaft Ball bearings with increased internal clearance and FPM shaft seals to use. These can still work trouble-free and permanently even at higher speeds.
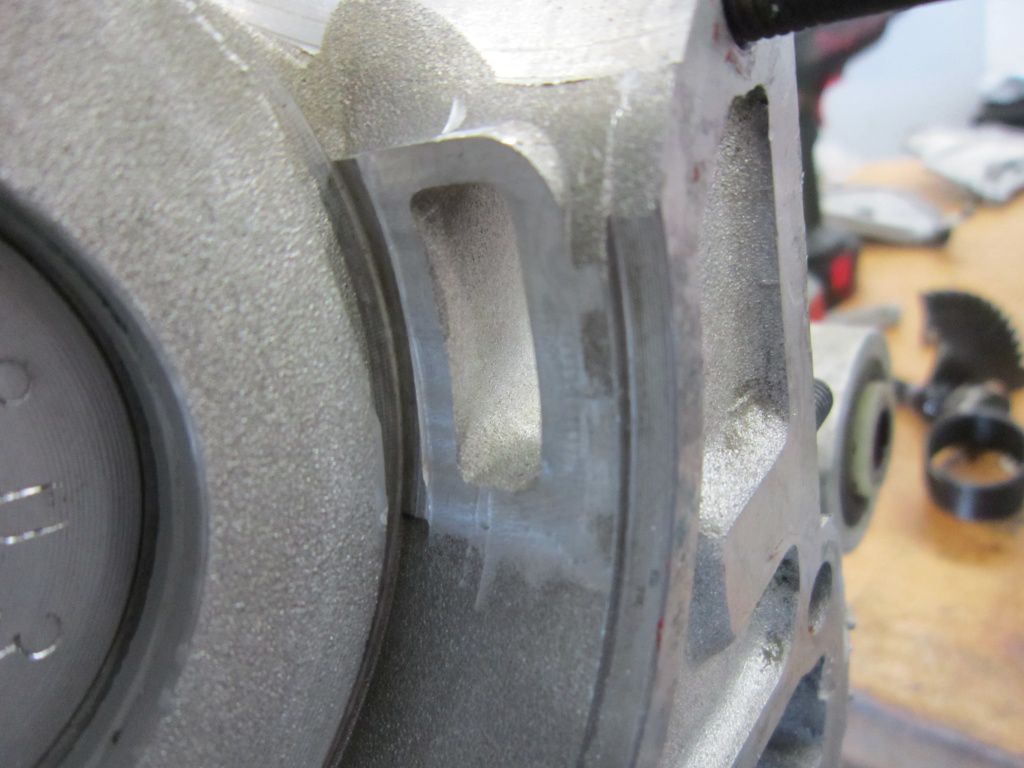
Cylinders / overflow channels / cylinder base
Every now and then it can happen that the coating on the cylinder base creates a few burrs. It is therefore advisable to deburr the edges before assembly.
In order to accommodate the large overflow channels, the Polini cylinder is significantly larger in the area of the channels than, for example, a gray cast iron cylinder. Therefore you have to edit your stator housing.
It is not absolutely necessary to plan the motor housing by machine. The part of the stator housing can also be easily removed with a saw.
Since there is no need to seal the surface, you can simply align the surfaces with a file.
You do not necessarily have to adjust the overcurrent channels in the motor housing. According to the rules of the ESC, however, this is permissible. We could not determine a performance or speed advantage through adapted overcurrent channels in the housing on the test bench. The overflow system clearly lives from the direct ventilation from the direction of the membrane.
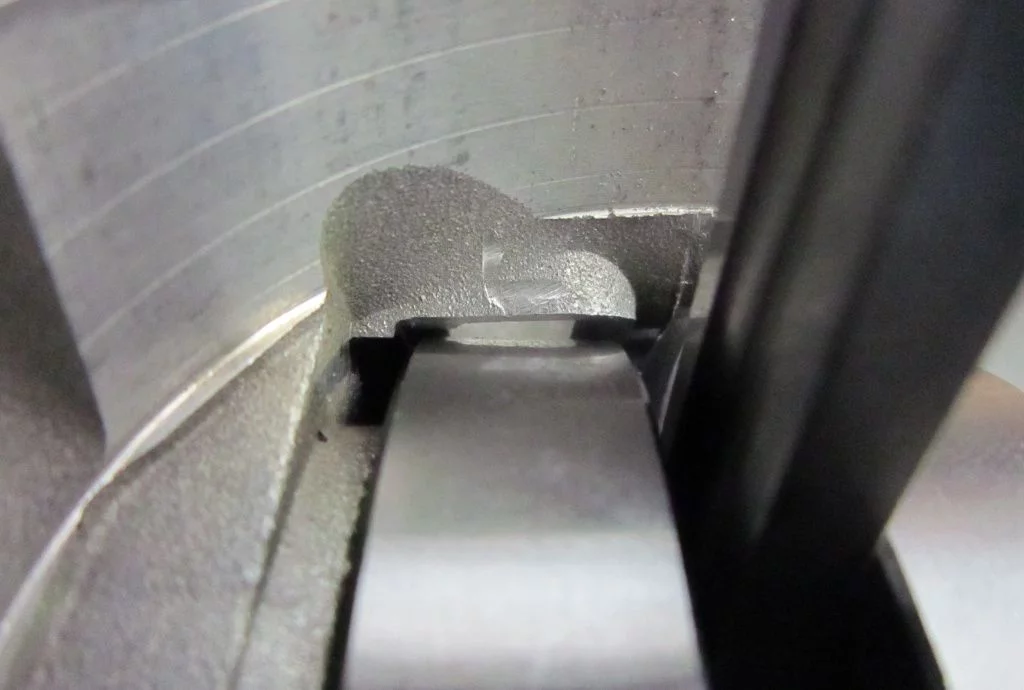
Intake manifold / membrane / spacer
Due to the fact that the cylinder is ventilated directly, the housing inlet must be closed.
This can be done on the one hand by filling the intake tract with so-called. Cold metal happen or through a Locking plate , the latter is available for 2-hole and 3-hole motors
When using cold metal, the inlet channel can only be reused with increased effort. With the locking plate, you have the option to use a housing-sucked cylinder at any time.
We used a locking plate on our engine.
After the assembly you have to adapt the locking plate to the cylinder.
Optionally, you can also edit the spacer to create the necessary space for the closure plate.
The intake manifold of the Polini cylinder is designed for good flow and thus for good performance. However, the shape of the suction means that space must be created accordingly on the frame. Depending on the model used, V50 or PK, more or less large modifications are necessary here.
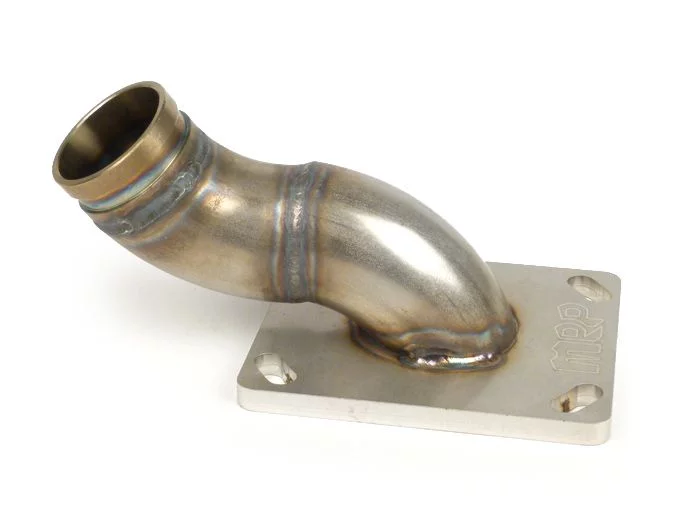
If you do not want to change your (racing) frame appropriately, you may optionally also use one according to the rules Intake manifold from MRP use. Due to the other course, the intake manifold fits into your scooter without major changes.
The good fit is unfortunately due to the performance compared to the Polini intake manifold.
You may not process the Polini Memrban any further, for example by separating out the bars, etc.
As a replacement or optional you can Carbon plate material or use one-piece membrane plates in any material thickness. You are not allowed to use Boyesen membrane plates, a similar, multi-part principle or any other membrane in class 1.
CARBURETOR
We used a Mikuni TMX 30 and a Keihin PWK 28 on the test engine we assembled.
Since our test engine has already driven almost all ESC routes, we can also give you some tips on how to set it up correctly. Of course, these tips are only intended as a guide. You have to find out the exact setting yourself on your engine, but so that you don't have to start from scratch, we have briefly summarized the jets we use on the routes.
MIKUNI TMX 30
Idle jet 20-22,5
5EL-68 needle 2 ° -3 °
Main jet 260-280 (with PJ!)
Powerjet 85-100
Keihin PWK 28
Idle jet 38-42
Needle JJH 2 ° -3 °
Main jet 142-148
IGNITION
Here, with our test engine, we have the "Polini tronics ” resorted to. Somewhat more interesting than that in terms of acquisition and equipment Vespatronic. Meanwhile, Malossi offers another interpretation of the IDM based ignition system. A ZZP of 26 ° -18 ° turned out to be the basic setting on our test engine. This ignition setting offers the best compromise between early torque and good speed behavior after peak performance. On racetracks with significantly longer straight sections, such as the club course in Magny-Cours or the new course in Mirecourt, you should take the ignition back 1 ° -2 °. When it comes to ignition timing, you have to try out what works best on your engine and what suits you best in terms of character.
EXHAUST
The current ESC K1 exhaust is based on a prototype of the ALEX1, which works very well on class 1 cylinders with suction from the housing and enables performance well above the 25pS limit there.
The new routing makes it an ESC-K1 exhaust

with good lean angle.
ZUSAMMENFASSUNG
Permissible pinch edge 1,0 - 1,2mm
Spacer 3mm (included in delivery) to adjust the pinch edge more spacers should be used.
Spark plug:
Ignition setting (IDM based ignitions, KyTronik curve no.7)
Carburettor and jets:
Idle jet 20-22,5
5EL-68 needle 2 ° -3 °
Main jet 260-280 (with PJ!)
Powerjet 85-100
Idle jet 38-42
Needle JJH 2 ° -3 °
Main jet 142-148
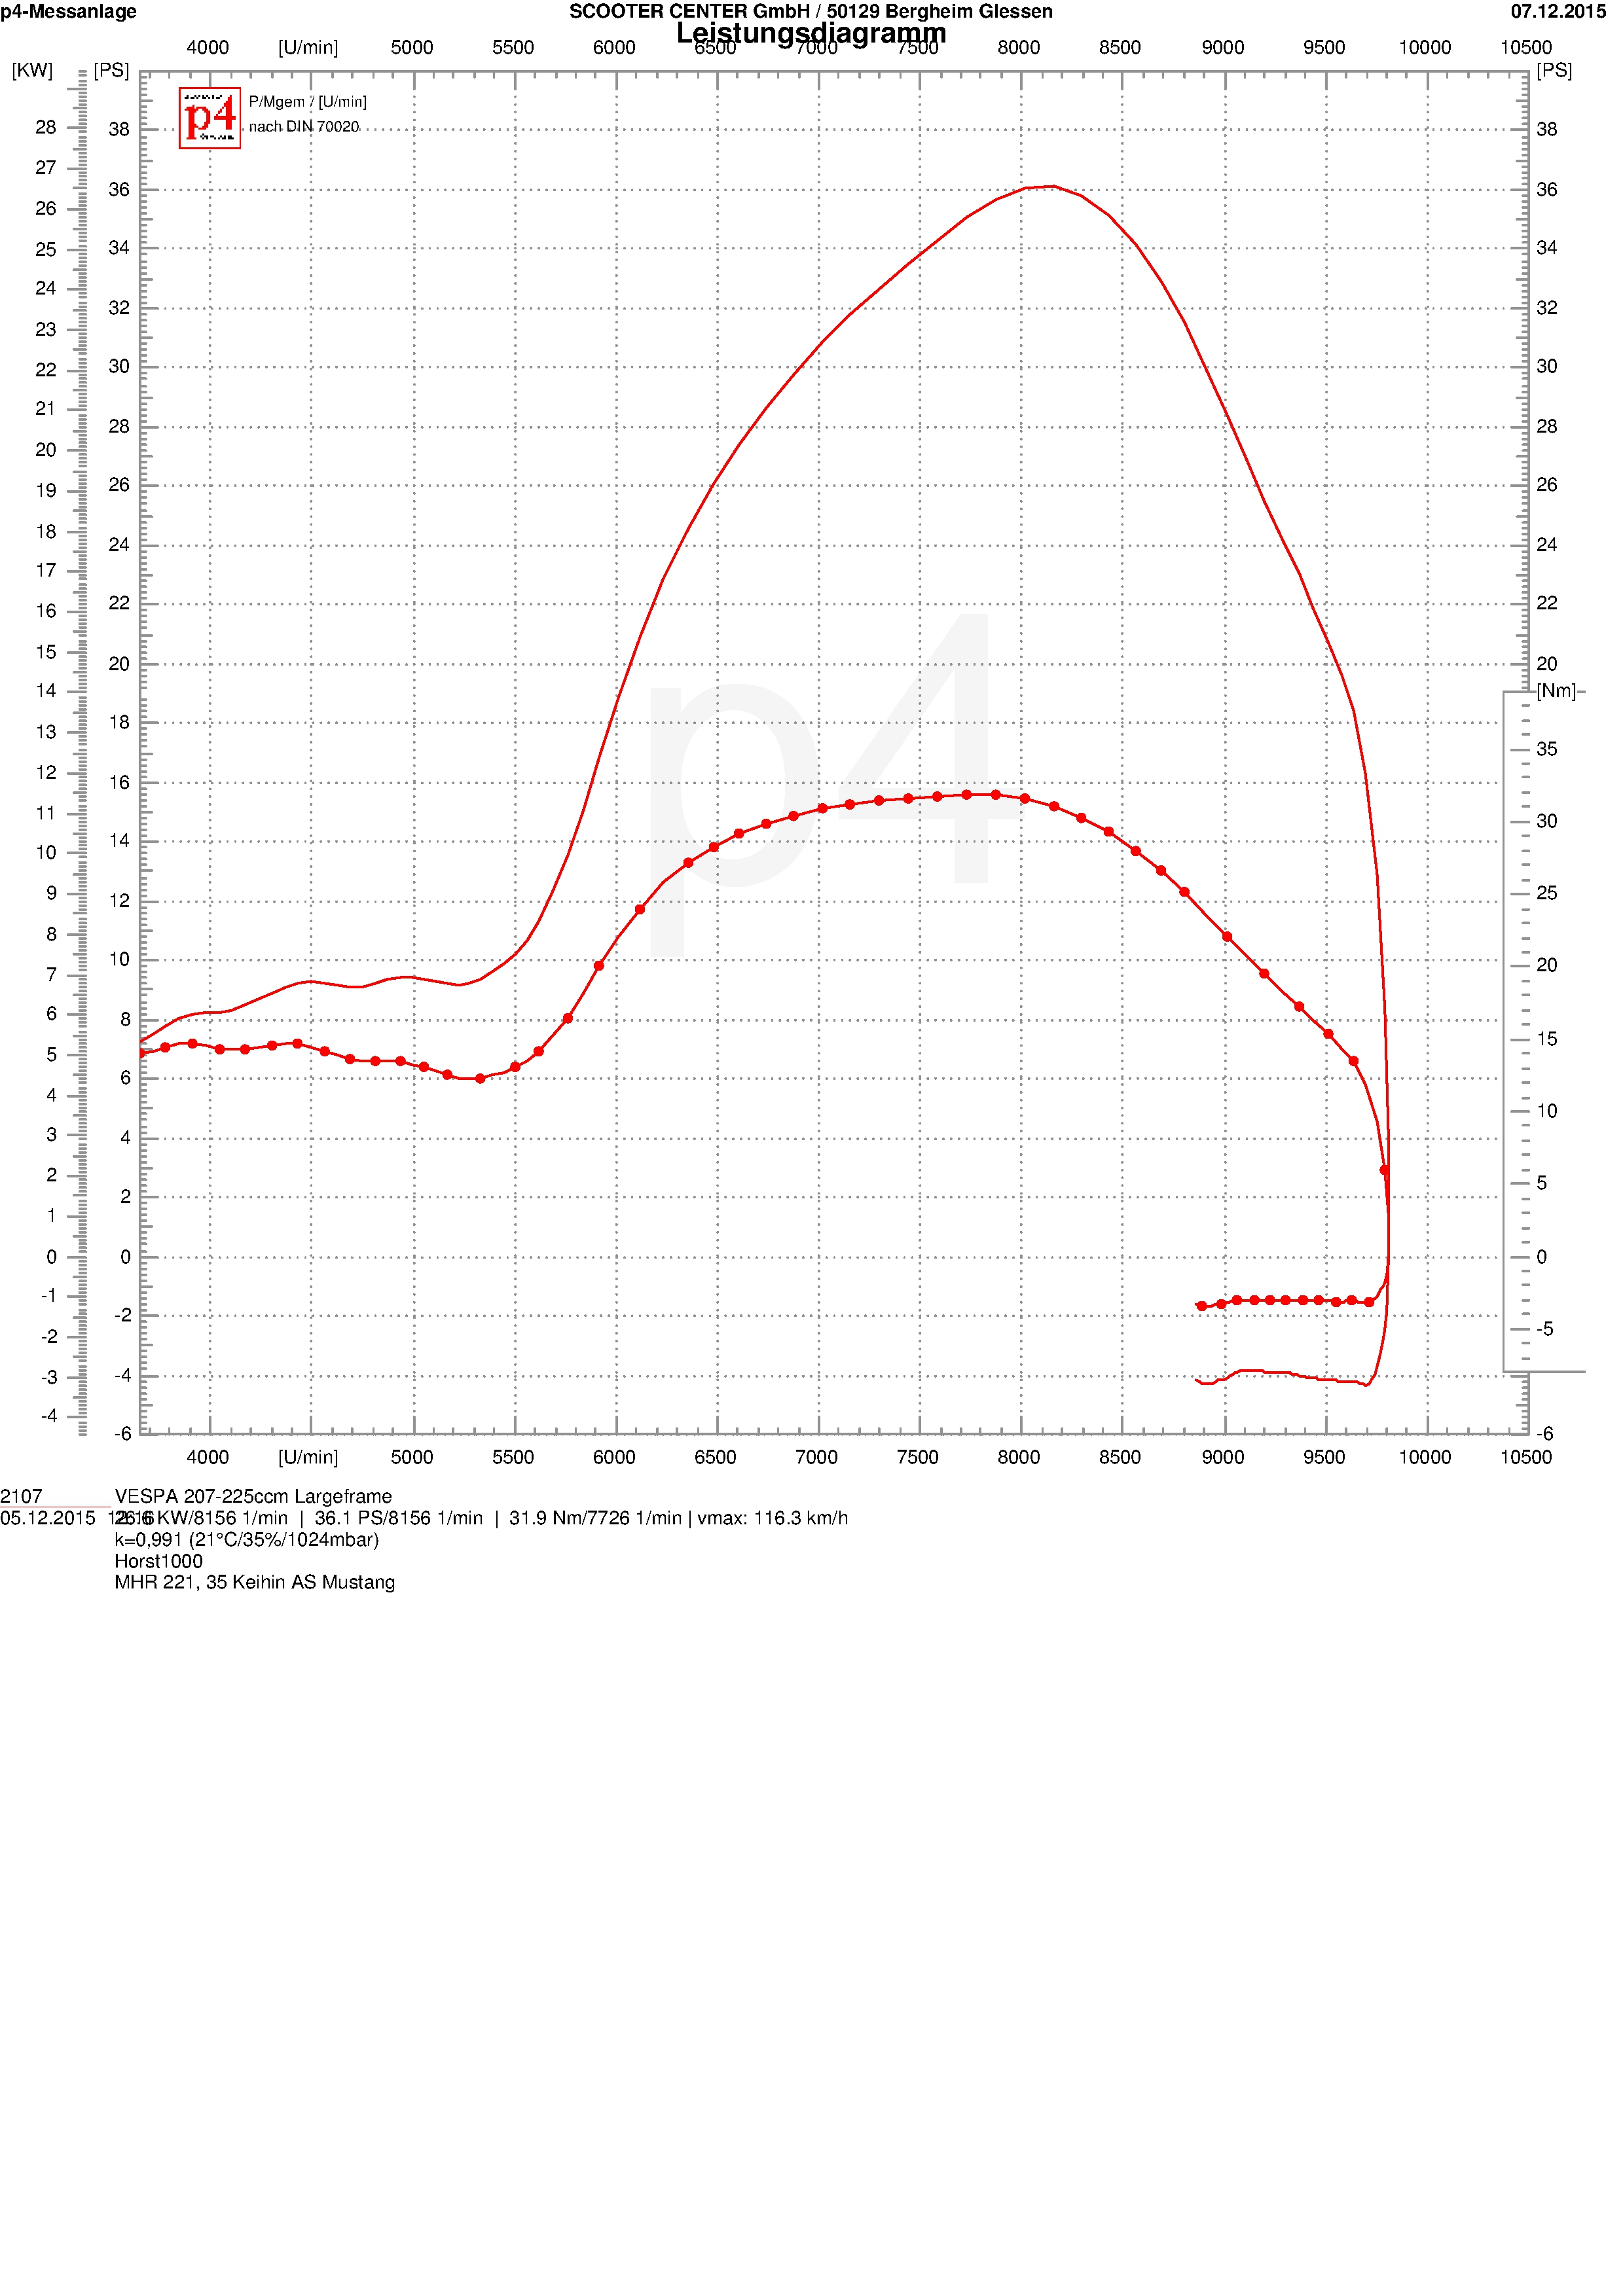
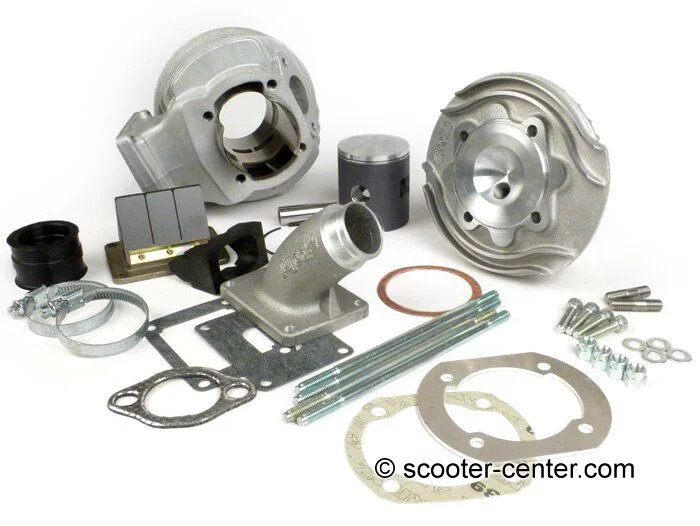
Update: Malossi MHR 221ccm cylinder for Vespa PX 200 available Malossi MHR 221ccm cylinder
As with the new one Malossi Sport and MHR cylinders , we also dedicate ourselves to the details of the Polini 221cc cylinder for 60mm stroke crankshafts. We had already measured timing & co for the Polini 221 cylinder for the Vespa here: Polini 221ccm 60mm long stroke.
The one included in the cylinder kit cylinder head is also with the current Polini 210cc used. Polini regulates the adjustment of the compaction simply by changing the pinch edge.
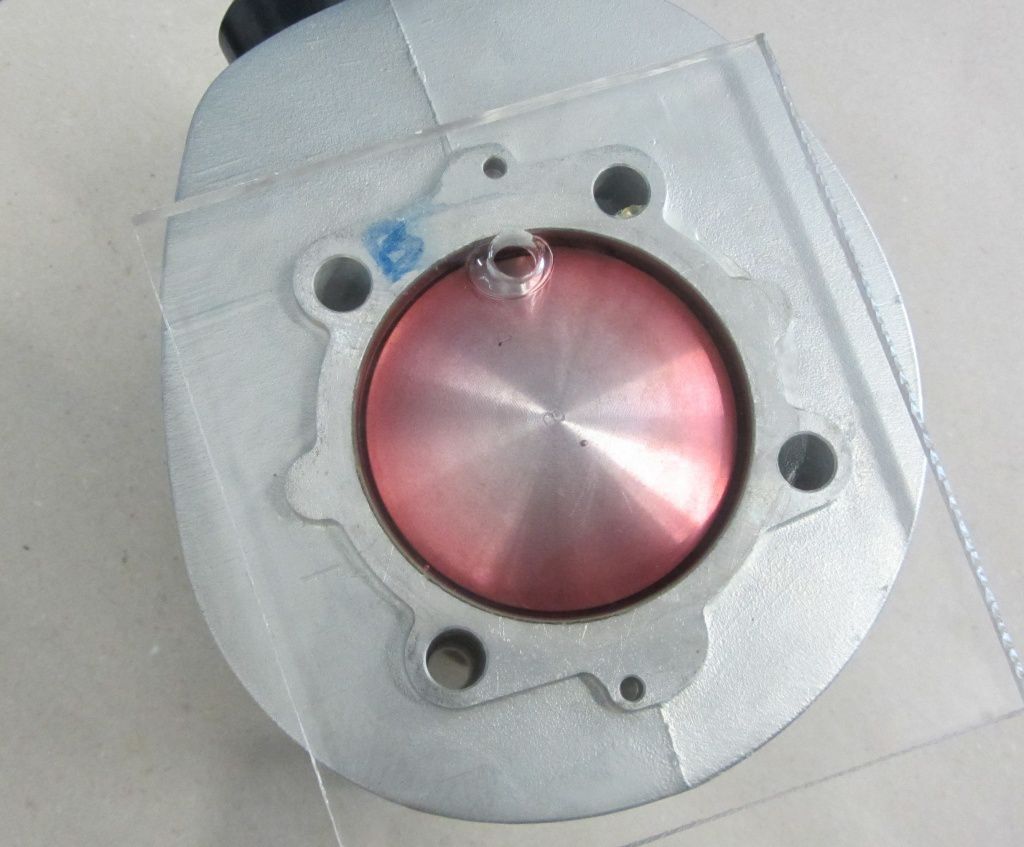
So let's grab the head and give it a suitable one Long thread spark plug and simply apply grease as a seal for our plexiglass instrument.
With the Plexiglas plate in place, we fill the cylinder head with the burette in order to determine the exact cylinder head volume.
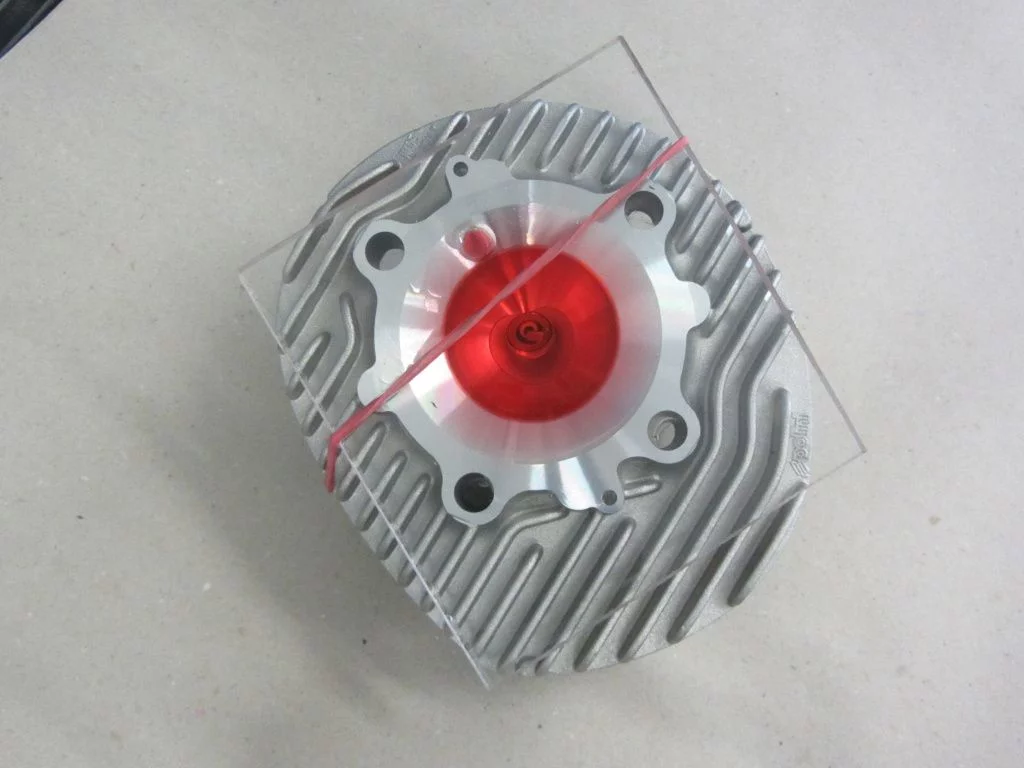
The meniscus remains in our burette at 25ml. The volume of the combustion chamber in the cylinder head is therefore 25ccm.
To get the entire combustion chamber volume (Vc), we still need the volume of the domed piston crown. With a defined piston backing, in our case 6mm, we first calculate the volume of this “cylinder”.
6,85 x 6,85 x 0,785 x 0,6 = 22,1ccm so is the volume.
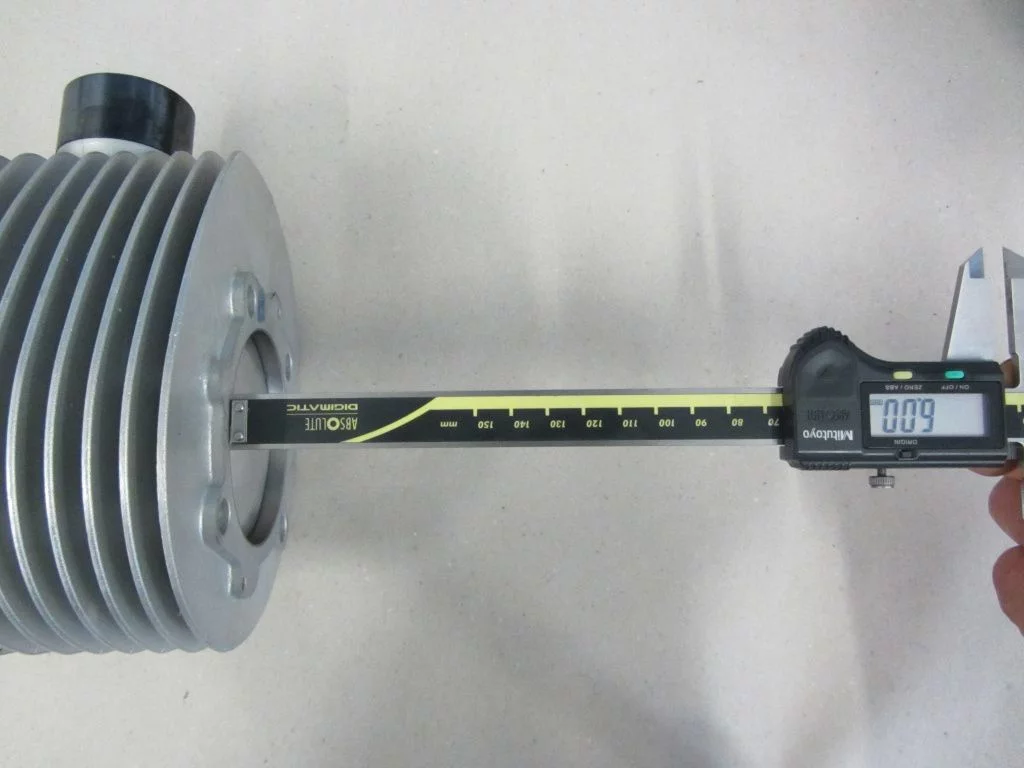
Also sealed with grease and filled with lamp oil in a playful delicate rose, the burette reveals a value of 14,6ccm. So 22,1 - 14,6 = 7,5ccm for the Volume of the piston crown.

The last ingredient is missing Volume of the pinch edge. Measured directly on the living object, i.e. directly on the engine, this is 2,2mm, which in turn has a volume of 8,1ccm requirements.
So we come to a total combustion chamber volume of:
Cylinder head 25ccm + pinch edge 8,1ccm - piston bottom 7,5ccm
= 25,6ccm
Does this result in a compression ratio? from
Cylinder displacement 221ccm + combustion chamber volume 25,6ccm / combustion chamber volume 25,6ccm
= 246,6ccm / 25,6ccm
? = 9,63
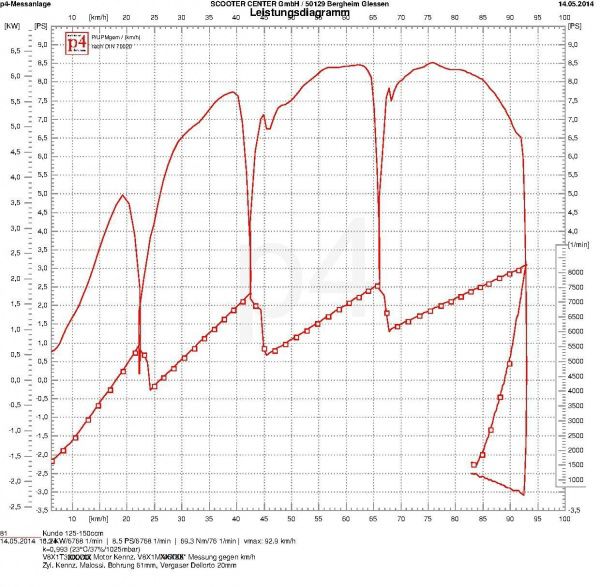
Polini 221ccm cylinder put to the test
Here is another example of the Polini 221 based on a customer engine.
So Polini 221cc, Polini crankshaft 60mm stroke, Dellorto PHBH 28, Polini intake manifold for rotary valve and ours bgm BigBox. With the original cylinder base seal, control angles of 120 ° / 170 ° result. For more information, see the diagram below.
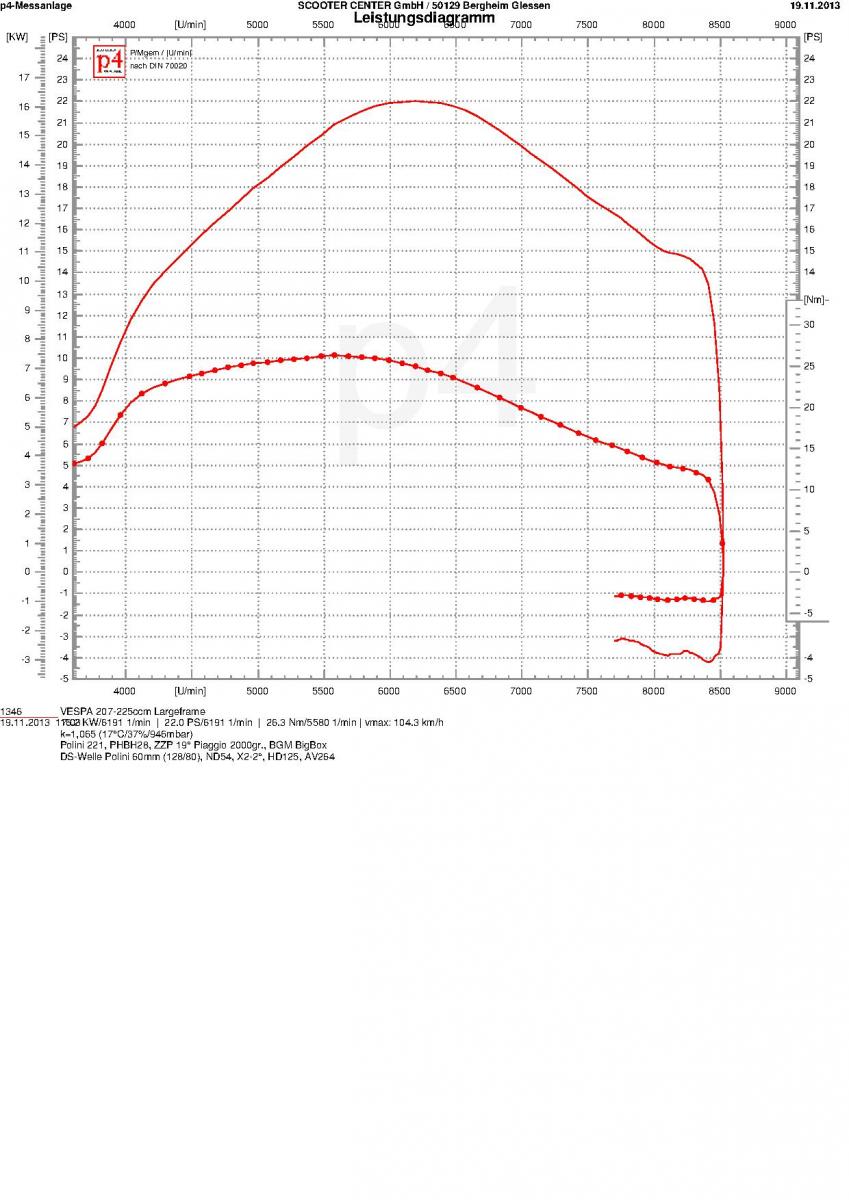
For a motor that is only plugged together, i.e. has not undergone any machining of the channel surfaces, 26Nm is a reasonable amount of torque. Especially when power and torque are available that early.
At 4000 rpm, 20Nm are already available, which is at least twice the value that an original PX200 reaches as a maximum.
Depending on the gearbox setting and application preferences, one can confidently longer primary can be used to achieve a solid cruising speed at low speeds on the motorway. The low-vibration running of the Polini crankshaft then contributes to the rest of the comfortable journey ...
With this motor and a longer reduction ratio should permanent 120km / h to be possible. Here ** as an example, once with the original gearbox and once with our bgm Superstrong clutch and DRT pinion extended by one tooth on the original primary of the PX200 with 65 teeth.
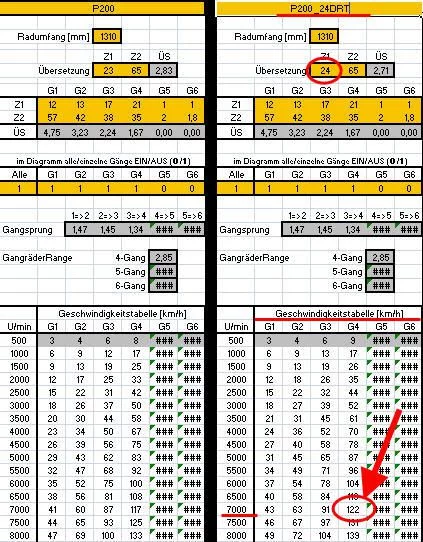
Since there are still 7000PS at 20rpm, it is possible to crack the often cited 120Km / h mark.
** The gear calculator "GearCalc" was kindly made available to us by GSF member Motorhead. Thanks very much!
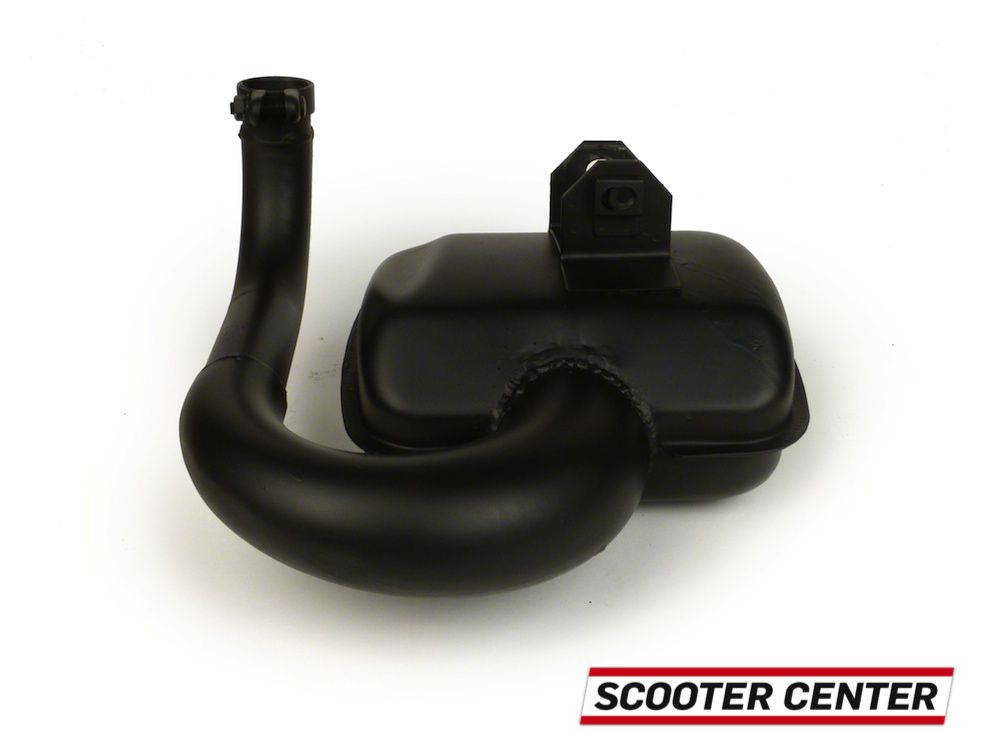
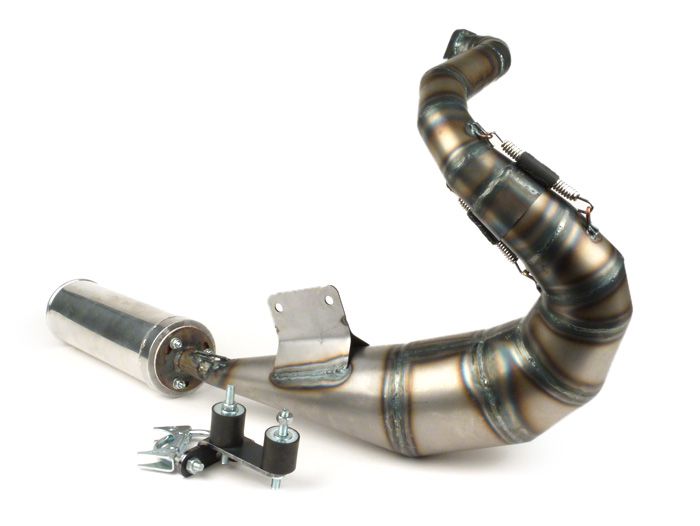
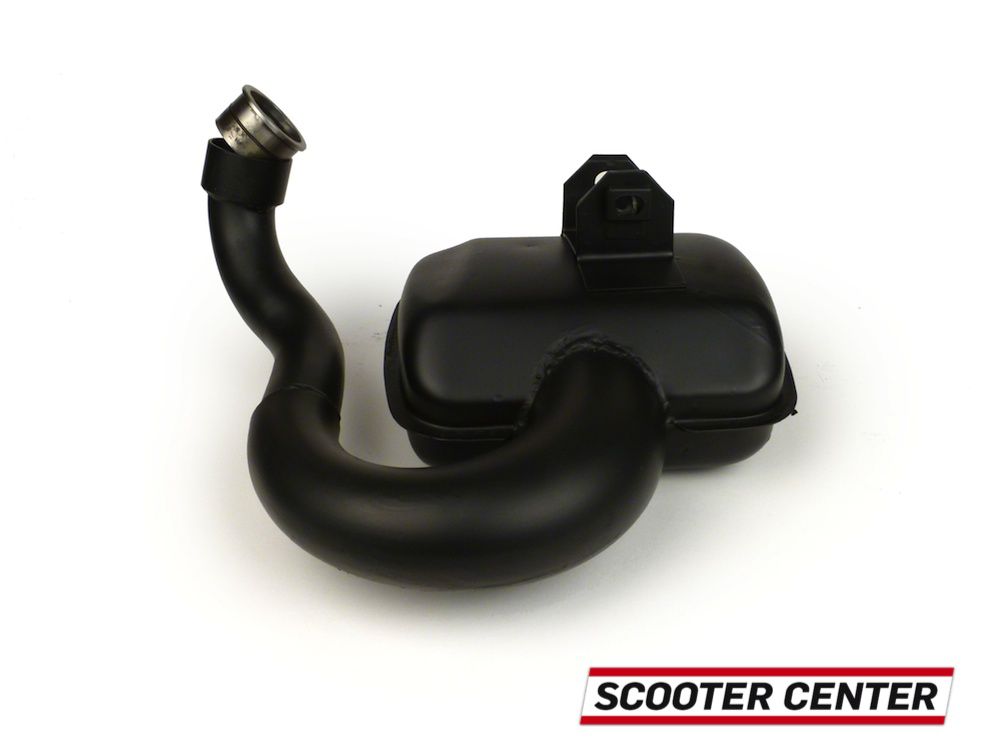
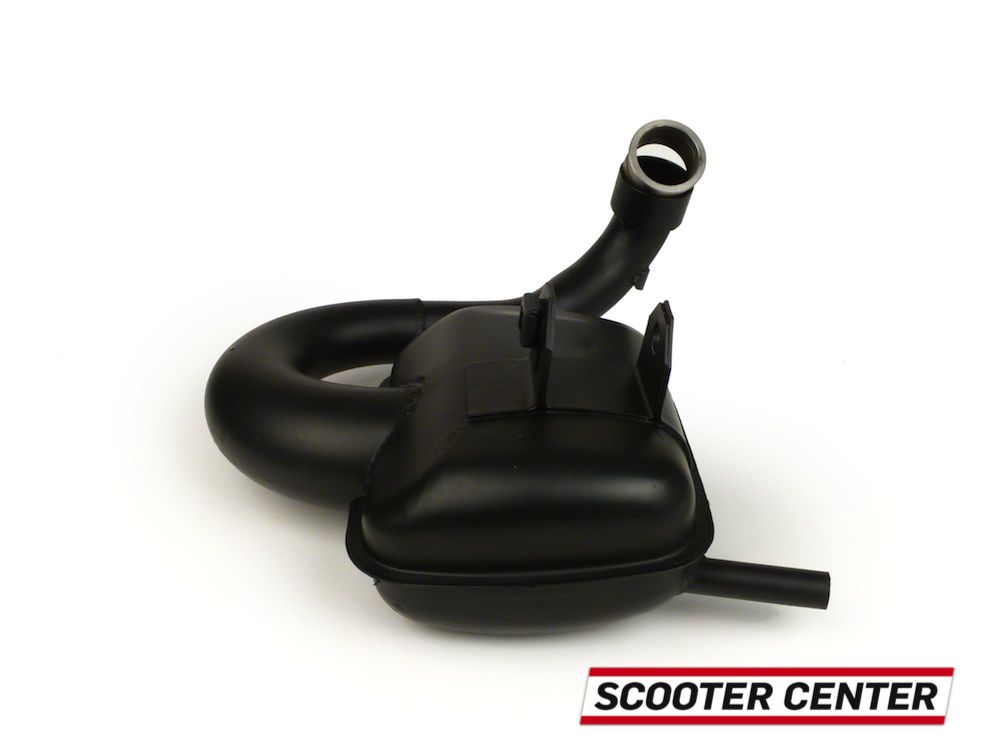
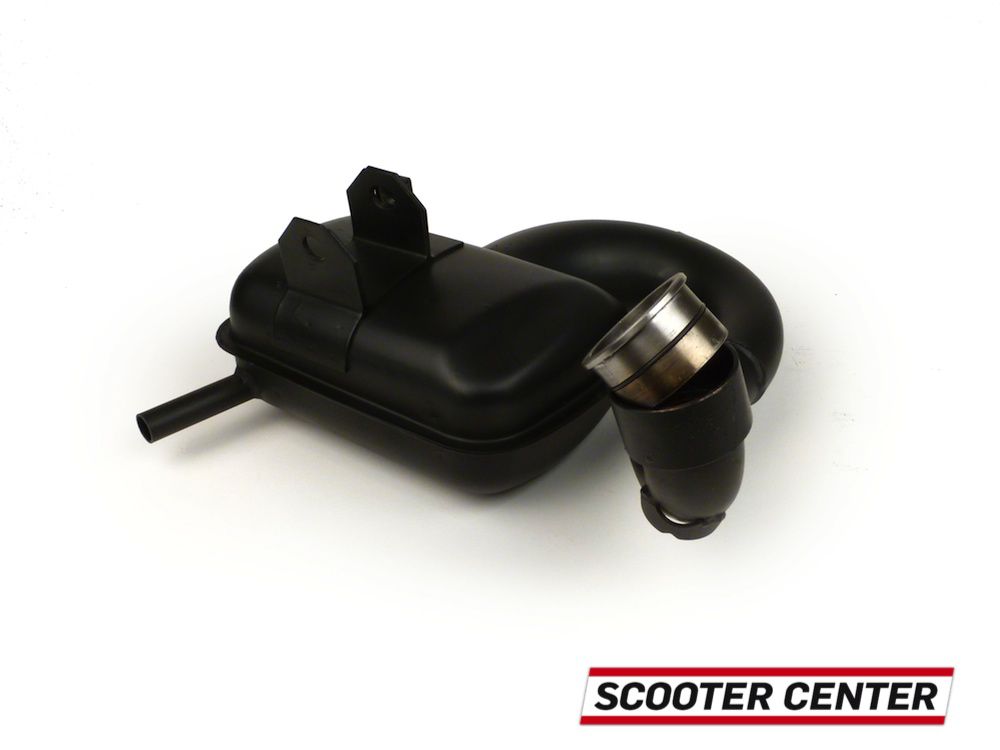
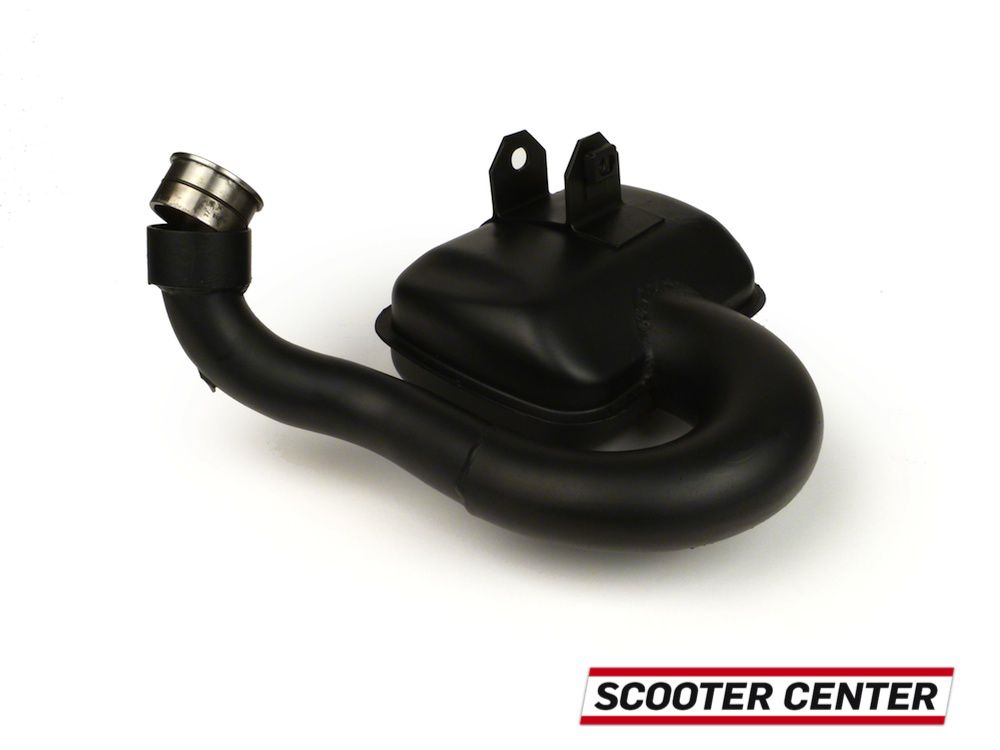
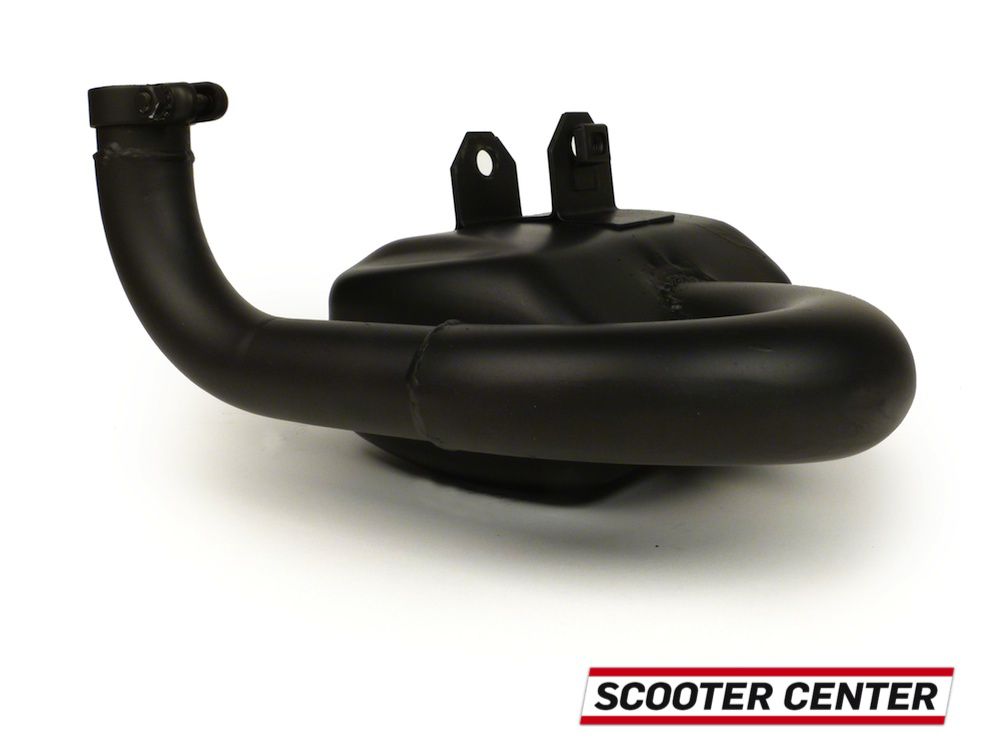
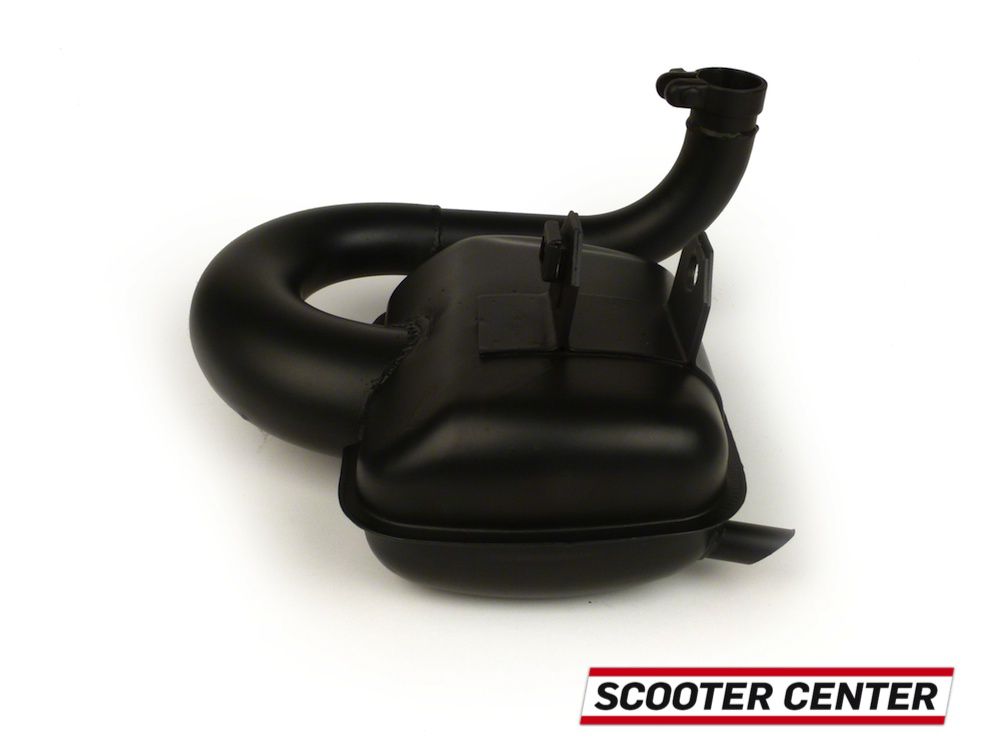
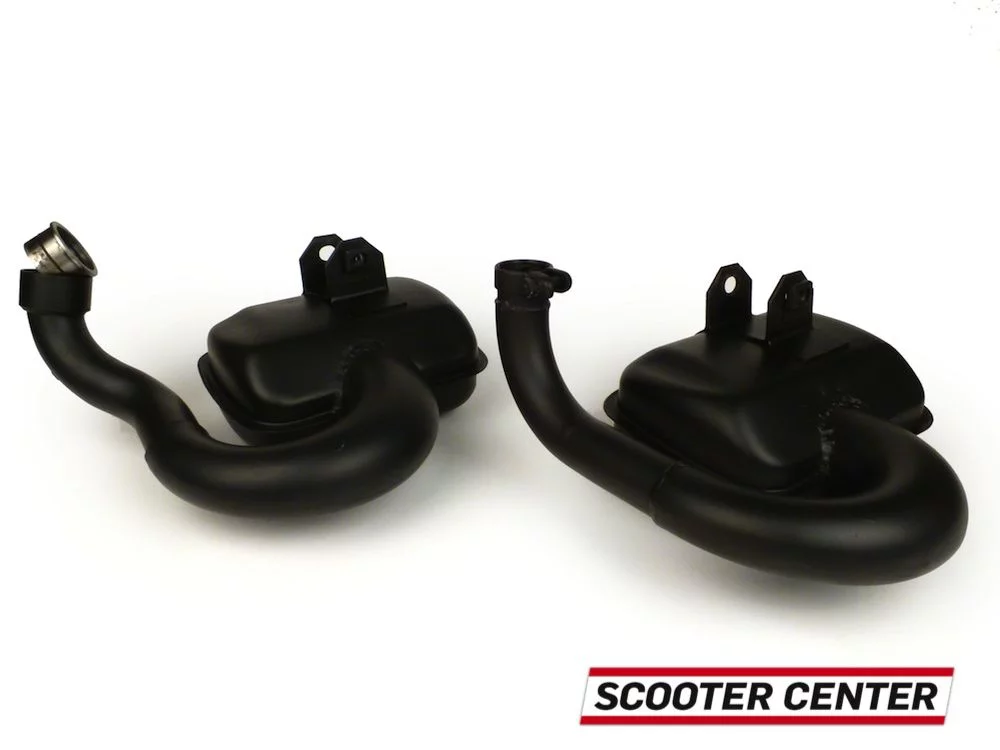
Today we proudly present you the first pictures and the first results of the test bench runs of our new one bgm PRO exhaust systems for the Vespa.
The Vespa Big Box exhaust was developed in close cooperation with MB in England and is also the result of over 20 years Scooter Center Experience.
Advantages of the exhaust:
Purpose of use:
Due to its original look and its low volume, the exhaust is particularly suitable for original tuning or touring setup.
Due to its power delivery, it can be used universally on original as well as heavily tuned engines at home.
First pictures:
Here are the images of the prototype. The exhaust will be available for the following models:
- Vespa PX 200 / Vespa Rally 200
- Vespa PX 125 / Vespa PX150 / Vespa SPRINT etc.


launch
We expect the exhaust from the beginning / middle of summer and are really looking forward to it. The test drives were great.
Test run performance diagrams:
The exhaust systems were made on the professional Scooter Center Ammerschläger P4 test bench tested with laboratory software:
Result: Significantly more power! eg:
As a Test roller the following candidates were available:
The test runs were all done with the engine warm. The tests were carried out against the existing exhaust systems on the vehicles and against the SIP Road exhaust.
Almost all scooters were then tested for several kilometers on the road in order to really feel the change. That was the very subjective so-called Popometer test ;-)
The conclusion
Awesome part - this is how a Vespa exhaust has to be!
Both for the "laboratory test" with performance diagram and for subjective testing on the road:
The new bgm PRO exhaust puts you in a good mood. The engine turns out much more freely, the Vespa becomes much more flexible and faster and without the consumption or volume increasing noticeably.


The trains were installed quickly and we are looking forward to the first runs!
The engine came to us with jet nozzles: without a needle, with a 50 mm auxiliary nozzle and 150 mm main nozzle.
The needles are the crux of the vote when it comes to tuning. Picking the supposedly right one from a seemingly endless offer of carburetor manufacturers is often quite difficult or, better, very time-consuming.
A small selection of needles from various manufacturers are always available on the test bench.
Small selection of Keihin needles
Experience has shown that rotary vane motors of this type feel quite comfortable with a DGL needle. The DEK needle installed as standard in the 35 mm Keihin is usually a bit too bold in the lower partial load range.
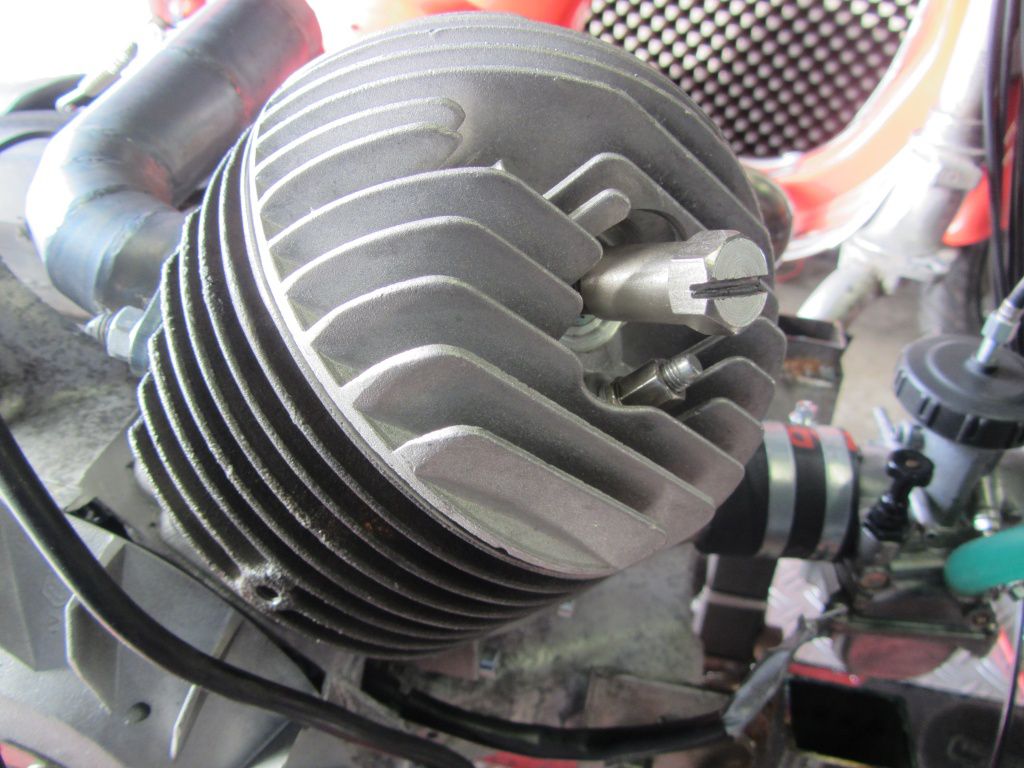
All that remains is to check the ignition.
Since the motor housing was welded to the outside of the overcurrent ducts, the ignition base plate had to be machined - unfortunately exactly at the point where the markings for ignition setting are attached to the base plate in the unchanged condition.
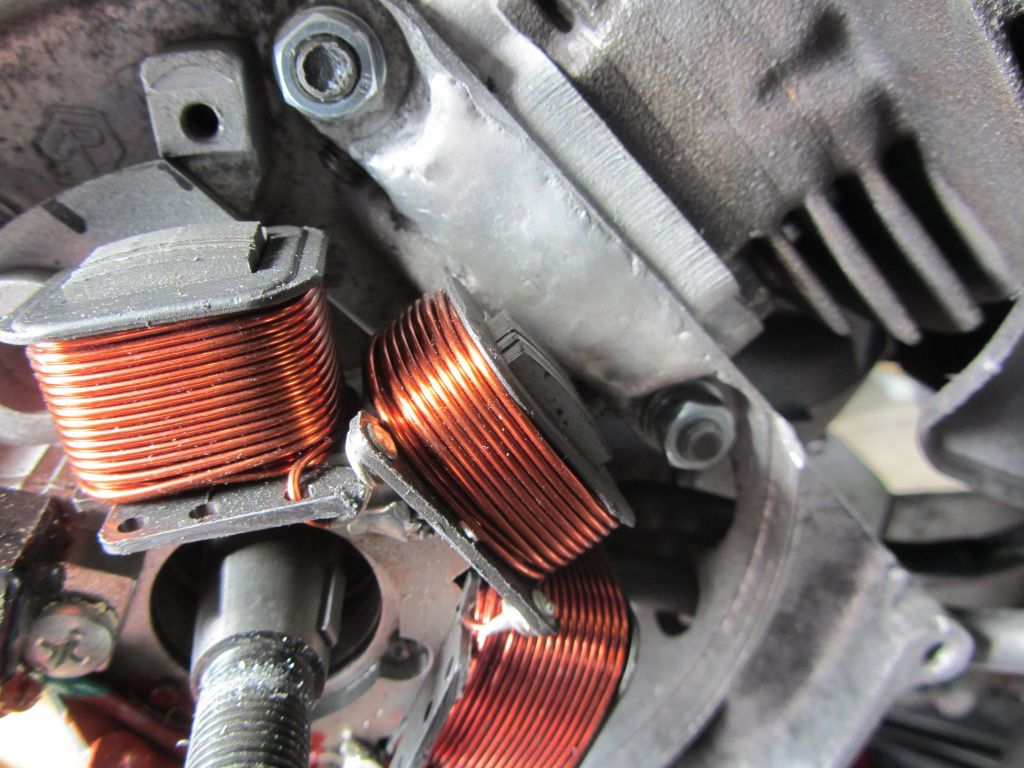
So that we can control the ignition point, we have to mark the top dead center, the TDC and the desired pre-ignition value.
As always, we determine the OT by means of a reversal measurement.
For this purpose, the piston is prevented from overcoming top dead center with a piston stopper.
Piston stopper for reversal measurement
We mark the pole wheel with a scriber and then transfer this mark to the motor housing at the first “stop”. The markings should of course be exactly in line. Here, in the picture below, the camera's angle plays a trick on us.
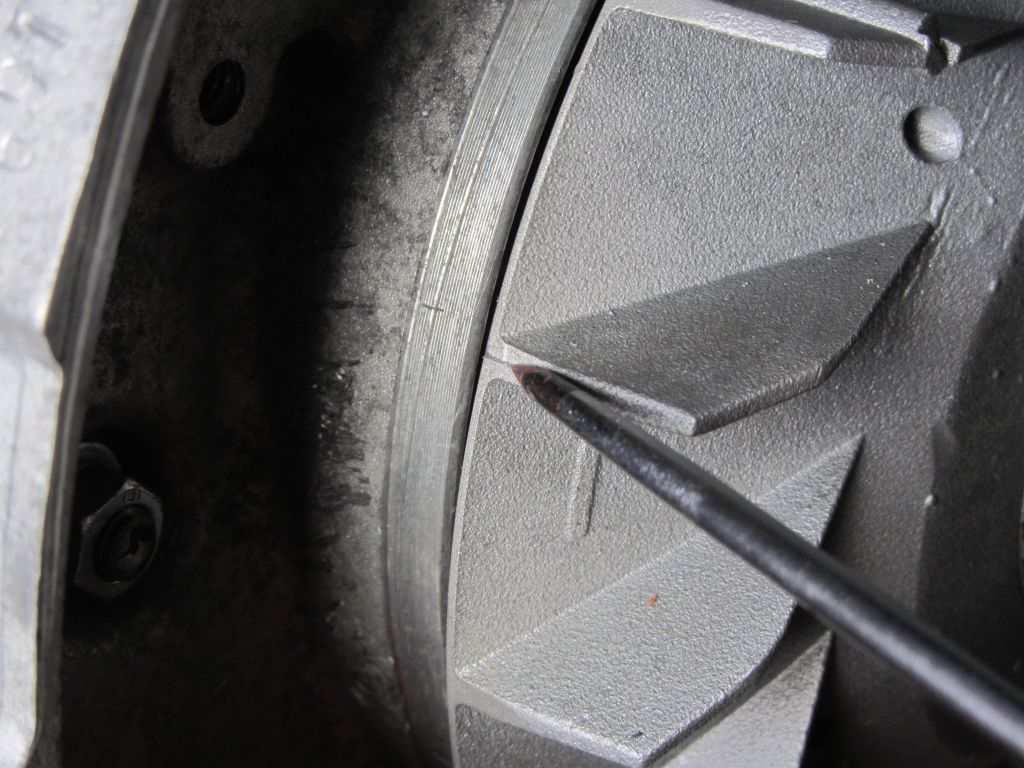
OT mark 1
After the pole wheel has been turned once against the second stop, we also transfer the marking from the pole wheel to the motor housing.
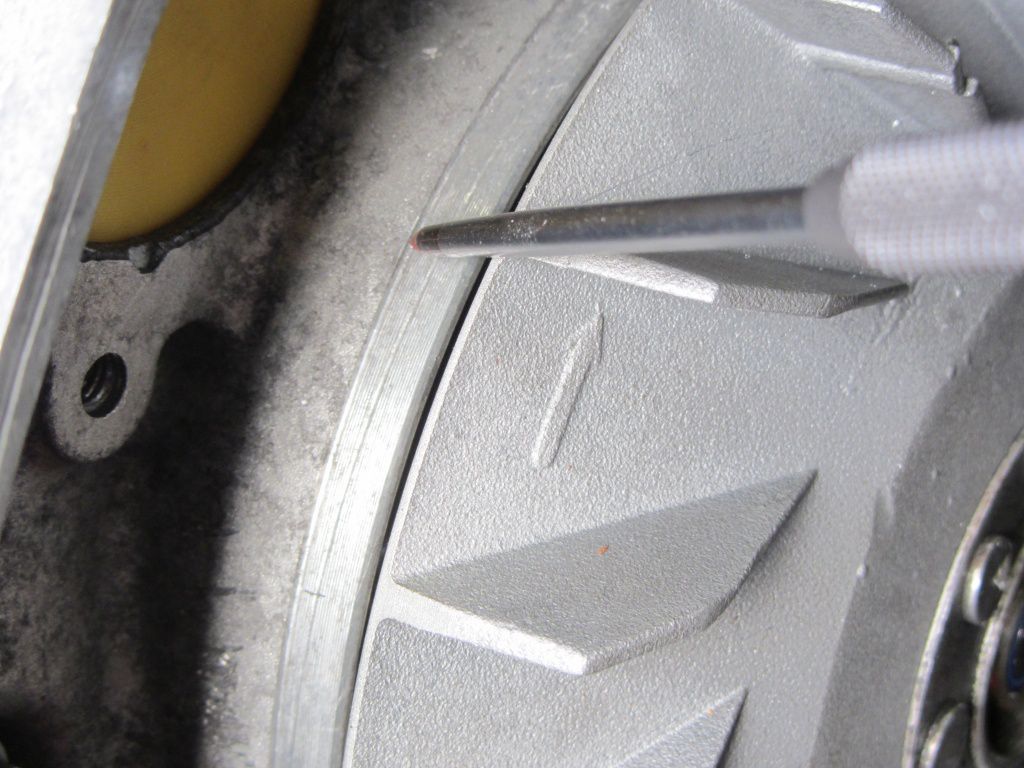
With a scriber you can now determine the exact position of the top dead center between these two markings on the motor housing.
Ok, now we know where the piston is at the top, but we're aiming for an ignition point of 18 °. This means that we now have to set a corresponding marker.
We also need the circumference of the pole wheel. This value can be simply measured or determined using the calculation method (D *?).
The pole wheel has a circumference of 529mm. If you divide this value by 360, you get the value for 1 °. This value must then be multiplied by the desired value for the number of degrees.
In our case 529/360 * 18 = 26,45mm.
This value is then marked on the circumference of the pole wheel, starting with the “0” marking.

During the subsequent check, the 18 ° marking should be congruent with the OT marking on the housing.
The control is carried out with a stroboscope lamp.
As you can see, the ignition point is around 2 ° next to our desired value of 18 °, i.e. 16 °. We reserve the right to adjust it for now and let the engine run as it is - you have to start somewhere.
When warming up the engine, it is unfortunately noticeable that third gear jumps out under load. Mmmmh .. stupid. Unfortunately, the problem cannot be remedied in the short term, so we drive the tests in fourth gear. The gearbox is practically the lever against which the engine has to work. This lever is of course much longer in fourth gear, so it “brakes” more than in third gear, which is usually used for measurements. The peak power on the graph with the dynamic measurement, power versus speed, will therefore be significantly smaller than would be the case in third gear.
As a final check, we may try a static run, performance against km / h and hope to be able to hold third gear in position at least once with the shift handle.
Ok, first try ...
As suspected, the spray is too bold. The performance drops badly, especially in the pre-reservation area.
We change the auxiliary nozzle to 45 ...
Well, something positive is happening in the pre-resso area - now we're going to 145 with the main jet
We haven't found top performance by changing the main jet. The curve becomes much smoother and the engine starts more willingly in fourth gear against the load of the roller. These are subjective impressions that no graph can depict.
What remains is the change in ignition timing to 18 ° ...
The ignition brought it again. More power in the pre-resol and peak area with more torque. 18HP in fourth gear with the longest transmission brake is okay.
Finally, a run over all four gears ..

Well, almost 20 horses in third gear ...
The difference in fourth gear is nice to see in this run. After all, the longer translation swallows almost two and a half horses.
In terms of spraying, we would leave the engine like that for now. The remaining fine adjustments should be adjusted according to the geographical conditions of the new owner on the road.
Here is the evaluation of our P4 duel.
The target was to beat the 29,9 HP mark. Set by one Cast iron Polini 133 with 54er bgm crankshaft, Carburetor Keihin PWK35AS and Fire magic Exhaust.
With 29,3PS, Jonas just missed the mark. Close behind with 29,2HP is Matthias with his 133 Polini rotary valve engine.
In a joint agreement, we, Jonas and the Scooter-Center decided to give the promotion voucher worth 100 euros "Scooterist-chairty / GSF donation campaign" let it come.

We also add the necessary test bench time for the donation engine on our test bench.
In the gallery fin det you a few selected runs of the X-mas duel.
In reality, small, angry SF motors are of course much more popular - so just be part of the next P4 campaign!
We would like to thank all participants of the x-mas campaign, it was really fun to spend the whole day with you “on the roll”.
[Nggallery id = 19]
[Nggallery id = 18]
On Friday the 14.12th of December was the first day of our X-Mas duel.
Despite sub-zero temperatures, some performance seekers came to our test bench.
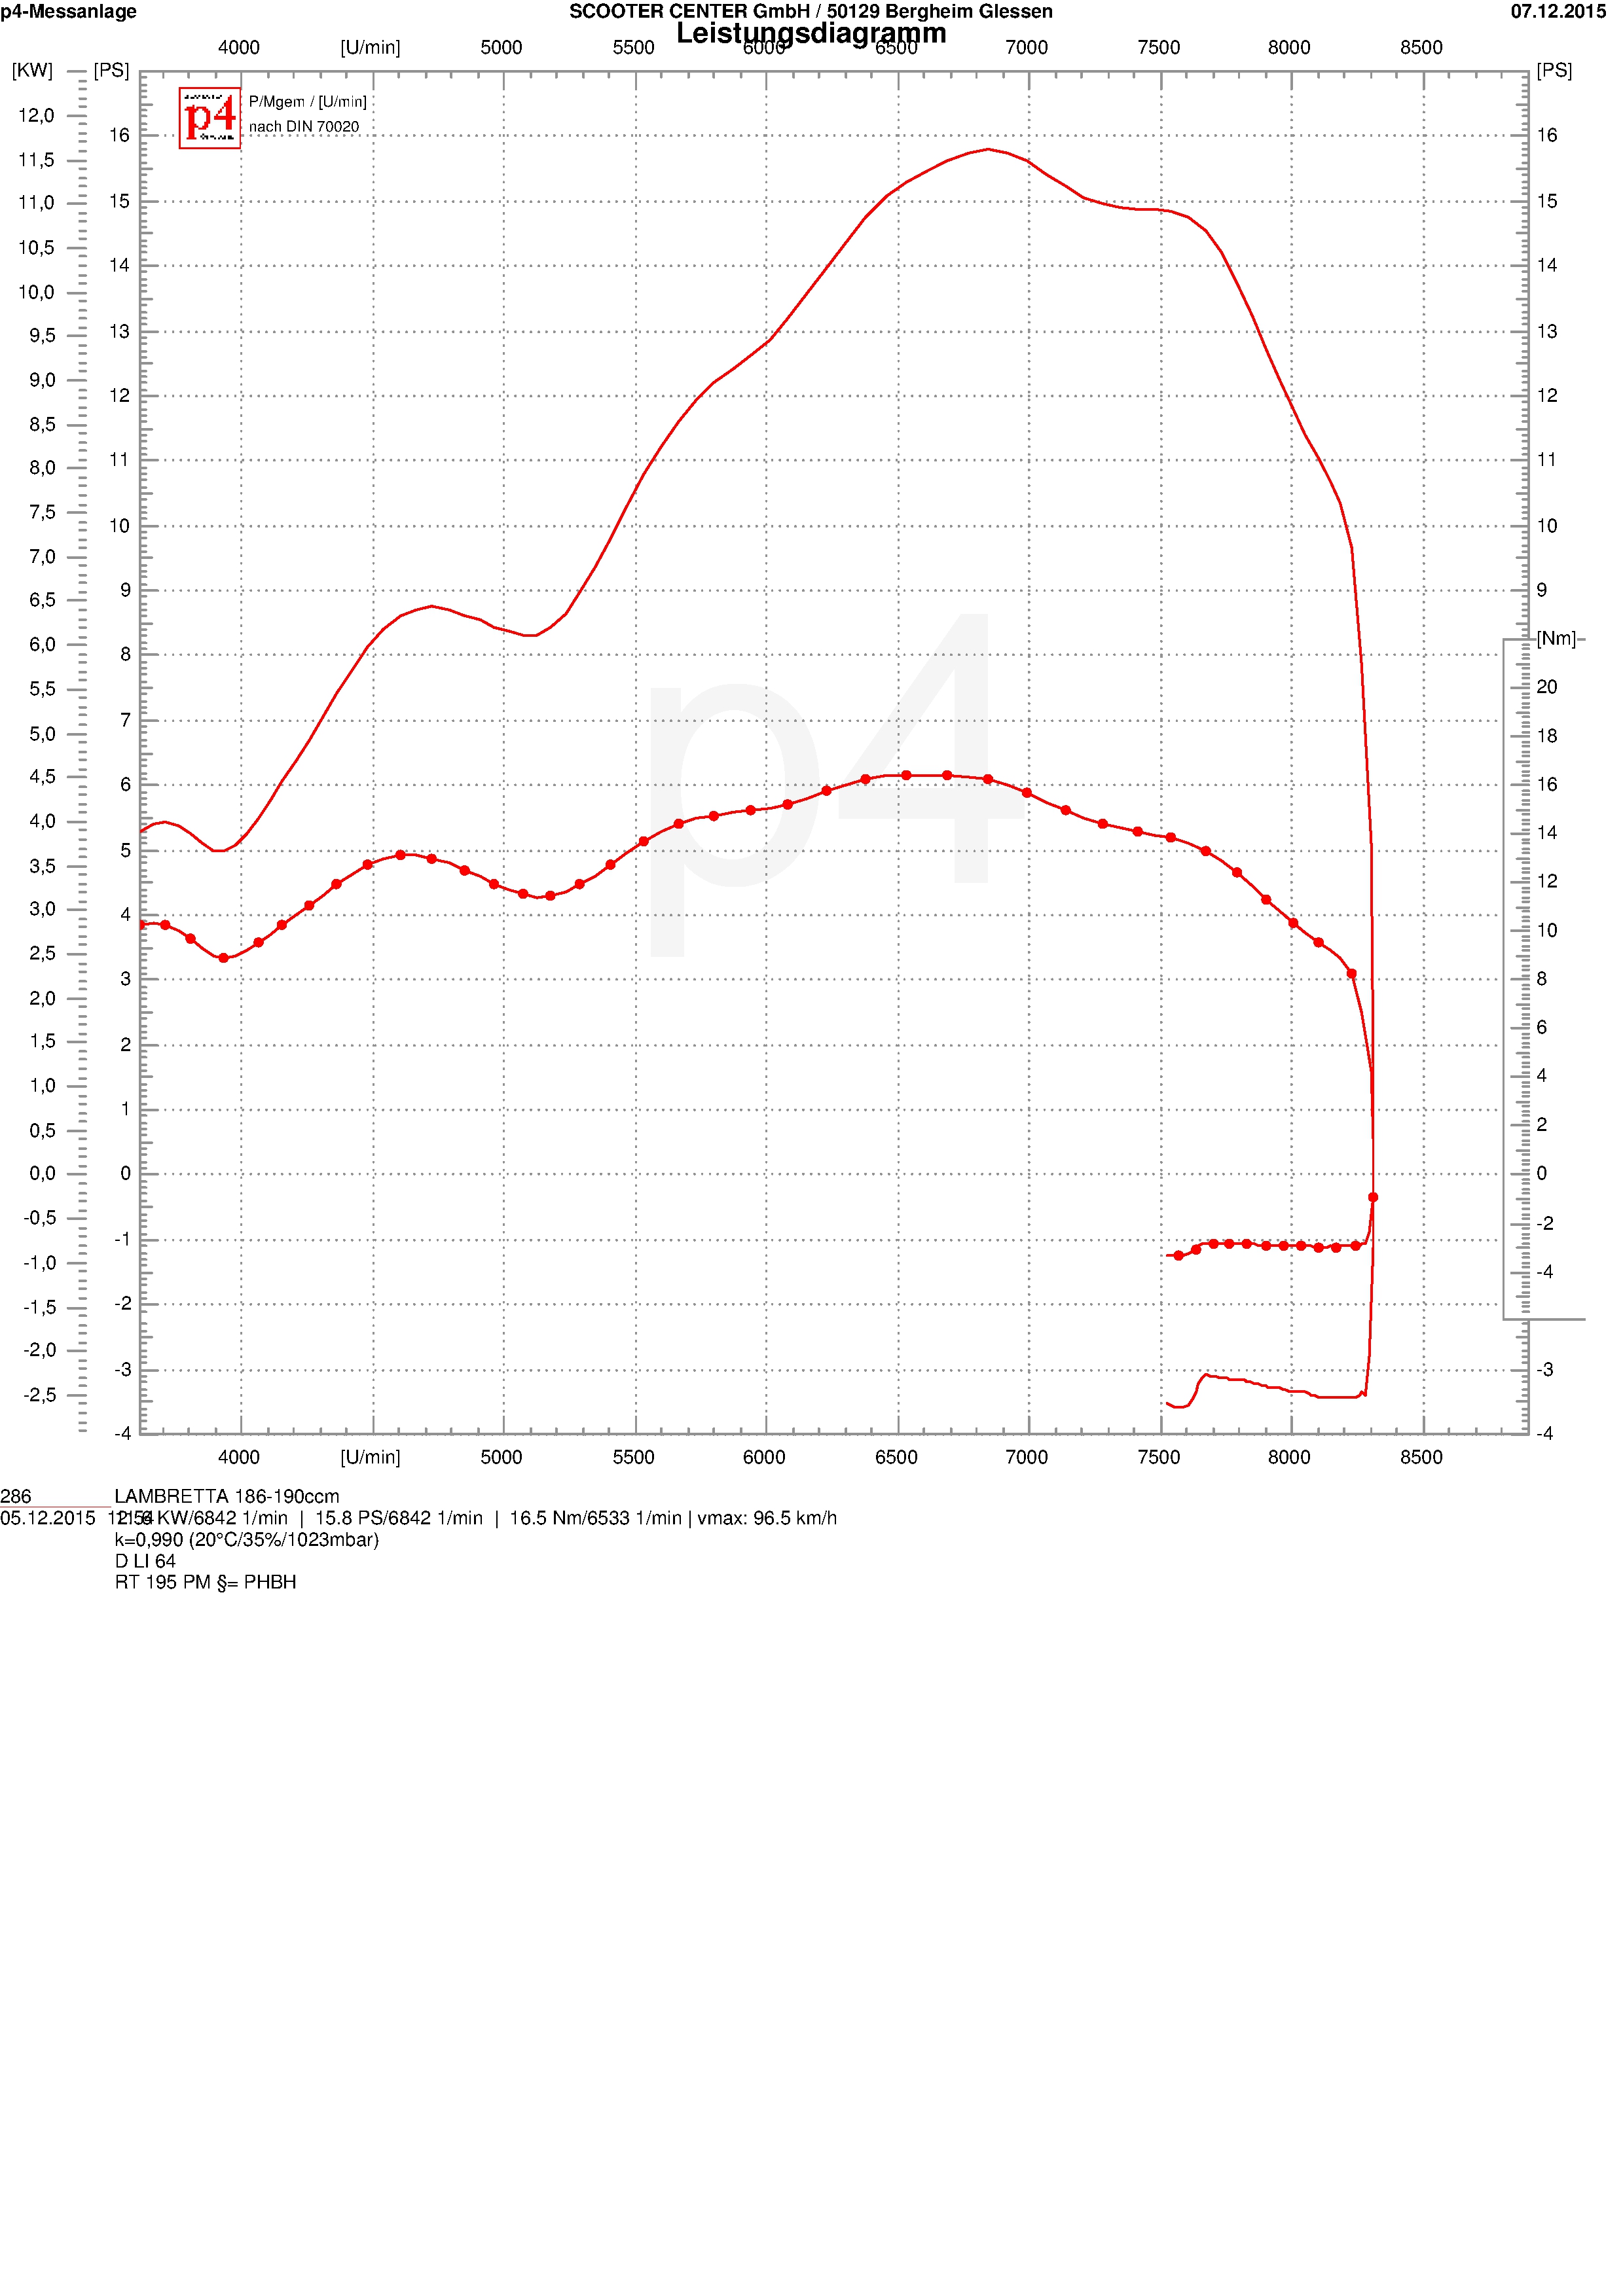
For refreshment, hot coffee with a shot and warm pretzels were available in our workshop
To begin with, we would like to briefly introduce you to the engine that needs to be beaten - the duel class, Vespa Smallframe, max.140ccm, one-piece outlet and sucked in via the motor housing.
The current state of affairs is 28,4HP at 9800U / min, from December 16.12.2010, XNUMX with a 133 gray cast iron Polini, bgm crankshaft, Magic fire exhaust and 35 Keihin PWK Carburetor with Strohspeed intake manifold and Polini membrane.
Among other things, the Strohspeed intake manifold was developed and tested on this engine, from the first prototype made of steel, through the cast samples made of aluminum to the finished intake manifold.

Today's fire magic exhaust also brought its first horsepower to the role on this Polini engine - the first Proto was still a straight pipe and was called Astro1.
")
We would like to show you some meaningful runs in the duel class:
Mathias Scherer from Ludwig & Scherer, currently with 28,2 HP, also with a Polini gray cast iron cylinder. The rotary valve (!) Is operated by a 38 Keihin PWK fed and currently provided with enough horses by a fire magic.

Jonas from Nettetal should of course not be absent from this campaign. In the Germanscooterforum you can be constantly advancing "Summer-Winter Project" admire.
It also fires a Polini 133 made of gray cast iron. The motor is also equipped with a Polini membrane and is ventilated via a 35 Keihin PWK. With the last changes to the control angles, now 128/196, a lot has happened here too!
In the first attempt with the air filter, the limit of 28,4 HP could not be cracked….

Without the fan ring of the Vespatronic, the output rose to over 30 HP….

... mmhh, then after almost exactly 2 years I have to get the Polini motor out of the corner and put it back on again - or maybe just unscrew the fan ring ;-)
There is still some time until the second day of the duel - but for December 2st. also announced numerous comrades-in-arms whose engines should also be able to exceed the 21.12HP limit ...
It will definitely be exciting.

At the end of the year we let it rip again. On the last two Fridays before Christmas, December 14th and 21st, 2012, we invite you all to join us again in Glessen from 10 a.m. to 17 p.m. Waiting for you:
· Test bench competition in different classes
· Steaming coffee with a shot
· Warm pretzels
· Solid engines
20% in store sales (code word: Xmas)
· WHO IS BEATING THE ALEX on our P4? *
* With Smallframe up to 140ccm, one-piece exhaust & housing suction!


