


Scooter Center xmas final. On the last two Fridays before Christmas, 14th and 21st December 2012, we invite all of you to our shop in Glessen between 10am and 5pm. Program for you:
· Dyno competition in different categories
· Irish Coffee
· Warm pretzels
· Hardcore engines
20% discount in our shop (codeword: Xmas)
· Who beats Alex on our dyno? *
*With a Smallframe up to 140cc (one exhaust and regular intake)!
The prize for the winner will be a Scooter Center voucher worth 100 € !!!
Good tools bring even more fun to the workshop. Jobs aren't a mess anymore and can be done properly.
Our bgm multitool bgm8819 contains bgm8811 and bgm8812.
The bgm8811 tool is the flywheel extractor (M28x1) for all Vespa scooters with electronic ignitions. Starting at the OEM PX flywheels to the electronic conversion for the Vespa Sprint/VBB and V50/Primavera. At the same time it is a clutch extractor tool for the Vespa Smallframe.
Together with tools bgm8812 it gets even more complete. Because you have the clutch compressing tool too. And it is a very clever clutch tool too. You can replace clutch plates with the clutch still fitted to the engine. Cell phone, eh?
Especially handy, because you don't have to lock up the primary drive any more to get the clutch nut undone. If you have a 12 spring PK-XL2 clutch you will love it even more when everything stays in place.

The clutch compressing tool fits all PK and V50, PV, ET3 and the Polini double spring Clutches with 3 and 4 plates. 
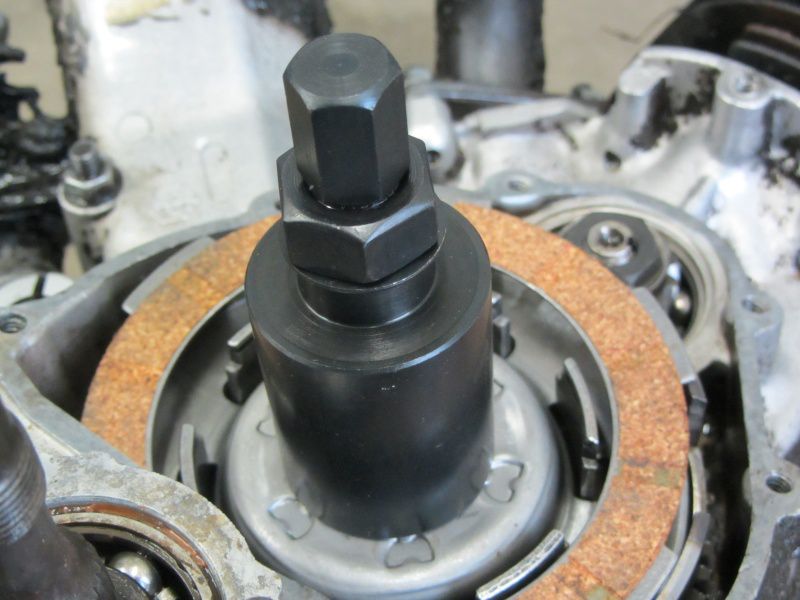
After the clutch cover and the pressure plate are off, tool bgm 8811 is screwed into the thread.

Afterwards clutch compressing tool bgm8812 comes on top.

And the nut, washer and screw (part of tool bgm8811) are used to compress the clutch.

As soon as the steel plates are spinning freely the securing clip can be taken of. Now you are ready to replace the plates.

Before the tool will be released the oil guide plate and -important! - the securing clip need to be fitted.
Job done!

Our test engine is running, we let it warm up properly. The jetting seems to be right with idle jet 48/160, air correcter jet of 160, atomizer BE3 and main of 140. So now we will see how powerful this engine is.
First of all the gear ratio needs to be measured. We measure this at least twice to be 100% sure. The gear ratio is 3.21. This can even be typed manually into the dyno software at a later date.
When you are operating a dyno a scientific operation is a good gesture to make sure that the results can be compared. After the first three runs we see that the power output is always nearly the same. A good sign, here is the best result:

Nice to see that the engine starts to lift the power low down in the rev range. As expected from the Polini kit. A quick road test shows that is a treat to use on the street. At slightly higher idle revs of 3.500 rpm the engine pushes -thanks to 17 Nm- heavily.
The inlet induction sound is nice too. The Polini solution works not just power wise, it reduces induction sound as well. The adapter has a small collar built in that breaks up the acoustic wave what gives a very discret induction sound.
Back from the road testing to the dyno, we take a closer look to the head design. Next we are going to test the MMW head. The previous fitted worb head gave a squish clearance of 1.7mm. To achieve this with the MMW head we are going to fit a 0.7mm head gasket. One quick note: Never combine normal head gasket with O-rings on heads. This doesn't work on the road. For short testing on the dyno it can be done though. And we needed to do this to make the heads test comparable with the same squish clearance.
After some more runs we have a direct comparison of the heads:
RED: MMW
BLUE: Worb5

The higher power output of the MMW head is caused by the slightly higher (but still road safe) compression ratio and the difference in the combustion chamber design.
The highest torque reading is still at 4700 rpm, but rises to a very good 22 Nm. At 7k rpm we still have 17 hp and 17 Nm. God figures for high speed motorway use.
The 60mm MMW head we are not going to test anymore. Not because we are lazy, it is more because there is no sense in it all. We already saw that the higher compression works. the 60mm version would reduce this, so we are not to keen to lose power.
A wider power band with a little more peak power at high revs would be nice though. This really separates good road engines from the very fast ones that are hard to catch on open roads.
Well ... what could be done. Something like a luxury problem here. A good working engine with nice power output in a useable rev range and we are still thinking of how it could be improved.
There it is our MBgm Vespa BIG BOX. Sounds like fun to get this on the Polini. Doesn't it?

This should be done tomorrow!
Stay tuned!
Only a few steps left untill we can dyno test our new engine.
The engine will go into the Silver Fern and be tested for Rally going and daily commuting then.
While fitting the flywheel care must have been taken that the slot in the flywheel cone aligns with the woodcall key.

Afterward the flywheel groove can be tightened down to 65Nm. the washer needs to be fitted, otherwise the nut will come loose.
The rear brake drum goes on the shaft next. We only put it on loose and fix it with the nut.
As soon as the rear brake is adjusted we will tighten it down to 110Nm. Securing cage and splint must be there.

For adjusting the clutch you need a little bit play at the clutch lever. This should be around 1.5mm and 2mm.

Oil and fuel hose are connected. consequences. The air bubble at the oil hose is a very good indication to see if there is oil pumped into the carb.
But the air bubble shouldn't be much bigger than that. Otherwise there is the risk that the oil pump runs dry. And so will do the lubrication then.
For the first firing we fill the fuel tank up with 1 liter of oil petrol mixture of 4%. This should be done to have a proper lubricated engine from the start and to compensate the oil pumps delay.

The engine starts and we let it idle for a while. Then we see that all cables are connected properly. We round down to fourth and everything is okay. The clutch works perfect. And the oil pump operates as well.
So we are ready for the first dyno sessions. Watch this space.
Today we found the time to have a look at the port timings of the Polini kit.
With a 1mm base gasket one look at the degree disc shows us transfer port timings of 125 ° and exhaust timing of 172 °. This results in a blow down timing of 23.5 °.
Figures that really worth to try on the dyno and figures that should result in fast road engine with torque capable of raching high revs for good speed.
We have three different cylinder head designs to test on the engine. And this will be the first mod on the dyno.
We are going to try the MMW for 57mm stroke, the MMW for 60 mmstroke as well as that Worb5 head for 57mm stroke.
On a first sight at the head we have a look at the squish clearance. The MMW 57mm version is a little bit tight at our 60mm crank. The squish would be 1mm on our setup, but well worth to try it with an additional head gasket. The MMW head for 60mm stroke is designed with a recess for the longer stroke. Used with our 1mm base gasket to achieve the right port timings we have a squish clearance of 2.7mm. So we have this head as an option if we want to try the setup without the base gasket. If we don't use the base gasket anymore, the port timings are lowered, but with the effect that the blow down timing is increasing. This is because of the greater reduction of transfer timing compared to the exhaust timing.

The Worb5 head is machined for the 57mm stroke, but with more squish clearance machined into the head. So we have a very useable squish clearance of 1.7 mm without additional head gasket.
The different combustion chamber designs we will test on the dyno the next days. Can't wait!
But the carb is still waiting for fitment. And there are some important steps on the way to take care off.
First of all you have to be careful with the use of sealer. On self-lubrication Vespas the hole marked red in the picture feeds crankshaft, barrel and flywheel side bearing wih oil. If this is blocked no oil gets in and the trouble free miles will be very limited.

The very basic design of the SI carb range is very solo. But one to watch out for is the mounting of the carb, this can easily be destroyed.
If the nuts are over tightened the carb is warped and a sticking slide is the result of it. At least the later version of the SI carb is improved in this area and the nuts can't bend the carb so that the slide sticks.
The pictures shows this feature on the later carbs and this recess can easily be done to later SI carbs.

But even on the later version the carb nuts shouldn't be tightened not more than 16-18Nm. And they shouldnot be fully tightened from the start. Instead tighten they evenly and in turn.
For the carb mounting there are two different versions available as well.
The “old” version with studs and sleeve nuts are there untill the SI carb was used first. the new version was introduced with self lubrication P-ranges labeled EFL, Arcobaleno or Lusso.

The ida came up because this was easier to fit. Carbs without self-lubrication are fitted with a very long air adjuster screw and slide hook.
Before the carb is fitted into it box we cut a slot into the air adjuster screw this makes adjustment much easier on a later point.

Damn, we spoil it!
That happens too often. So you have to take care that the hook hits the clip of the oil pump.
If the carb is fitted like the one pictured, it simply won't work and you foul the slide hook.

Studs for carb fitment are not supporting good work flow and Piaggio introduced the sleeved screw. But this advantage brings a risk.

The screw next to the end of the scoots is located right above the rotary valve.
If you don't use the right washer and spring washer the rotary valve surface will be destroyed for sure.

Tighten it down in steps of 8, 12, 16 Nm.

The Polini bellmouth is secured by only one screw. The idle adjustment screw can be used to get the location of the glory hole right. So simply adjust it that idle adjustment screw and the hole align.
For the dyno sessions we simply screw it to the carb. When all the jetting is done and we are happy with it, we glue the screw into place with threadlock.

The stator plate is adjusted to 18 °. This equals to the “IT” marking on the plate.

Carb and rotary valve inlet are prepared and ready!
Now the bare casings can be filled up with all the internals that make a good engine.
For the gear box we opted for a complete one P200 gearbox with layshaft, pre-assembled and in Original Equipment Manufacturer quality. Not a good idea to cut corners here. Because it is pre-assembled only, we dismantle it, double check it and re-fit it with attention to the gear box play.

To hold it properly in place, we fit the gearbox cruciform with a drop of threadlock.

Gear wheels, securing clip and gear wheels, Seeger and the gear box shims look like this when assembled.

The gear box needs to be shimmed properly. Otherwise problems will occur. The right tolerance is 0.05mm-0.15mm. The best way to check if everything is spot on, is to use two feeler gauges. For new shims you should go for the tighter tolerances. The surface wears much more than with shims that were already used for a few thousand kilometers.

The easiest and best way to fit the inner track of the flywheel bearing is to use the proper tool for it.

Now we are ready to get it bearing kit fitted to the engine casings. The only proper way is to heat the casing or freeze the bearings or even better do both. If this is done fitting is a job that could be done in the kindergarten.
To safe time we cooled the bearings down with ours cooling spray.

The exception to the rule are the small needle bearings. Those should be fitted with the right tool also.
The flywheel side bearing should be guided with the right tool for the job.
For the B188bearing it is a good idea to consult a good one to persuade to get it properly fitted into place.

When you have the bearings in place, there is the time to get the oil seal set fitted.Normally fitting the oil seal shouldn't disturb the work flow too much. Much more patience is needed to get the bearing needles of the Christmas tree in place. To give each needle a good smear whih a nice grease helps very much here. Every needle should be counted and the end result needs to be 21.

The Kick start sprocket and Shaft are the only parts remaining at the workbench, while the engine is waiting for those.


One to watch! Don't forget to fit the kick start spring, holding it in place with some grease is advisable.

Now the crank is fitted and the casing halves can be put together.
The engine casing studs are torqued down evenly.

The oil gear drive is fitted.
The drive wheel has one washer on each side. At the picture there is only that securing ring missing that holds the wheel tightly in place.

After the oil pump wheel is fitted with the fine smear of oil, the Fort can be put onto the crank. There is a chamfered side at the wheel, this side should face forward to the engine casing. Otherwise the whhel and crank could touch. Mainly depending on the crank design.

Once fitted you can see the beauty and nice design of the bgm crankshaft together with double lipped oil seal.

One of the most important things is to get the power of the top end transmitted to the bottom end. Therefore we highly recommend the well proved bgm Superstrong clutch.
Design to be used with 10 clutch springs there are plenty of variations to cope with any power!
For the expected power delivery we opt for 10 XL springs.

Once again: oil! This time to lubricate wave designed hub.

Now we are going to fit the clutch sprocket and clutch plates. If you are going to purchase a complete bgm SUPERSTRONG all this will be done for you. And you receive a complete plug & play unit.
For first fit some drops of oil will do it!

For the steel plates the positining of the curved one is of importance.

This one needs to be slightly bent, only a few tenths of a millimeter to get the clutch working properly right from the start of the lever action.

If the plates, steel plates and securing clip are fitted it is done.

The self-locking n is tightened to 60Nm.

Once the engine is completed, the proper tuning action can start. Tomorrow we are going to have a look for the port timings!

Today we took a closer look at the Air intake filter / bellmouth from Polini as well as for that Dell Orto SI 26 carbs And we will answer the question what the glory hole on top of the carb is good for?
In the end it has a good effect on the functioning of the carb. Simplified it works like a bigger carb, the carb sucks harder and gives more fresh air for the engine. The result is well known: more power, good!
If your engine gets more air you need to enrich the mixture with the right amount of more fuel. The delivery of the Polini air intake includes a138 main jet for the SI carb (this is at the P200 version).
At the idle jet and atomizer there is a relief groove at the venturi. This guides the fresh air thru. This is similar to the mods done to that SI air filter base. To get a bore in there gives a better and easier jetting and better throttle response. This does the groove in the Polini kit as well.

Because you can't put the air filter on top anymore, Polini found a nice and well working solution for this too.

An adapter kit is tightened down at the carb box. This makes it easily possible to fit a modern day foam filter.


The adapter should be fitted in a way that you can still get to all connectors, fuel pipe connection as well as cables for choke and throttle cable.
The fact that Polini included a 138 main gives a rough indication of how much more air will get thru with this neat mod. Experience on engines with bigger SI main jets than 130 showed us that some mods to the carb are needed to get the show reliable. Otherwise the fuel starvation will happen.
You need to sort this out properly and start where the action starts. At first the fuel tap should deliver enough fuel. We recommend for tuned engines bgm FASTER FLOW taps. These are capable of delivering more than enough fuel. If your fuel tap gets 280-300 ml / min through everything should be fine. But check the video at the fuel tap out to get the full story.
Except for a working air vent in the fuel tap cover you can't do much more for the fuel tank. It is sorted with the bgm FASTER FLOW.
Now we come to the blue printing of the carb that is needed-at least- from 130 main jets on.
The small float bowl of the SI carb needs to be topped up with fuel all the time. Even under full throttle for long distances. The main bottle neck here is the float bowl valve. The best way is to swap this for the Vespa Cosa one. A straight and easy fit that cures this problem.

To the right: the standard SI item. At the left corner: The Cosa one.
Except for the larger float needle the bore diameter for the valve is bigger too. And for sure the of the valve.
The fuel channel for the float valve is opened up to 3mm.

Now all the needed mods are done to have a proper blue printed SI carb that gets enough fuel even on powerful engines.
One hidden design fault is still there though.

The small hole in the middle of the picture has a 1.5mm diameter. This is the channel for the main jet. All the fuel for the main jet has to go through this.
This is too small as well. It is good for a 150 main jet but a design flaw. We drill this out to 2mm. Better safe than sorry!
The bore at the left is for the choke system only and fine as it is.

Lots of scooterists out there and in here Scooter Center to, dream about a Polini 207 kit made of alloy with the hard wearing Nicasil plating. This dream already came true!
we had one of the first kits fitted to a 10 hp standard P-range engine on our P4 dyno. The bullet proof Polini layout was even better in the alloy trim. High torque low down the rev range made it t the most desired kit right from the start.
Polini introduced more and more toys for boys. Lots of stuff to get higher power output and an even bigger grin on your face. Besides the airintake / bellmouth To get the most out of the SI carbs, a Polini 210 kit for 60mm stroke is down in the pipe line. This kit is specially made for the 60mm crank and gives 221 tsp.
With lots of trouble free miles during the last 1 1/2 year we are so happy with the kit that we decided to build a Polini test engine and show you what we think is worth to take care of. As soon as the 60mm version is out, we will replace the 210 for the 221.
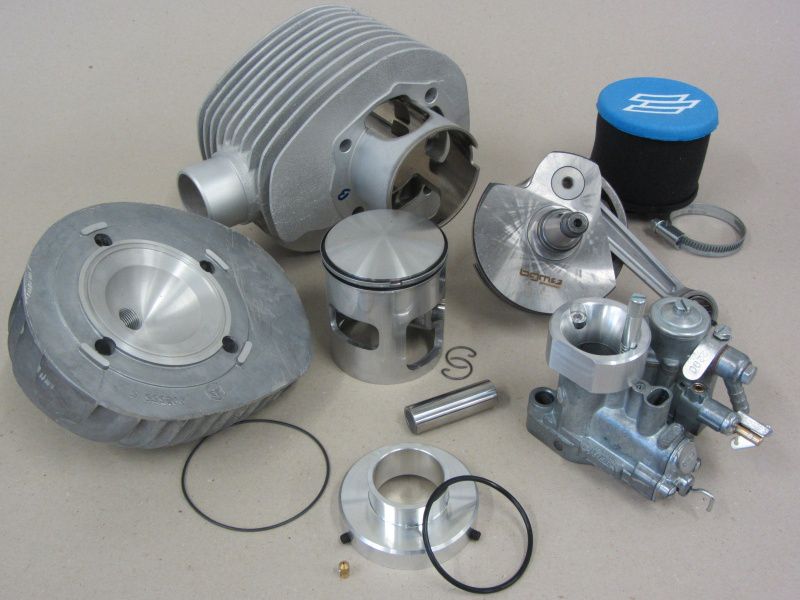
The games started today and this is stored into the workshop. And the dyno is waiting desperately.
Cylinder kit Polini 210, cylinder head MMW and Worb5, airintake / bellmouth Polini for SI carbs, 26mm SI carb and one of the bgm PRO 60mm crank.
All parts are carefully checked and everything is going to be prepared for fitting.
First view is the engine casing, that will house all the other toys we saw here.
At the moment the only P 200 casings are branded as Malossi. Besides the name nothing major changed though.
Care we have taken for the inlet area. The inlet area is carefully cleaned, blue orinted and optimized.

For the heart of the engine we opted for the BGM crankshaft. Perfect inlet timing for high power, clean running and good fuel consumption are the key words of the good designed crankshaft. The very well made crank leaves nothing to be desired.
An additional nice feature of the bgm PRO crankshaft is the enlarged sealing area at the taper of the flywheel side. Thanks to this you can use the far superior FPM oil seal with dust lip. Compared to the common NBR oil seals FPM oil seal has a much better reliability.

N Next we will have a look for the Polini air intake improvement. Watch this space!
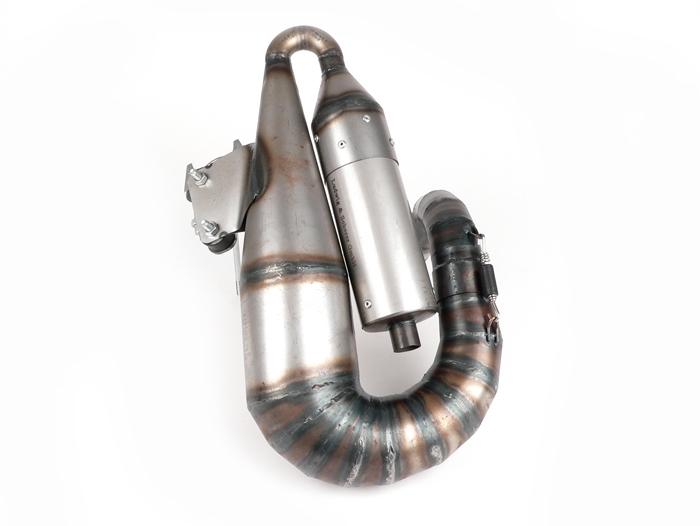

Ludwig & Scherer are THE two-stroke exhaust specialists! Especially for the Smallframe engines, their products seem to turn into instant classics. Their official first release, the “Hammmerzombie”, is our evergreen when it comes to powering Smallframes.The "Big Bertha" was developed for Parmakit's SP09 cylinder. Power unfolds continuously on a wide power band, easily surpassing the 20 hp mark. The "Franz" is state of the art at the moment for really powerful engines with a broad power band. With exhaust port timings of 190 ° -185 ° it works best. With a ported Polini 133cc cast barrel, 54mm bgm crankshaft, Vespatronic ignition and 30mm Mikuni carb (main 290, needle 5EN68, pilot jet 20) our Alex has achieved 27 hp at the rear wheel. Workmanship, mountings, muffler and fit leave nothing to be desired. The exhaust are available for scoots with the small luggage box on the left hand side as well as for those without it.
And as if there is no stopping them: their latest exhaust - the "Fire magic" reached Alex at the last minute! In direct comparison to “Franz” the exhaust starts slightly later but has a visibly higher peak and achieves a 1,000 rpm wider band. 29 hp with the cast iron Polini is worth mentioning! We recommend 128 ° for the port transfer and 192 ° at the exhaust port. Workmanship, mountings, muffler and fit leave nothing to be desired!
 (2)")
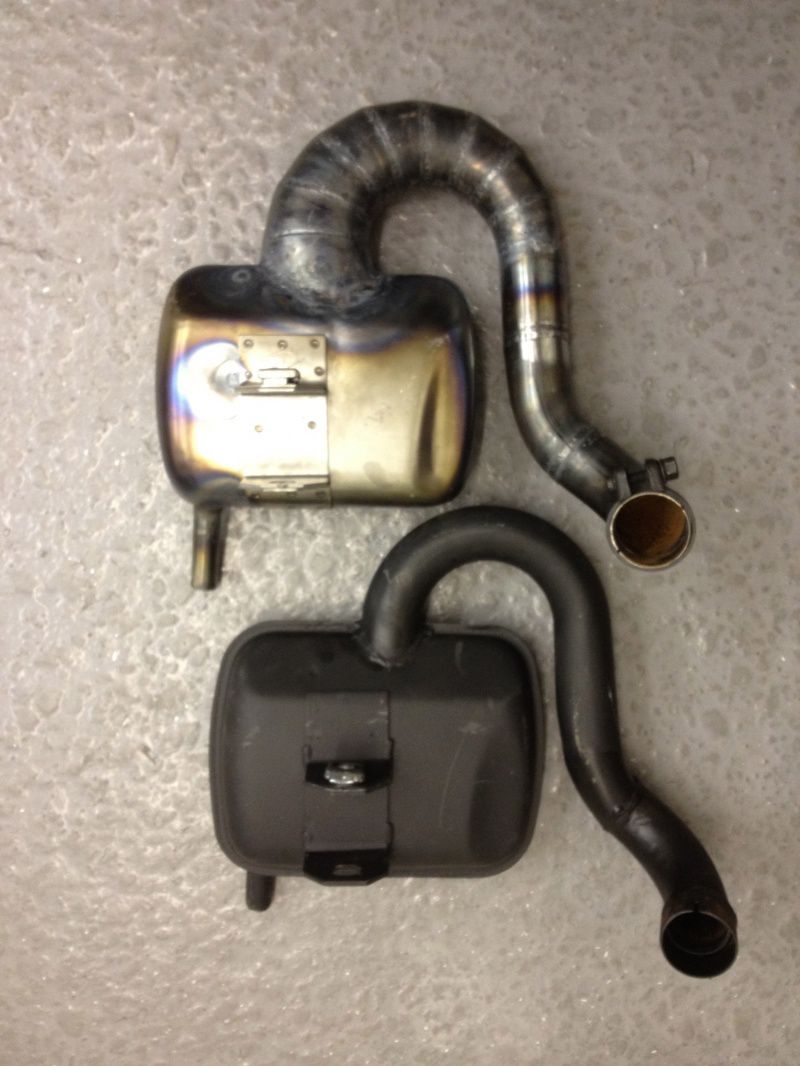
After the Lambretta bgm & MB Developments BIG BOX exhaust project was as far that we can't do anything more than waiting for the manufacturer and sending reminders every then and now, we thought to move on.
During the early 90ties we sold quite a few T5 and P 200 conversions that Mark did for us. Along the loads of Lambretta conversions. but back to the plot we thought a BIG BOX for the Vespa would be nice and have send some sets of shells to Doncaster. After the Eurolambretta Maks started to weld his ideas into the new BIG BOX. Monday morning it arrived and we started dyno'ing.
We tested on these engines so far:
- Malossi Silverfern known from the SCK Newsblog
- Original barrel tuned and used with 60mm bgm crankshaft and Si26 carb
- POLINI 207cc cast iron
- POLINI 210 known from the SCK Newsblog and very torquey
- Malossi 210 choice tuning
Here is a selection of some dyno sheets. Uwe did a lot more and we will post some in the next few days!
Hope you like it!
Today we had a real beauty on our Dyno. A Vespa Rally 200.

The aim of this project was to get a tractor torque engine for daily driving.

Base what a vespa PX200 motor, the rotary valve in the housing has been expanded for more discreet inlet angle before TDC. Crankshaft is genuine PX200 crank with 57mm stroke.
The new 210 Polini is filled by a Si26 carb With Polini induction funnel.
because of the Polini induction funnel the available torque in the lower rev range stands out very clearly. The same engine with a Malossi cylinder without the Polini funnel is “missing” almost 4Nm in the same rpm range!
The alloy Polini is supported by a SIP Road exhaust.
From idle speed the engine has proper torque and power.
15hp and 23Nm from 4500 rpm speak for themselves.
With a taller Primary gear the torque can be stretched and relatively high speeds can be achieved at low rpm.
Nice setup!
The European Scooter Challenge (ESC) is just about to start. New engines and new scooters will be seen across the race tracks in Germany, France, Austria and Hungary.
We just had a typical K1 engine on our test rig recently which we tested for its performance and functioning.
According to the ESC rules, the stroke is limited to 51mm. Therefore, a bgm crankshaft with 51mm Stroke and 105mm rod is used.
The engine is running on a Polini Evo cylinder with 2 flaps 0.35mm carbon material Converted Polini membrane and to Straw speed intake socket. 33 Keihin carburetor is injecting the 2-stroke petrol. In order to keep the crankcase clean, the air is sucked through a Marchald air filters. The outstanding air flow rate of Marchald filters and the resulting low power dissipation make this road-proven filter very interesting for racing engines.
A Vespatronic ignition set at 24 ° -16 ° BTDC makes it smooth.
The K1 engine is fitted with a Franz exhaust. Good torque values and moderate revs make this exhaust interesting for the round circuits.
The rated power is currently supported by a XL2 clutch in combination with a DRT auxiliary shaft. More on this later. Now let's discuss the test rig curve:

All in all it is a typical Franz engine. Frequency range starts between 5500 and 6000 rev / min, peak at 9000 rev / min.
11hp at 6000rev / min uphill makes this setup really nice to drive.
With more than 20hp from 7300 to 9700 rev / min it is possible to drive within the power band due to the DRT auxiliary shaft.
Now comes the crucial point, the clutch is not the best choice for this power range. Nearly 20NM are showing us the limits of an XL2 clutch. So we have to reopen the casings and insert a Hartz4 clutchch.
Maybe this will change something regarding power and torque.
Even if a non-slip clutch does not increase any further, then at least the wear out is halted. A slipping clutch won't last many laps on the racing track. Even on the road this circumstance can lead to consequential damages.
Maybe we will find enough time to make a port map of the cylinder. Let's see.

Yesterday our friend Ercole was here again in order to get his Lambretta D Racer ready for the Cologne run on the Nurburgring. His first visit can be found here.

This time he changed the carburator from 25mm to a VHS 30mm carburator.
The blue line shows the test rig from yesterday and the red one his first visit. 1hp more power and a better acceleration was the result. The Scooter Center Team wishes him all the best for his upcoming run.


Last Saturday the 4thth Aachen Kickstart Rideout took place. Official pictures are shown here.

We took the chance to test ours Silver Fern project. All in all we drove around 200km without any problems. We also took a short distance on the autobahn and it was just great. It is a really good touring engine with lots of power.

Nothing is more unpredictable than the weather. It was the same procedure last Saturday. We had heavy rain, hail, heavy wind and sunshine. All seasons in one day.

After the halftime stop we were lucky and we had brilliant weather until the end and everyone could enjoy the final BBQ.


All in all it was a really nice rideout and we hope to see you all on our Classic Day on May 5th.
The assembly of the Vespatronic needs a lot of TLC and improved interpretation.
A further complication is the fact that the attached wiring diagram is not correct.
According to the wiring diagram, the mass and excitation voltage would be simply put together and distributed again to ports 1 and 2 of the CDI.

It is of course only right to wire red / black from the stator plate to -1 - (the wider slot) which is connected with green on the wiring loom and blue to -2 - to connect (the narrow slot), which is connected with black on the wiring loom.
 Likelihood of confusion exists with the cable box; here different colors need to be combined. All cables with dissolved connectors and which are energized during running engine have been provided with plug-in sleeves. The earth connection is not as potentially dangerous and can be equipped with a plug.
In order not to confuse the exciting voltage and the on-board vehicle electrical system which are both connected with a plug-in sleeve, you can use the following memory hook: “blue sea under the yellow sun” - in practice this works really well ...

For test purposes we will adjust the stator plate to the later mark of the 2 marks available.
 Once we have placed all the glory in the cable box and the flywheel is mounted again, we can start the engine to control the ignition timing.
The marks for the TDC of 25 ° have been previously determined and marked by reversal measurement.

A quick check with the strobe light ...
 The ignition is set to 25 ° at 2000 rpm. This is a satisfactory starting point for a run on the test rig.
The goal was a 25 hp engine but have a look at the diagram itself.
 Without air filter was the 148 main jet was still OK but with filter we had to use a 145 main jet and in addition to that we had to move the NAPE needle a clip on the 2nd position from the top.
19hp and 25Nm at 6.000rpm speaks for itself. Even at 8.600rpm there are 25hp and 20Nm on the rear wheel. In this power range there will be no power loss when changing gears. It is incredibly awesome ...
To get an idea of how fast this baby can get in the end, we will make another test run - HP vs. Km / h
 At a speed of 140 km / h there are still 24hp left ...
What do you think? Mission accomplished?
Only thing left now is to place the remaining parts again and then we are ready for a practical test on the road ...
We ship climate neutral with DHL

