Today a customer and friend of Scooter Center popped in to see how the bgm PRO MRB Big BOx is performing.

The Mugello kit came in tuned to 128 ° transfer and 190 ° exhaust timing.

The carb is a 34 mm Koso and the ignition system fitted is the Varitronic.

The Style63 exhaust made nearly 29 hp.

If you compare the expansion chambers and the Big Box peak power wise they win.

But when it comes to a smooth engine to ride that is easy to hold into the power band than the Big Box is the winner again.

The ignition timing was set to 23 ° -15 °, what is okay for the hig revving monsters. But even with that expansion chamber setting the Clubman out-performs the expansion with roughly 3 hp and 3 Nm more torque low down.

At around 5.600 rpm the JL and Style63 start to perform and double the horse power within a power range of 1.000 rpm. Right for 'general hooligan behavior around twon' to quote one of our favs from a Scootering exhaust test back from the ninties.
Steady acceleration can be found marked red in the dyno sheet!

After our testing of the bgm PRO MRB Big Box Clubman on TS1 engines, we thought it might be a good idea to test the pipes on the test bike.

The engine on it is fitted with the bgm PRO MRB RaceTour 225 kit, bgm PRO 60 mm crankshaft and 30 mm carb. The cylinder kit is unmodified and as it will be on serial production.

Besides the Big Box Clubman we have the JL3 and the Ancillotti.

This is the bgm PRO Clubman vs Sito Ancillotti

As we saw it on the TS1 testing the power and torque advantages of the Big Box Clubman are there. Up to 7.000 rpm there is 1 hp and 2 Nm of torque for the Clubman.

bgm PRO MRB Big Box vs. JL KRP3

From 4.500 rpm to 8.500 rpm (!) The Clubman has more than 1 hp more. There isn't a chance for the JL 3 even not when you consider the slight dip in the torque.

The conclusion is that the bgm PRO Clubman is a good choice for ported and un-ported cylinder kits. Especially the torque and power delivery makes it the choice of weapon on all road applications!

Today we continued our bgm MRB Big Box exhaust test. to continue the testing we have fitted a MRB tuned TS1. This TS1 has undergone the RaceTour tune from Mark Broadhurst. The engine remained the same and is the one fitted to red GP 150.
The MRB tuned cylinder kit comes with the MB forged piston, Tassinari V-Force reeds and a head machined by Mark for ultimate reliability. The Mikuni TMX30 was still used.

TS1 cylinder kit versus MRB tuned TS1 to RaceTour specs, both using the bgm PRO MRB Big Box Clubman:

Exhaust test Scooter Center Lambretta TS1 touring vs TS1 race tour tuned


[break]

bgm PRO MRB Big Box Clubman versus the Sito Ancillotti:

Exhaust test Scooter Center Lambretta TS1 racetour tuned bgm PRO Clubman vs SITO Ancillotti

[break]

bgm PRO Clubman versus JL3 / Road expansion chamber:

Exhaust test Scooter Center Lambretta TS1 bgm PRO Clubman versus JL3

With the JL3 / Road being a much favored exhaust (for what ever reasons) we tested our Big Box Clubman against it too. When looking at the dyno sheets, you shouldn't be focused on the peak power alone. Even if peak is 3 hp more, you should compare the width of the power band instead. Or at least as well. If you compare the delivery of power from around 4.600 - 9500 rpm the power delivery is only slightly better, but the more power low down should make the Big Box engine the easier and faster to ride one. Mainly because you easily stay into the power band and don't have to change gears all the time.
[break] Exhaust test Scooter Center Lambretta TS1 bgm PRO MRB Big Box Clubman versus JL3

[break]

Upshot: The bgm PRO MRB Big Box Clubman works on all setups. From original to properly tuned TS1 engines. Watch this space for more dyno work coming!

We have dynoed the upcoming bgm PRO MRB Big Box Clubman today again, this was mainly done to shorten our waiting time. The Big Box will be in stock early March 2013!

Testing was done on Ulf's every day GP equipped with a touring spec ported TS1 and the TMX30.

Comparison was done against the Ancillotti and the favored (for whatreasons ever) JL Road KRP3.

These are the tested pipes!

The Big Box gives more power, broad (y) er power band and more torque. More than 2.5 Nm torque and 2 hp from 4.700 rpm to 6.700 rpm is something you easily feel on the road and that gives better acceleration too.

This shows the comparison between our Big Box and the KRP3 or JL Road.

Even with a little bit more on peak the JL has no chance to out perform the Big Box on the road. The better power and torque figures from 4.500 rpm to 5.500 rpm are the points that count for the big box.

And here again all tourers in comparison.

[Nggallery id = 22]

This is the final report about our pre-Xmas dyno shootout!

The 29.9 hp at the rear wheel of a Cast polini 133 cylinder kit with 54mm bgm sickly, Keihin PWK35AS carb and Fire magic exhaust had to be bettered.

With 29.3 hp Jonas did very well, but missed the goal. Followed by Mathias with 29.2 hp on a Polini 133 rotary inlet engine.

Together - Jonas and Scooter Center- decided to donate the € 100 shopping voucher for “Scooterist-chairty / GSF fundraiser.

Scooter Center likes the idea and is addiotionally offering free dyno time to set up the charity engine.

The gallery shows the atmosphere of the dyno shootout. Something that will hopefully continued very soon. What do you think? Fin.

Because virtual reality can hardly ever beat proper live action, we recommend to have a look at the small but mean Smallframe engines the next time.

Thanks to all the people who dropped in during the day. It was pure fun and we hope to see you soon!

[nggallery id = 19] [nggallery id = 18]

On the 16th of March Twisted Pistons SC Aachen and Scooter Center present the 6thth edition of the Scootershow at the adventure halls lime in cologne.

The new bike and skate venue www.ablebnishallenkalk.de/bs/ will be used to display all sorts of scooters. And when we say all sorts of scoots, we mean it. From 50cc Twist & Go's, classic Vespa and Lambretta scooters up to the modern day Vespas. On more than 1.000 m² place in a stunning atmosphere, we are going to present this top event!

There will be the full range from customs to racers, from gold and chrome plating to 50 year old original paint.

Additionally there will be a private parts fare. There isn't a fee, but registration is needed. So don't hesitate, if you want to sell parts and email to: parts market@scooter-center.com.

Program:

  • Saturday, 16nd of March 2013
  • Opening hours: 12 pm-18pm
  • Custom show for scooters
  • Private parts fare
  • Food & Drinks
  • live dj
  • Lots of trophies waiting

Here you can get your tickets:
www.scooter-center.com


Scooter Center xmas final. On the last two Fridays before Christmas, 14th and 21st December 2012, we invite all of you to our shop in Glessen between 10am and 5pm. Program for you:

· Dyno competition in different categories

· Irish Coffee

· Warm pretzels

· Hardcore engines

20% discount in our shop (codeword: Xmas)

· Who beats Alex on our dyno? *

*With a Smallframe up to 140cc (one exhaust and regular intake)!

The prize for the winner will be a Scooter Center voucher worth 100 € !!!

From now on all bgm Super Strong clutches are equipped with our new bgm Pro clutch springs.

Of course our bgm Pro XL springs also fit in all other Cosa clutches from Piaggio, MMW and Newfren.

The springs are made in Germany from the material Oteva70 ®, a material which is specially designed for high dynamic loads, block resistance and high frequencies.

Because of its properties, the material is typically used in high quality valves and springs.

This means in the case of our Vespa clutch:

- practically no fatigue slope, the strain of the spring remains constant bgm Pro.

- bgm Pro springs are stable block. That means even if the spring is compressed repeatedly to the extent, the spring returns back to its original length.

The pre-tensioning remains the same.

Our bgm Superstrong clutch, equipped with bgm Pro XL springs also resists Largeframe engines with 25 Nm torque on the rear wheel.

Good tools bring even more fun to the workshop. Jobs aren't a mess anymore and can be done properly.

Our bgm multitool bgm8819 contains bgm8811 and bgm8812.

The bgm8811 tool is the flywheel extractor (M28x1) for all Vespa scooters with electronic ignitions. Starting at the OEM PX flywheels to the electronic conversion for the Vespa Sprint/VBB and V50/Primavera. At the same time it is a clutch extractor tool for the Vespa Smallframe.

Together with tools bgm8812 it gets even more complete. Because you have the clutch compressing tool too. And it is a very clever clutch tool too. You can replace clutch plates with the clutch still fitted to the engine. Cell phone, eh?

Especially handy, because you don't have to lock up the primary drive any more to get the clutch nut undone. If you have a 12 spring PK-XL2 clutch you will love it even more when everything stays in place.

The clutch compressing tool fits all PK and V50, PV, ET3 and the Polini double spring Clutches with 3 and 4 plates.

After the clutch cover and the pressure plate are off, tool bgm 8811 is screwed into the thread.

Afterwards clutch compressing tool bgm8812 comes on top.

And the nut, washer and screw (part of tool bgm8811) are used to compress the clutch.

As soon as the steel plates are spinning freely the securing clip can be taken of. Now you are ready to replace the plates.

Before the tool will be released the oil guide plate and -important! - the securing clip need to be fitted.

Job done!

Our test engine is running, we let it warm up properly. The jetting seems to be right with idle jet 48/160, air correcter jet of 160, atomizer BE3 and main of 140. So now we will see how powerful this engine is.

First of all the gear ratio needs to be measured. We measure this at least twice to be 100% sure. The gear ratio is 3.21. This can even be typed manually into the dyno software at a later date.

When you are operating a dyno a scientific operation is a good gesture to make sure that the results can be compared. After the first three runs we see that the power output is always nearly the same. A good sign, here is the best result:

Nice to see that the engine starts to lift the power low down in the rev range. As expected from the Polini kit. A quick road test shows that is a treat to use on the street. At slightly higher idle revs of 3.500 rpm the engine pushes -thanks to 17 Nm- heavily.

The inlet induction sound is nice too. The Polini solution works not just power wise, it reduces induction sound as well. The adapter has a small collar built in that breaks up the acoustic wave what gives a very discret induction sound.

Back from the road testing to the dyno, we take a closer look to the head design. Next we are going to test the MMW head. The previous fitted worb head gave a squish clearance of 1.7mm. To achieve this with the MMW head we are going to fit a 0.7mm head gasket. One quick note: Never combine normal head gasket with O-rings on heads. This doesn't work on the road. For short testing on the dyno it can be done though. And we needed to do this to make the heads test comparable with the same squish clearance.

After some more runs we have a direct comparison of the heads:

RED: MMW

BLUE: Worb5

The higher power output of the MMW head is caused by the slightly higher (but still road safe) compression ratio and the difference in the combustion chamber design.

The highest torque reading is still at 4700 rpm, but rises to a very good 22 Nm. At 7k rpm we still have 17 hp and 17 Nm. God figures for high speed motorway use.

The 60mm MMW head we are not going to test anymore. Not because we are lazy, it is more because there is no sense in it all. We already saw that the higher compression works. the 60mm version would reduce this, so we are not to keen to lose power.

A wider power band with a little more peak power at high revs would be nice though. This really separates good road engines from the very fast ones that are hard to catch on open roads.

Well ... what could be done. Something like a luxury problem here. A good working engine with nice power output in a useable rev range and we are still thinking of how it could be improved.

There it is our MBgm Vespa BIG BOX. Sounds like fun to get this on the Polini. Doesn't it?

This should be done tomorrow!

Stay tuned!

Only a few steps left untill we can dyno test our new engine.

The engine will go into the Silver Fern and be tested for Rally going and daily commuting then.
While fitting the flywheel care must have been taken that the slot in the flywheel cone aligns with the woodcall key.

Afterward the flywheel groove can be tightened down to 65Nm. the washer needs to be fitted, otherwise the nut will come loose.

The rear brake drum goes on the shaft next. We only put it on loose and fix it with the nut.

As soon as the rear brake is adjusted we will tighten it down to 110Nm. Securing cage and splint must be there.

For adjusting the clutch you need a little bit play at the clutch lever. This should be around 1.5mm and 2mm.

Oil and fuel hose are connected. consequences. The air bubble at the oil hose is a very good indication to see if there is oil pumped into the carb.

But the air bubble shouldn't be much bigger than that. Otherwise there is the risk that the oil pump runs dry. And so will do the lubrication then.

For the first firing we fill the fuel tank up with 1 liter of oil petrol mixture of 4%. This should be done to have a proper lubricated engine from the start and to compensate the oil pumps delay.

The engine starts and we let it idle for a while. Then we see that all cables are connected properly. We round down to fourth and everything is okay. The clutch works perfect. And the oil pump operates as well.

So we are ready for the first dyno sessions. Watch this space.

Today we found the time to have a look at the port timings of the Polini kit.

With a 1mm base gasket one look at the degree disc shows us transfer port timings of 125 ° and exhaust timing of 172 °. This results in a blow down timing of 23.5 °.

Figures that really worth to try on the dyno and figures that should result in fast road engine with torque capable of raching high revs for good speed.

We have three different cylinder head designs to test on the engine. And this will be the first mod on the dyno.

We are going to try the MMW for 57mm stroke, the MMW for 60 mmstroke as well as that Worb5 head for 57mm stroke.

On a first sight at the head we have a look at the squish clearance. The MMW 57mm version is a little bit tight at our 60mm crank. The squish would be 1mm on our setup, but well worth to try it with an additional head gasket. The MMW head for 60mm stroke is designed with a recess for the longer stroke. Used with our 1mm base gasket to achieve the right port timings we have a squish clearance of 2.7mm. So we have this head as an option if we want to try the setup without the base gasket. If we don't use the base gasket anymore, the port timings are lowered, but with the effect that the blow down timing is increasing. This is because of the greater reduction of transfer timing compared to the exhaust timing.

The Worb5 head is machined for the 57mm stroke, but with more squish clearance machined into the head. So we have a very useable squish clearance of 1.7 mm without additional head gasket.

The different combustion chamber designs we will test on the dyno the next days. Can't wait!

But the carb is still waiting for fitment. And there are some important steps on the way to take care off.

First of all you have to be careful with the use of sealer. On self-lubrication Vespas the hole marked red in the picture feeds crankshaft, barrel and flywheel side bearing wih oil. If this is blocked no oil gets in and the trouble free miles will be very limited.

The very basic design of the SI carb range is very solo. But one to watch out for is the mounting of the carb, this can easily be destroyed.

If the nuts are over tightened the carb is warped and a sticking slide is the result of it. At least the later version of the SI carb is improved in this area and the nuts can't bend the carb so that the slide sticks.

The pictures shows this feature on the later carbs and this recess can easily be done to later SI carbs.

But even on the later version the carb nuts shouldn't be tightened not more than 16-18Nm. And they shouldnot be fully tightened from the start. Instead tighten they evenly and in turn.

For the carb mounting there are two different versions available as well.

The “old” version with studs and sleeve nuts are there untill the SI carb was used first. the new version was introduced with self lubrication P-ranges labeled EFL, Arcobaleno or Lusso.

The ida came up because this was easier to fit. Carbs without self-lubrication are fitted with a very long air adjuster screw and slide hook.

Before the carb is fitted into it box we cut a slot into the air adjuster screw this makes adjustment much easier on a later point.

Damn, we spoil it!

That happens too often. So you have to take care that the hook hits the clip of the oil pump.

If the carb is fitted like the one pictured, it simply won't work and you foul the slide hook.

Studs for carb fitment are not supporting good work flow and Piaggio introduced the sleeved screw. But this advantage brings a risk.

The screw next to the end of the scoots is located right above the rotary valve.

If you don't use the right washer and spring washer the rotary valve surface will be destroyed for sure.

Tighten it down in steps of 8, 12, 16 Nm.

The Polini bellmouth is secured by only one screw. The idle adjustment screw can be used to get the location of the glory hole right. So simply adjust it that idle adjustment screw and the hole align.

For the dyno sessions we simply screw it to the carb. When all the jetting is done and we are happy with it, we glue the screw into place with threadlock.

The stator plate is adjusted to 18 °. This equals to the “IT” marking on the plate.

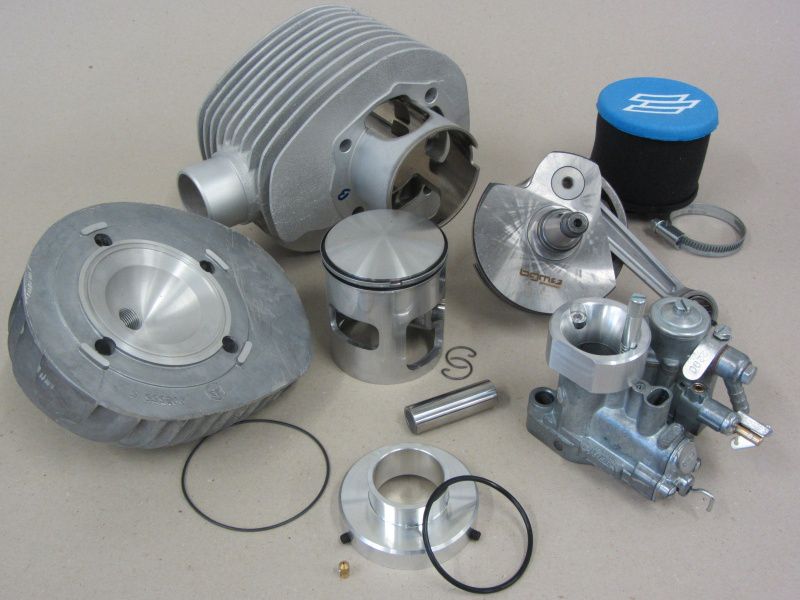
Carb and rotary valve inlet are prepared and ready!

Now the bare casings can be filled up with all the internals that make a good engine.

For the gear box we opted for a complete one P200 gearbox with layshaft, pre-assembled and in Original Equipment Manufacturer quality. Not a good idea to cut corners here. Because it is pre-assembled only, we dismantle it, double check it and re-fit it with attention to the gear box play.

To hold it properly in place, we fit the gearbox cruciform with a drop of threadlock.

Gear wheels, securing clip and gear wheels, Seeger and the gear box shims look like this when assembled.

The gear box needs to be shimmed properly. Otherwise problems will occur. The right tolerance is 0.05mm-0.15mm. The best way to check if everything is spot on, is to use two feeler gauges. For new shims you should go for the tighter tolerances. The surface wears much more than with shims that were already used for a few thousand kilometers.

The easiest and best way to fit the inner track of the flywheel bearing is to use the proper tool for it.

Now we are ready to get it bearing kit fitted to the engine casings. The only proper way is to heat the casing or freeze the bearings or even better do both. If this is done fitting is a job that could be done in the kindergarten.

To safe time we cooled the bearings down with ours cooling spray.

The exception to the rule are the small needle bearings. Those should be fitted with the right tool also.

The flywheel side bearing should be guided with the right tool for the job.

For the B188bearing it is a good idea to consult a good one to persuade to get it properly fitted into place.

When you have the bearings in place, there is the time to get the oil seal set fitted.Normally fitting the oil seal shouldn't disturb the work flow too much. Much more patience is needed to get the bearing needles of the Christmas tree in place. To give each needle a good smear whih a nice grease helps very much here. Every needle should be counted and the end result needs to be 21.

The Kick start sprocket and Shaft are the only parts remaining at the workbench, while the engine is waiting for those.

One to watch! Don't forget to fit the kick start spring, holding it in place with some grease is advisable.

Now the crank is fitted and the casing halves can be put together.

The engine casing studs are torqued down evenly.

The oil gear drive is fitted.

The drive wheel has one washer on each side. At the picture there is only that securing ring missing that holds the wheel tightly in place.

After the oil pump wheel is fitted with the fine smear of oil, the Fort can be put onto the crank. There is a chamfered side at the wheel, this side should face forward to the engine casing. Otherwise the whhel and crank could touch. Mainly depending on the crank design.

Once fitted you can see the beauty and nice design of the bgm crankshaft together with double lipped oil seal.

One of the most important things is to get the power of the top end transmitted to the bottom end. Therefore we highly recommend the well proved bgm Superstrong clutch.

Design to be used with 10 clutch springs there are plenty of variations to cope with any power!

For the expected power delivery we opt for 10 XL springs.

Once again: oil! This time to lubricate wave designed hub.

Now we are going to fit the clutch sprocket and clutch plates. If you are going to purchase a complete bgm SUPERSTRONG all this will be done for you. And you receive a complete plug & play unit.

For first fit some drops of oil will do it!

For the steel plates the positining of the curved one is of importance.

This one needs to be slightly bent, only a few tenths of a millimeter to get the clutch working properly right from the start of the lever action.

If the plates, steel plates and securing clip are fitted it is done.

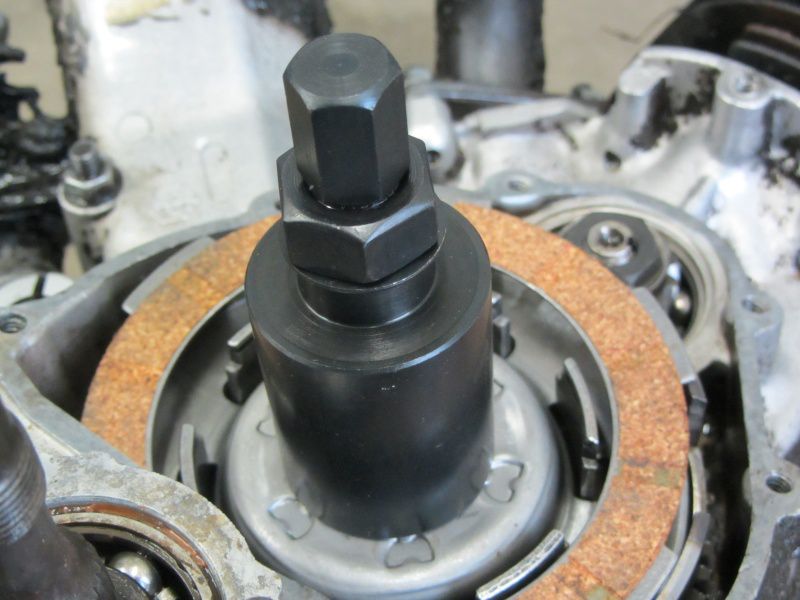
The self-locking n is tightened to 60Nm.

Once the engine is completed, the proper tuning action can start. Tomorrow we are going to have a look for the port timings!

Today we took a closer look at the Air intake filter / bellmouth from Polini as well as for that Dell Orto SI 26 carbs And we will answer the question what the glory hole on top of the carb is good for?

In the end it has a good effect on the functioning of the carb. Simplified it works like a bigger carb, the carb sucks harder and gives more fresh air for the engine. The result is well known: more power, good!

If your engine gets more air you need to enrich the mixture with the right amount of more fuel. The delivery of the Polini air intake includes a138 main jet for the SI carb (this is at the P200 version).

At the idle jet and atomizer there is a relief groove at the venturi. This guides the fresh air thru. This is similar to the mods done to that SI air filter base. To get a bore in there gives a better and easier jetting and better throttle response. This does the groove in the Polini kit as well.

Because you can't put the air filter on top anymore, Polini found a nice and well working solution for this too.

An adapter kit is tightened down at the carb box. This makes it easily possible to fit a modern day foam filter.

The adapter should be fitted in a way that you can still get to all connectors, fuel pipe connection as well as cables for choke and throttle cable.

The fact that Polini included a 138 main gives a rough indication of how much more air will get thru with this neat mod. Experience on engines with bigger SI main jets than 130 showed us that some mods to the carb are needed to get the show reliable. Otherwise the fuel starvation will happen.

You need to sort this out properly and start where the action starts. At first the fuel tap should deliver enough fuel. We recommend for tuned engines bgm FASTER FLOW taps. These are capable of delivering more than enough fuel. If your fuel tap gets 280-300 ml / min through everything should be fine. But check the video at the fuel tap out to get the full story.

Except for a working air vent in the fuel tap cover you can't do much more for the fuel tank. It is sorted with the bgm FASTER FLOW.

Now we come to the blue printing of the carb that is needed-at least- from 130 main jets on.

The small float bowl of the SI carb needs to be topped up with fuel all the time. Even under full throttle for long distances. The main bottle neck here is the float bowl valve. The best way is to swap this for the Vespa Cosa one. A straight and easy fit that cures this problem.

To the right: the standard SI item. At the left corner: The Cosa one.

Except for the larger float needle the bore diameter for the valve is bigger too. And for sure the of the valve.

The fuel channel for the float valve is opened up to 3mm.

Now all the needed mods are done to have a proper blue printed SI carb that gets enough fuel even on powerful engines.

One hidden design fault is still there though.

The small hole in the middle of the picture has a 1.5mm diameter. This is the channel for the main jet. All the fuel for the main jet has to go through this.

This is too small as well. It is good for a 150 main jet but a design flaw. We drill this out to 2mm. Better safe than sorry!

The bore at the left is for the choke system only and fine as it is.

The battle for the precedence is at the voters. The world is waiting for the results, while we are under the impression that the sympathy seems to be at one of the contrahents.

We have election day today as well and we are waiting excited who did the better green shade? While the late 6Ts brought us innovation like long hair, free love and the said Green apple shade.At Piaggio's Vespa as well as for Innocenti's Lambretta.

Especially the Vespa V50 and the Lambretta SX 150 are rare as rocking horse shit and for that and the stunning looks much sought after.

Here you'll find some pictures of original paint Verde Mela scooters as well as the election for the better shade of it!

[Poll id = "13"]

Lots of scooterists out there and in here Scooter Center to, dream about a Polini 207 kit made of alloy with the hard wearing Nicasil plating. This dream already came true!

we had one of the first kits fitted to a 10 hp standard P-range engine on our P4 dyno. The bullet proof Polini layout was even better in the alloy trim. High torque low down the rev range made it t the most desired kit right from the start.

Polini introduced more and more toys for boys. Lots of stuff to get higher power output and an even bigger grin on your face. Besides the airintake / bellmouth To get the most out of the SI carbs, a Polini 210 kit for 60mm stroke is down in the pipe line. This kit is specially made for the 60mm crank and gives 221 tsp.

With lots of trouble free miles during the last 1 1/2 year we are so happy with the kit that we decided to build a Polini test engine and show you what we think is worth to take care of. As soon as the 60mm version is out, we will replace the 210 for the 221.

The games started today and this is stored into the workshop. And the dyno is waiting desperately.

Cylinder kit Polini 210, cylinder head MMW and Worb5, airintake / bellmouth Polini for SI carbs, 26mm SI carb and one of the bgm PRO 60mm crank.

All parts are carefully checked and everything is going to be prepared for fitting.

First view is the engine casing, that will house all the other toys we saw here.

At the moment the only P 200 casings are branded as Malossi. Besides the name nothing major changed though.

Care we have taken for the inlet area. The inlet area is carefully cleaned, blue orinted and optimized.

For the heart of the engine we opted for the BGM crankshaft. Perfect inlet timing for high power, clean running and good fuel consumption are the key words of the good designed crankshaft. The very well made crank leaves nothing to be desired.

An additional nice feature of the bgm PRO crankshaft is the enlarged sealing area at the taper of the flywheel side. Thanks to this you can use the far superior FPM oil seal with dust lip. Compared to the common NBR oil seals FPM oil seal has a much better reliability.

N Next we will have a look for the Polini air intake improvement. Watch this space!

Cylinder Polini 221 Alu Vespa PX200

Polinis project to launch the well known 210cc aluminum cylinder for the PX as a long-stroke version (as reported), is finally in the last steps.

Cylinder Polini 221 Alu Vespa PX200The new cylinder, which is presumably similar to the existing 210cc cylinder (but with a long aluminum bore), will be available with a special cylinder head to fit the stroke of 60mm. For further details such as steering angle, compression and performance data we will keep you posted as these information are not known yet.

The cylinder head will also be available separately. According to Polini this head will also fit the existing aluminum and cast iron versions with standard stroke. We will see how this is achieved and what head will look like.

The performance of the current 57mm stroke aluminum version can be found in our earlier blog reports here:

Polini 210 Alu Plug & Play

Polini 210 with conversion

A special self-made long-stroke version has been tested here:

Polini 230cc

We expect that the new version will have an even broader performance than the 210cc variant, as the angle bound will automatically grow through the use of a 60mm stroke crankshaft. This would certainly result in an engine concept for everyday use with lots of torque from low engine speeds, a strong middle performance and a sufficient rotary power for the highway. All without the balancing act of the old thermal cast iron version.

Polini also wants to offer an own designed crankshaft for this cylinder kit:

Crankshaft Polini PX200 60mm stroke for aluminum cylinder 221ccmPolini speaks of a well balanced shaft. Here again, we will post all further information as soon as we receive it and have verified it ourselves.. The suggested retail price of Polini is around 290Euro

The cylinder will of course also run on any 60mm stroke crank. A high quality and significantly less expensive alternative is our bgm PRO crankshaft which has been proven in quite a few very powerful engines

Crankshaft PX200 Lagnhub 60mm BGM pro

With a selling price of 179,99 € our bgm crank it will be much cheaper than the polini version but regarding quality it will be similar and has proven its power already in many existing setups.

Conclusion: Polini makes again a big step forward regarding its leadership in terms of product innovations in the kickstart scooter market. While rival Malossi currently limits their ideas to changing names of already existing products, Polini shows what they can provide with a little more courage and innovative spirit.

The selling price of the new cylinder will be a little higher than the current one 210cc cylinders as the head will be included in the new kit.

Cylinder and shaft together will offer a strong touring package that will probably have around 20hp.
What do you need more?

Surely one of the loveliest inventions for the PX200 since our BGM Superstrong Cosa clutch...

Winter time is service time. The same procedure every winter, our beloved Sscooters need a service, repair or maybe a full restoration so that they will be back on the road for the first rideouts.

The floorboard area and the floorboard runners are a service intense area of ​​our Vespas. Rust and dirt are just one side of the story. The runners are easy to remove but when it comes to remount them again we have only few choices. We either chose bolts and nuts or pop rivets but the results of these two methods are not the best.

We now have the ultimate tool for you. The outstanding riveter tool made in Austria with which you can handle both flat and round rivets. By using the rivet tool you prevent the paint damage that would otherwise be caused by old pop rivet tools. At last, a quick and clean work area shall make possible. An additional feature of the riveter tool is that you can also use it for mounting the original badges on the legshield.

We do have some great floor board runner sets available in our shop. Please also watch the video of the riveter floor runner tool:

The Vespa rivet pliers

the classic mirror for our beloved Vespa is finally available in black. It is mounted under the steering head and offers impeccable views to the rear. A truly effective left rearview mirror in original form with E-mark. This fits many Vespas smallframe and largeframe models. Now you finally have the overview you need and all in a stunning black design.

Check the mirror in our online shop.